Friday, February 24, 2017

Just For You Gift Set

Hello Crafty Friends! I'm here with Team DCWV today to show you a couple projects I made using one of the newest releases that will be making it onto Joann Stores across the nation!!


Both projects were made using gorgeous paper from Peri & Peach Stack.


Supplies Used
Peri & Peach Stack (DCWV)
Lori Whitlock's Scalloped Gable Box (Sizzix)
Eileen Hull's Kitchen Labels (Sizzix)
Lynda Kanase's Photo Banners (Sizzix)
Sticker Maker (Xyron)
Tape Runner (Xyron)
ColorBox Blends- Melon (Clearsnap)
Flowers (Maya Road)
Silk Ribbon
3D Dots 
Clear Liquid Adhesive
Bling

On top of this being stack being filled with pretty patterns and foil, I love that these paper are all double sided as well. 

For today's project I decided to use this beautiful pattern with a dark blue midnight blue with pink and white flowers. The flip side to this pattern is a very feminine white and pink flower/ sunburst pattern.

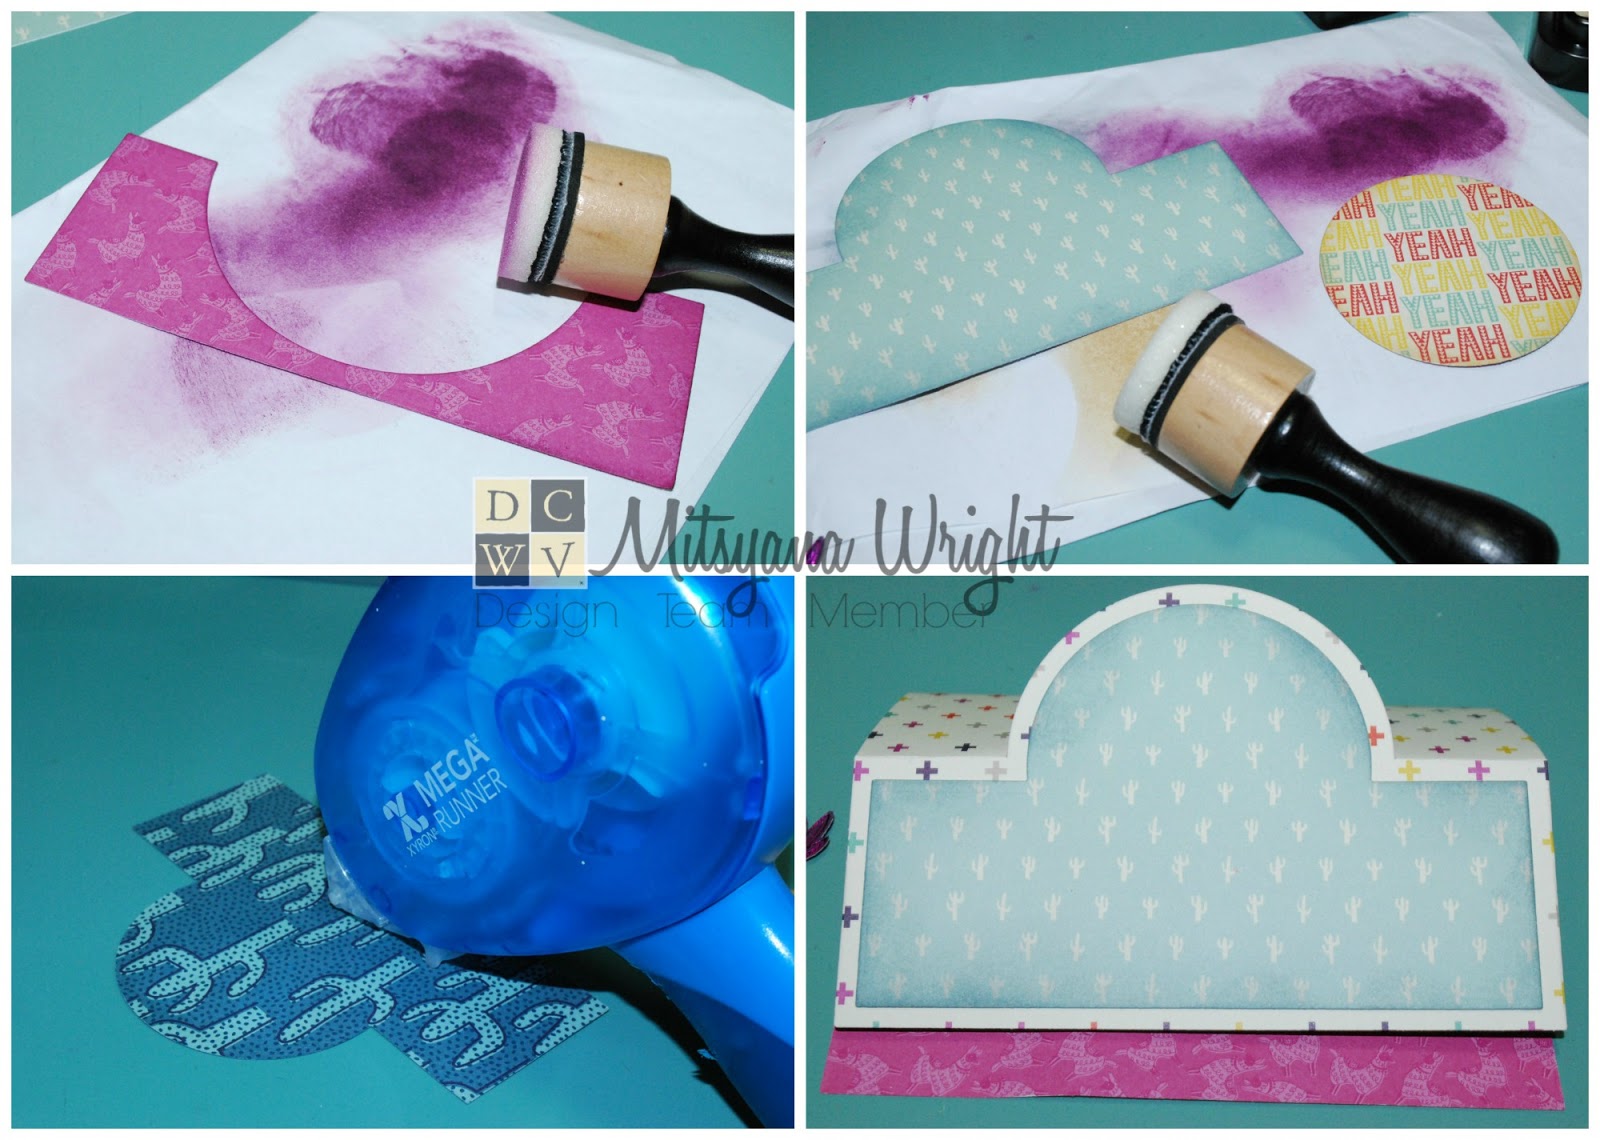
To make my box I used my Lori Whitlock Gable bBx die and die cut 2 pieces. Then, die cut 2 more scalloped handles from the reverse side of the paper for a bit of contrast.

To attach I simply ran the handles through my sticker maker and attached to the top.

Then folded the box panels on the premade crease lines and used my tape runner on the flaps and attached them together.

I used crinkled silk ribbon to tie a simple bow and attached my tulle flower. I glued the flower just under the bows not allowing the recipient to get in and out of the box with ease.

Another wonderful perk to many DCWV stack is that they include the awesome sheet full of cut outs, sentiments, and journaling tags.

I found this gorgeous one that says "hello, beautiful" in gold foil! The shine is just stunning!!

I used one of my Eileen Hull Kitchen Labels to die cut it out then attached foam adhesive to the back and mounted it to the front of my box.

This box is almost too pretty to open! It's a good thing I put a special gift that is equally beautiful inside to make it worth opening! LOL

And since I'm gift giving, you know I have to include a card!!

The gable box used less than a sheet a paper to make. So I used the leftover from the same sheet to make a coordinating card.

I cut my biggest piece to 4"x 5.25" (A2 card mat size). The dark blue strip was cut at 1.5"x 5.25". The Pennant flag measure 1"x 5". The sentiment strip was cut directly out of the same sheet the "hello, beautiful" was from. No measuring involved. 

I layered the pieces onto a standard A2 (4.25"x 5.5") sized hit card base, simply attaching with tape runner.

I die cut 3 of the bigger leaves from the Lynda Kanase Photo Banner set from this soft periwinkle blue and white polkadot paper (also from the Peri & Peach Stack).

 I also die cut 6 stemmed leaves out of peach and gold foiled paper. Then inked the edges of the leaves with Melon ColorBox Blends applicator.

I attached the leaves onto the card using clear liquid adhesive and topped with paper roses.

Finally, I attached a little bling to the lower right corner.


I really love how the little pop of periwinkle just leaps off the card.

I really love how this gift set came out! Very feminine and elegant!!

I hope you've enjoyed today's project!!
Thanks for stopping by and have a beautiful day!!

Until next time...
HAPPY CRAFTING!!
~Mitsy

Monday, February 20, 2017

My Bunny Filled Weekend

Hello Crafty Friends!! I'm back today to show you some crafty goodness with Team Pink and Main!!

I have been crafting up a storm this weekend and have a few cards to share with you all! 

All of which are made using some of  Pink and Main's New February Releases!!

Because I have more than one card to share, I decided to do a mostly pictorial post with you all today. Otherwise this would be an extremely long post and I don't want you all too get bored reading the same steps over and over for each new card. 

With all my cards I started by stamping out my images, from the Seeds of Kindness stamp set, with VersaFine Onyx Black ink onto Strathmore Mixed Media Paper and I colored them with my Clean Color Real Brush markers. I used a waterbrush to blend out and soften the colors. Then all my images were cut out using the Seeds of Kindness Dies.

Patterned papers used in this card are from the new Spring Flings (plaid paper) and the Shades of Spring (green dot) paper pads.
 I used the largest of the stitched rectangle dies for the card front. The largest circle was used for the semi-circle mat and the third largest circle was used to put behind the bunny and watering can.

I adhered all (with the exception of the images) to a plain white card base using my Xyron Mega Runner.

I used 3D dots to prop up the bunny and watering can and add dimension.

The patterned paper used on this card is from the Spring Flings (rainbow chevron) and the Shades of Spring (scallop circle and flags) paper pads.

I used the second to the largest stitched square die for my card mat. 

I hand cut two 1"x 2" pennants and tucked them under the scallop circle.

I used dies from the Stitched Circles and the Scallop Circles dies to house my little wheelbarrow bunny. I attached all together (flat) with my Mega Runner then popped the whole piece up with foam adhesive. 


For this card, I once again used the largest Stitched Rounded Rectangle die to cut my patterned paper. This gorgeous houndstooth pattern is from the Spring Color Pop paper pad. The pink gingham, from Spring Flings . And the pink heart paper from the Shades of Spring.

I cut out 2 lacy borders and attached them across the top of the card using my Mega Runner.

I used a glue pen to attach the smile word to the background cut-out. Then attached it to the oval. 

I added a foam dot to the bunny which coordinated with the ribbon and laid it diagonally across from the bow to give the card some balance.


BONUS CARD

I had an extra bunny so decided to make another card...


I didn't use P & M paper on this one. I used a fun plaid paper from DCWV's Birthday Stack along with Stephanie Barnard's Mini Chevron Background Dies. to create the card base. 

I left some of the chevrons still attached and attached a ribbon over top, giving it a little belly band. 

Then added my little bunny in a stitched circle.


NEW RELEASES USED


Other Pink and Main Dies Used


Additional Tools and Supplies Used
VersFine Onyx Black Ink Pad
Strathmore 140 lb Mixed Media Paper
Kuretake Zig Clean Color Real Brush Pens
Waterbrush
Enamel Dots
3D Dots
Fabri Tac
Ribbon
2way Glue Pen 


WHEW!! That was lots of projects done in one weekend (at least for me it was a lot)!! I was so pleased that I was able to get so many cards from one stamp set!!

I hope you enjoyed them! 

Until next time...
HAPPY CRAFTING!!!
~Mitsy


Friday, February 17, 2017

Floral Keepsake Box

Hello Crafty Friends!!
It's a gorgeous day today! A complete 180 from the weather we had the last few days. I loathe gray skies and stormy weather. So, to see the sun out with blue skies and hear the birds chirping outside my window, it makes my heart happy! To know even after a little bit of ugly, the world seems beautiful!

And, when I feel good inside it extends outward. I get inspired by the way I feel and what I see around me. Today's project is no exception...

I made this lovely Floral Keepsake Box featuring Eileen Hull Design's dies and her wonderful ColorBox Blends applicators by Clearsnap!!

Supplies Used
Big Shot (Sizzix)
Eileen ColorBox Blends - Melon, Wildberry, Beach, Nutmeg (Clearsnap)
Peri & Peach Stack (DCWV)
Chipboard
Velvet Flowers 
Rhinestone
Brad
Cheesecloth
Crinkled Silk Ribbon
Fabric Tack 

I have been very curious about these blends from Eileen Hull and Clearsnap for quite some time now.  I was so ecstatic when I was given the opportunity to play with and create using them.
For those of you who are unfamiliar with this product, here's a little background on these amazing inks...

 1) It works as an ink pad and sponge dauber all in one. Cool!! I dount have to struggle looking for a dauber or blending tool when I need one... it's already built in!! 

2) It hold up to 10x's MORE ink than traditional ink pad. What, what??!! Yes!! Exactly what I said... 10x's the ink!! It's like having the equivalent to an ink pad and refill bottle in one (actually this applicator contains more fluid than a traditional refill/ reinker bottle). 

3)The price point... This applicator cost less than the average ink pad (without a re-inker). These typically runs around $5.50... A steal!!Especially considering that it has a built in re-inker!! Most refills cost 2-3 times that of their ink pad counterparts.

When I got the inks in I uncapped the heads and noticed that they were white. I first had to "prime the pump". 

For my example above, I used one of my large acrylic blocks, faced the applicator sponge side down, and pressed the sponge head in an up and down motion till the ink started to surface. then gently rubbed the sponge into the ink in a circular motion. 

Press & rub, press & rub, till I got to the the consistency and richness I wanted. So super easy. Now the applicators are ready for inking projects. If at anytime they become dry or I just want the color to be a little more saturated, all I have to do is give it a few more pumps and I'm good to go!!

Another AMAZING fact about this project... they are permanent once heat set!! Which is awesome for what I wanted to use them on... Glitter Paper!!

For today's project I wanted to use this gorgeous glitter paper! I love bling! And paper is no exception! But with glitter paper ink usually will rub off because the glitter pieces are very similar to that of plastic or, in some cases, metal. These non-porous surfaces make it hard for inks to adhere as there are no pores to sink into. So this was going to be an experiment for me, which I'm happy to report, WORKED!!

I started off by first, die-cutting my gold glitter paper using Eileen Hull's Pansy flower die. Then used the Melon Blends applicator to add color to the centers and tips of the petals, softly blending it out.

I heat set the first layer of color to prevent it from rubbing off. Once these blends are heat set, the color is permanent. They don't go anywhere!!

Once the first color was heat set and cooled, I used I added the darker color right over it. I just didn't spread the color out as much so the lighter color was also showing.

You can see a big difference layering with a deeper color (lower left pic). It adds so much depth.

Here's another cool fact...
Heat setting glitter paper naturally makes the edges curl!! Win-win for me!! The curled petals adds volume!! Now I don't need to bring out any special tools and hand curl them! YES!!
**Insert fist pump**

For a bit of added texture, I decided to mix in a few premade velvet flowers and attached them together with a brad through the center hole.

I also die-cut Leaves from glitter paper. This time using green glitter paper with Ocean and Nutmeg Blends. I gave my leaves a vein down the center and inked across the raised edge. Then heat set it to be permanent.

I wanted this flower to be the focal point of my keepsake box...

This box I wanted so bad and had been at the top of my wish list as soon as it was released. This is Eileen's Cookie Box Die. The scalloped edges are super cute!

Well, it finally came in and I knew I had to use it right away.

I like to die-cut my paper and chipboard together. Then run my paper pieces into my Creative Station and adhere my pieces onto the chipboard. 

Then, I fold the box along the crease lines.

I use a quick dry liquid adhesive to attach the my chipboard pieces together and added an extra piece (that was intended to be the bottom base) onto the inside of the top cover. When press down it holds the lid in place.

Like I said, I wanted the flower to be the focal point so besides using pretty I didn't do much else to this box. It was already very pretty and I didn't want to detract from that.

I used more clear adhesive to add my leaves, flower, and a strip of cheesecloth to the top of the box. Why cheesecloth?? It's a very easy and inexpensive filler that looks gorgeous! 

Added a bit of crinkled silk ribbon and presto... 
A beautiful floral keepsake box!!


I hope that this project has inspired you to try new things and new techniques... 
It's amazing where an idea might take you!

Until next time...
HAPPY CRAFTING!!
~Mitsy


Saturday, February 11, 2017

No Prob Llama


Hello Crafty Friends! 
I'm back with my good friends at DCWV today! I am absolutely giddy about all their new paper lines that have been filling the shelves of Joann Craft store across the U.S! They have really out done themselves with this release! And I am head over heals in love and tickled over their new NO PROB LLAMA STACK!!!

This stack is full with bold color and tons of foil!
And...
Lots & lots of cacti and lla-a-a-a-a-a-a-a-mas!!!!
I am so in love with this stack that I immediately had to create something with it! So I decided to make a easel style card.

Supplies Used
No Prob Llama Stack (DCWV)
Stephanie Barnard's Circle Stand-Ups Card (Sizzix)
Border Die- Stephanie Barnard's Elegant Stand-Ups (Sizzix)
Stephanie Barnard's Succulents & SucculentsTWO Dies (Stamps of Life)
Mega Runner (Xyron)
Distress Inks- Weathered Wood, Antiqued Linen, & Seedless Preserves (Tim Holtz/ Ranger)
3D Dots (Ek Success)

 
First, I cut my paper down to 6"x 12" pieces so that it can fit into my die-cut machine. Then I die-cut the card base and mat pieces from coordinating patterned paper.

I used my mini blending tool and inked the edges of my die-cut pieces.

I used my Xyron Mega Runner to adhere my panels onto my card base.

Then, folded my my card base on the score lines.

I added foam adhesive to the back of my circle die-cut and set it to the side.

I die cut cacti from green striped paper using the prickly cacti from my succulents and succulentsTWO die sets.

I found a sheet of cut-outs from the No Prob Llamas Stack and filled with different lamas, cacti, journaling tags, and sentiments. I found a tag with this cute lama and sentiment. I cut it out and separated the sentiment.

I kept the foiled cacti attached to the llamas, added tiny glitter enamel dots to my sentiment, then added foam adhesive to the back of both.

I attached all my element to my card front. Placed the circle in the center, layered the ferns on top that, then the llama in front of those. Added a cactus to each side and my sentiment in the bottom center. It created the most adorable desert landscape!

I finished the bottom flap with a simple border from the Elegant Stand-Ups die set.

Final here is my finished card...

This card is full of dimension!! I pulled some of the ferns forward so they stem and leaves are growing from behind the llama, as if he was standing under a shrub.

All the dimension and the foiled accents really makes the card pop!!

This was such a fun card and I can definitely see myself making tons and tons of llama themed everythings!!

I hope you all enjoyed my project for the day!

Until next time...
HAPPY CRAFTING!!
~Mitsy


Friday, February 10, 2017

Pink and Main February Release Blog Hop

Hi Crafty Friends!
Thank you so much for joining us for Pink and Main's February Release Blog Hop!!

We are celebrating Pink and Main’s February Release with a fun and inspirational blog hop! Be sure to go to the website (www.pinkandmain.com) and check out all the new stamps and dies! And be sure not to miss the brand new paper line that we are very excited to debut... we have 3 new 6x6 paper pads that are perfect for spring and coordinate with each other. Please hop along through all of the design team members’ blogs, and a couple of guest designers’ too. There will be prizes along the way.

For my project, I created...

I used Pink and Main's NEW Scentsational stamps set & NEW Lacy Border Dies.          

And a couple of stitched die favorites...
to create the card base and mat.
          

I stamped my images with Momento Tuxedo Black ink onto 140lb mixed media paper.

Then colored the images in using my Kuretake Clean Color Real Brush Pens

Then I used the matching die... yes, matching dies... for the Scensational Stamps!! They are not pictured with the above pics. These dies cut close to the image but still give a nice border around.
For the card base and framed card mat I used the Stitched Rounded dies set. I cut and pre-folded a 6"x 6" card from patterned paper using the biggest square.

For the frame, I die cut twice. First, with a square die. Then I centered a stitched circle die and die cut again to make a quick and easy frame.

I also created a frame using craft foam and mounted it under my frame to give it more dimension.

Speaking of more dimension... I also added more foam to the back of my little colored images.

Then cut two strips of green lacy border to create grass. I tucked and layered all my stamped images onto my card front and attached a multi-looped bow. 


...............................................................................................
Each blog has a prize to give away, and I am excited to give away Those awesome Lacy Borders Die Set. To enter the giveaway, just leave a comment here and on every blog in the hop. We will choose random winners from the comments and post them on the Pink and Main blog on the 15th. Here is the lineup for the hop, enjoy!

Mitsyana (You Are Here)