Showing posts with label Distress Markers. Show all posts

Friday, June 29, 2018

What's Cookin' with Newton's Nook & Xyron

Hi, Crafty Friends!!
I'm so happy to be back with Team Xyron today!! And this week we partnered up with the awesome people at Newton's Nook to bring you some amazing projects from BOTH teams for twice the FUN!!
**WOOT WOOT**

Boy, do we have lots of great things in store for you!! On top of all the inspiration created by both our talented teams, we also are doing an AMAZING GIVEAWAY!! 
Both Xyron & Newton's Nook will be giving away prize packages. 

PRIZE PACKAGE
Each company will be giving away a Mega Runner (like the one used in this post- winning color may vary) and a $25 Newton's Nook Gift Certificate!!

TO ENTER:

-Visit the Newton Nook Blog and COMMENT on their Xyron/ Newton's Nook posts all week long.
&
- Visit Xyron's Facebook Page and LIKE & COMMENT on all the Xyron/ Newton's Nook posts all week long. 

Winners will be chosen at random from the comments left on the posts.

I am so glad to be winding down and closing out this week-long promotion with ... not 1, not 2... not even 3... but 4... yes, 4... super simple, yet super cute cards!!


Let me show you how I created these adorable cards all from 1 stamp set.

Supplies Used
Newton's Kitchen (Newton's Nook)
Floral Lace Stencil (Newton's Nook)
Serene Strips Stencil (Newton's Nook)
Mega Runner (Xyron)
ColorBox Petal Point Chalk Ink- Primary Pastels (Clearsnap)
Lori Whitlock Snow Day Embossing Folder (Echo Park)
Mixed Media Paper (Strathmore)
Chalkboard Cardstock (DCWV)
Shimmers Stack (DCWV)
VersaFine Onyx Black Ink (Tsukineko/ Imagine Crafts)
Tim Holtz Distress Markers (Ranger)
MISTI Stamping Tool (My Sweet Petunia)
Stitched Square Dies, Scalloped Square Dies, & Stitched Circle Dies (Pink and Main)
Glitter Enamel Dots
Large Round Makeup Brush
Paper Trimmer
Scoreboard
Scissors

I'm a little weird when it comes to coloring. Most people who color with markers tend to use smooth cardstock to stamp and color on. Not me! A major thing I've noticed when coloring is that I am very heavy handed. They say you're supposed to use light strokes and flicking motions... and that's good and all but I just can't. I try and I try but just can't. I must have a really lazy hand but it just doesn't seem to cooperate with what my mind is telling it to do.

So, instead of constantly ruining perfectly good cardstock with my heavy hand and excessive bleeding... because I know my colors will bleed... I just switch out my paper and use something that can handle my coloring style. I almost always use a mixed media paper to do all my coloring on. It's thick, durable, and can hold up to all the moisture that I know I'm gonna pile onto it. And you know what it works for me! I'm in no way a professional colorist but I just find that this works best for me.

I stamp my images from the NEW Newton's Kitchen stamp set from Newton's Nook with an archival black ink onto mixed media paper. Then colored the images using Tim Holtz Distress Markers.

Then cut out each image out by hand. Newton's Nook does carry the matching dies but I don't mind a little fussy cutting.

I set my colored images to the side and worked on the card bases. I knew I wanted a colorful stenciled background. So I used plain White Cardstock cut down to 4 1/4" x 4 1/4".

I dabbed/ smooshed ink onto my craft mat and with a makeup brush, I blended color over my stencil. I started with Blue Lagoon, then applied Blue Iris, then Lime Pastel from the Primary Pastel Petal Point.

**TIP**
Make sure to use a quality brush. Tried using one from the dollar store and didn't like the results. It was very splotchy and didn't blend evenly. Blot off excess ink till you get a cloud effect on your craft mat before applying. These extra steps help make very soft results.

Look at that pretty pattern the stencil left... It's absolutely gorgeous!!

I also used the Serene Strips Stencil to create backgrounds... and again came out with gorgeous results by brushing on that chalk ink.
I gave each of the four backgrounds their own spin bu the techniques used were the same.

Then, I used a stitched die to die cut each background down to 4"x4" and give it stitching... I albsolutly adore stitching even if it is faux stitching.

Then I die cut scalloped square out of black chalkboard cardstock to mat behind the inked backgrounds.

I adhered the backgrounds to their scalloped mats using my Mega Runner... look at how beautifully these card fronts are coming together!


I inserted my card fronts into my MISTI Tool to help me align my sentiments in just the right spot... but first, I placed my colored image in the areas I wanted them to be in (I did not glue them down yet). Then removed the image before stamping, just in case something slipped and I had an accident, I didn't want to mess up my coloring with a big smudge of ink.

Once the inked sentiment was dried, I added craft foam to the back to give it a litlle dimension and adhered them onto the card fronts.

Then cut out 4- 4 3/4"" x 4 3/4" pieces of Shimmers cardstock, inserted them into the Lori Whitlock Snow Day embossing folder, which by the way makes for an awesome random polka dot background for everyday use... Not just for winter/ Christmas themed projects.


I created 5"x 5" card bases by cutting chalkboard paper down to 5" x 10" then creasing and folding in half to get a 5" squared card.

Then used my Xyron Mega Runner to attach the card fronts to their black card bases.


As a final touch, I added glitter enamel dots onto each as a simple accent.


And here are my finishd cards...


You can check out this amazingly adorable quartet a little closer down below...


How stink cute did these turn out??!

I hope you enjoyed today's project! I'm so glad you were able to join us today!

Don't forget to visit Xyron's Facebook Page to see what amazing projects my Design Team Sisters created!! Leave a comment on each of the week's project and you could win amazing prize package!!

Wanna double your chances of winning? Then swing by the Newton's Nook Blog for more amazing projects and leave some love on their Xyron posts!! * ** ***


DISCLAIMERS
*This giveaway is not sponsored, endorsed, or affiliated with Facebook, their partners, or subsidiaries.*

**This blog is compensated to provide opinion on products, services, websites and various other topics. Even though the owner(s) of this blog receives compensation for our posts or advertisements, I always give my honest opinions, findings, beliefs, or experiences on those topics or products.
The views and opinions expressed on this blog are purely my own. Any product claim, statistic, quote or other representation about a product or service should be verified with each manufacturer, provider, or party in question.

***This blog contains affiliate links, clicking and shopping through these links helps to support and run the Up On Tippy Toes blog at no additional cost to you..***


Monday, June 4, 2018

Flamingos in the Tropics

Hey, Crafty Friends!! 
Boy, is it HOT! I don't know where Spring went but it's long gone and hiding!
My kids are already out for summer break and they are enjoying all the sunshine. swimming, running, lots of screaming laughter... that's what we're down for in these next couple of months. All of which reminds me of my of my childhood days growing up in Hawaii. Tropical weather and visits to the zoo where at the foot of the entrance gates flamingoes await visitors. Yup, those were the days. They were a bit stinky but those flamingos sure were pretty! Lots of these majestic birds standing on one leg or rubbing beaks, occasionally spreading their wings for a stretch. How I want to share memories like those with my children.

So, when Blank Page Muse released my good friend Pam Bray's newest stamp set, it brought back all kinds of feels! I immediately fell in love with these stamps!! And when Kim (owner of Blank Page Muse) and  Pam asked if I would like to create with these stamps, I literally squealed!! I've always loved Pam's designs and of course, I had to jump at the opportunity! What's even better is that all of these stamps are made of deeply etched red rubber! So I know the impression is gonna be amazingly crisp and clear! And boy, was I right! It makes a HUGE difference, especially with detailed stamps such as these!

And in the spirit of my childhood memories, I created this #10 sized Tropical Flamingo Card.


Supplies Used 
Pam Bray Flamingo Row (Blank Page Muse)
Tim Holtz Tropical Dies (Sizzix)
Tim Holtz Stitched Ovals (Sizzix)
Tim Holtz Labels (Sizzix)
Mixed Media Paper (Strathmore)
Sun Drenched (Paper House)
Chalkboard Stack (DCWV)
Cardstock- Light Green, Orange
Vellum
VersaFine (Tsukineko/ Imagine Crafts)
Tim Holtz Distress Markers- Worn Lipstick, Picked Raspberry, Hickory Smoke (Ranger)
Clean Color Real Brush Marker- No. 052 Bright Yellow, No. 023 Scarlet Rd (Zig/ Kuretake)
Eileen Hull Blends- Leaf, Frog, Melon (Clearsnap)
MISTI Stamping Tool (My Sweet Petunia)
Hemp Twine
Mixed Media Glue
Foam Adhesive
Aqua Brush (Pentel)
Stylus


I started by stamping my faves from the set... FLAMINGOS!! I stamped them onto mixed media paper using Versafine Onyx Black ink.  Then colored in m images using my Tim Holtz Distress Markers. First coloring most of the bird with Worn Lipstick. I blended out the color using a water brush then went back in to add a second layer using Picked Raspberry to add more depth. Then colored the beaks with Hickory Smoke.

Once I was satisfied with my coloring and the images were completely dried, I cut out both flamingos by hand with scissors.


I die cut monstera leaves out of light green cardstock using Tim Holtz's Tropical Dies by Sizzix. I cut 3 leaves altogether.

Then shaded around the edges using Eileen Hull's Blends inks in Leaf, then in Frog.


After the ink was completely dried, I used a ball stylus to add dimension and shape the leaves.


Using the leftover scraps from my flamingoes, I stamped these little stemmed flowers using more Versafine ink. I didn't need the stems so stamping the entire stamp perfectly wasn't necessary. As long as all the flowers were intact I was good to go!


I colored these dainty flowers using, my Zigs in Bright Yellow, blended out toward the center with a water brush, then added Scarlet Red in the centers and blended outward with the water brush.

Once the flowers were all dried, I fussy cut them out, then creased each petal down the center to give them more dimension.

For the hibiscuses... again used dies from the Tropical set, and die cut from orange cardstock. I shaded along the edges using the Melon Blends ink.

I separated each petal from the flower and creased and folded them, then re-attached them to the cut-out centers with glue.


Disassembling them then re-assembling them gave them a whole lot more dimension.

For the card base, I cut patterned paper from PaperHouse's Sundrenched collection
to measure 3-3/4" x 9".

I used my Xyron Mega Runner to mount it onto a 4-1/8" x 9- 1/4" card base made from 110 lb white cardstock.


I  wanted a center focal point that wouldn't block out all that gorgeous ocean scenery. So, I die cut an oval out of vellum using Tim Holtz's Stitched Ovals. I ran the oval through my Xyron Crative Station with a 5" permanent refill cartritdge. Then adhered it to the card front.

I anchored the oval with a palm tree cut from black chalkboard paper die using the palm tree die from the same Tropical die set.

I attached foam adhesive sheets to the back of the flamingos and attached them to the oval then arranged the flowers and leaves and tucked in loops made from hemp twine.


I thought the "I'll stand by you... Today, Tomorrow, Always" sentiment went perfectly with this pretty pink couple. So I stamped it onto more mixed media paper and die cut it out using a label from the Tim Holtz Labels die set and shaded the edges with Eileen Hull's Sunshine blends ink.

And at the very last minute, I decided to re-mount the card front with a black mat mad with more of that deep black chalkboard paper. It gives a nice balance of black throughout the card, don't you think?!

And here is my finished card...


CLOSE-UPS


I hope you enjoyed this card tutorial and definitely take a peek on over to Blank Page Muse!! Pam Bray has so many more amazing stamps sets you need to check out!!

Thanks for stopping by!!

Until next time...
HAPPY CRAFTING!!

~Mitsyana

Tuesday, August 15, 2017

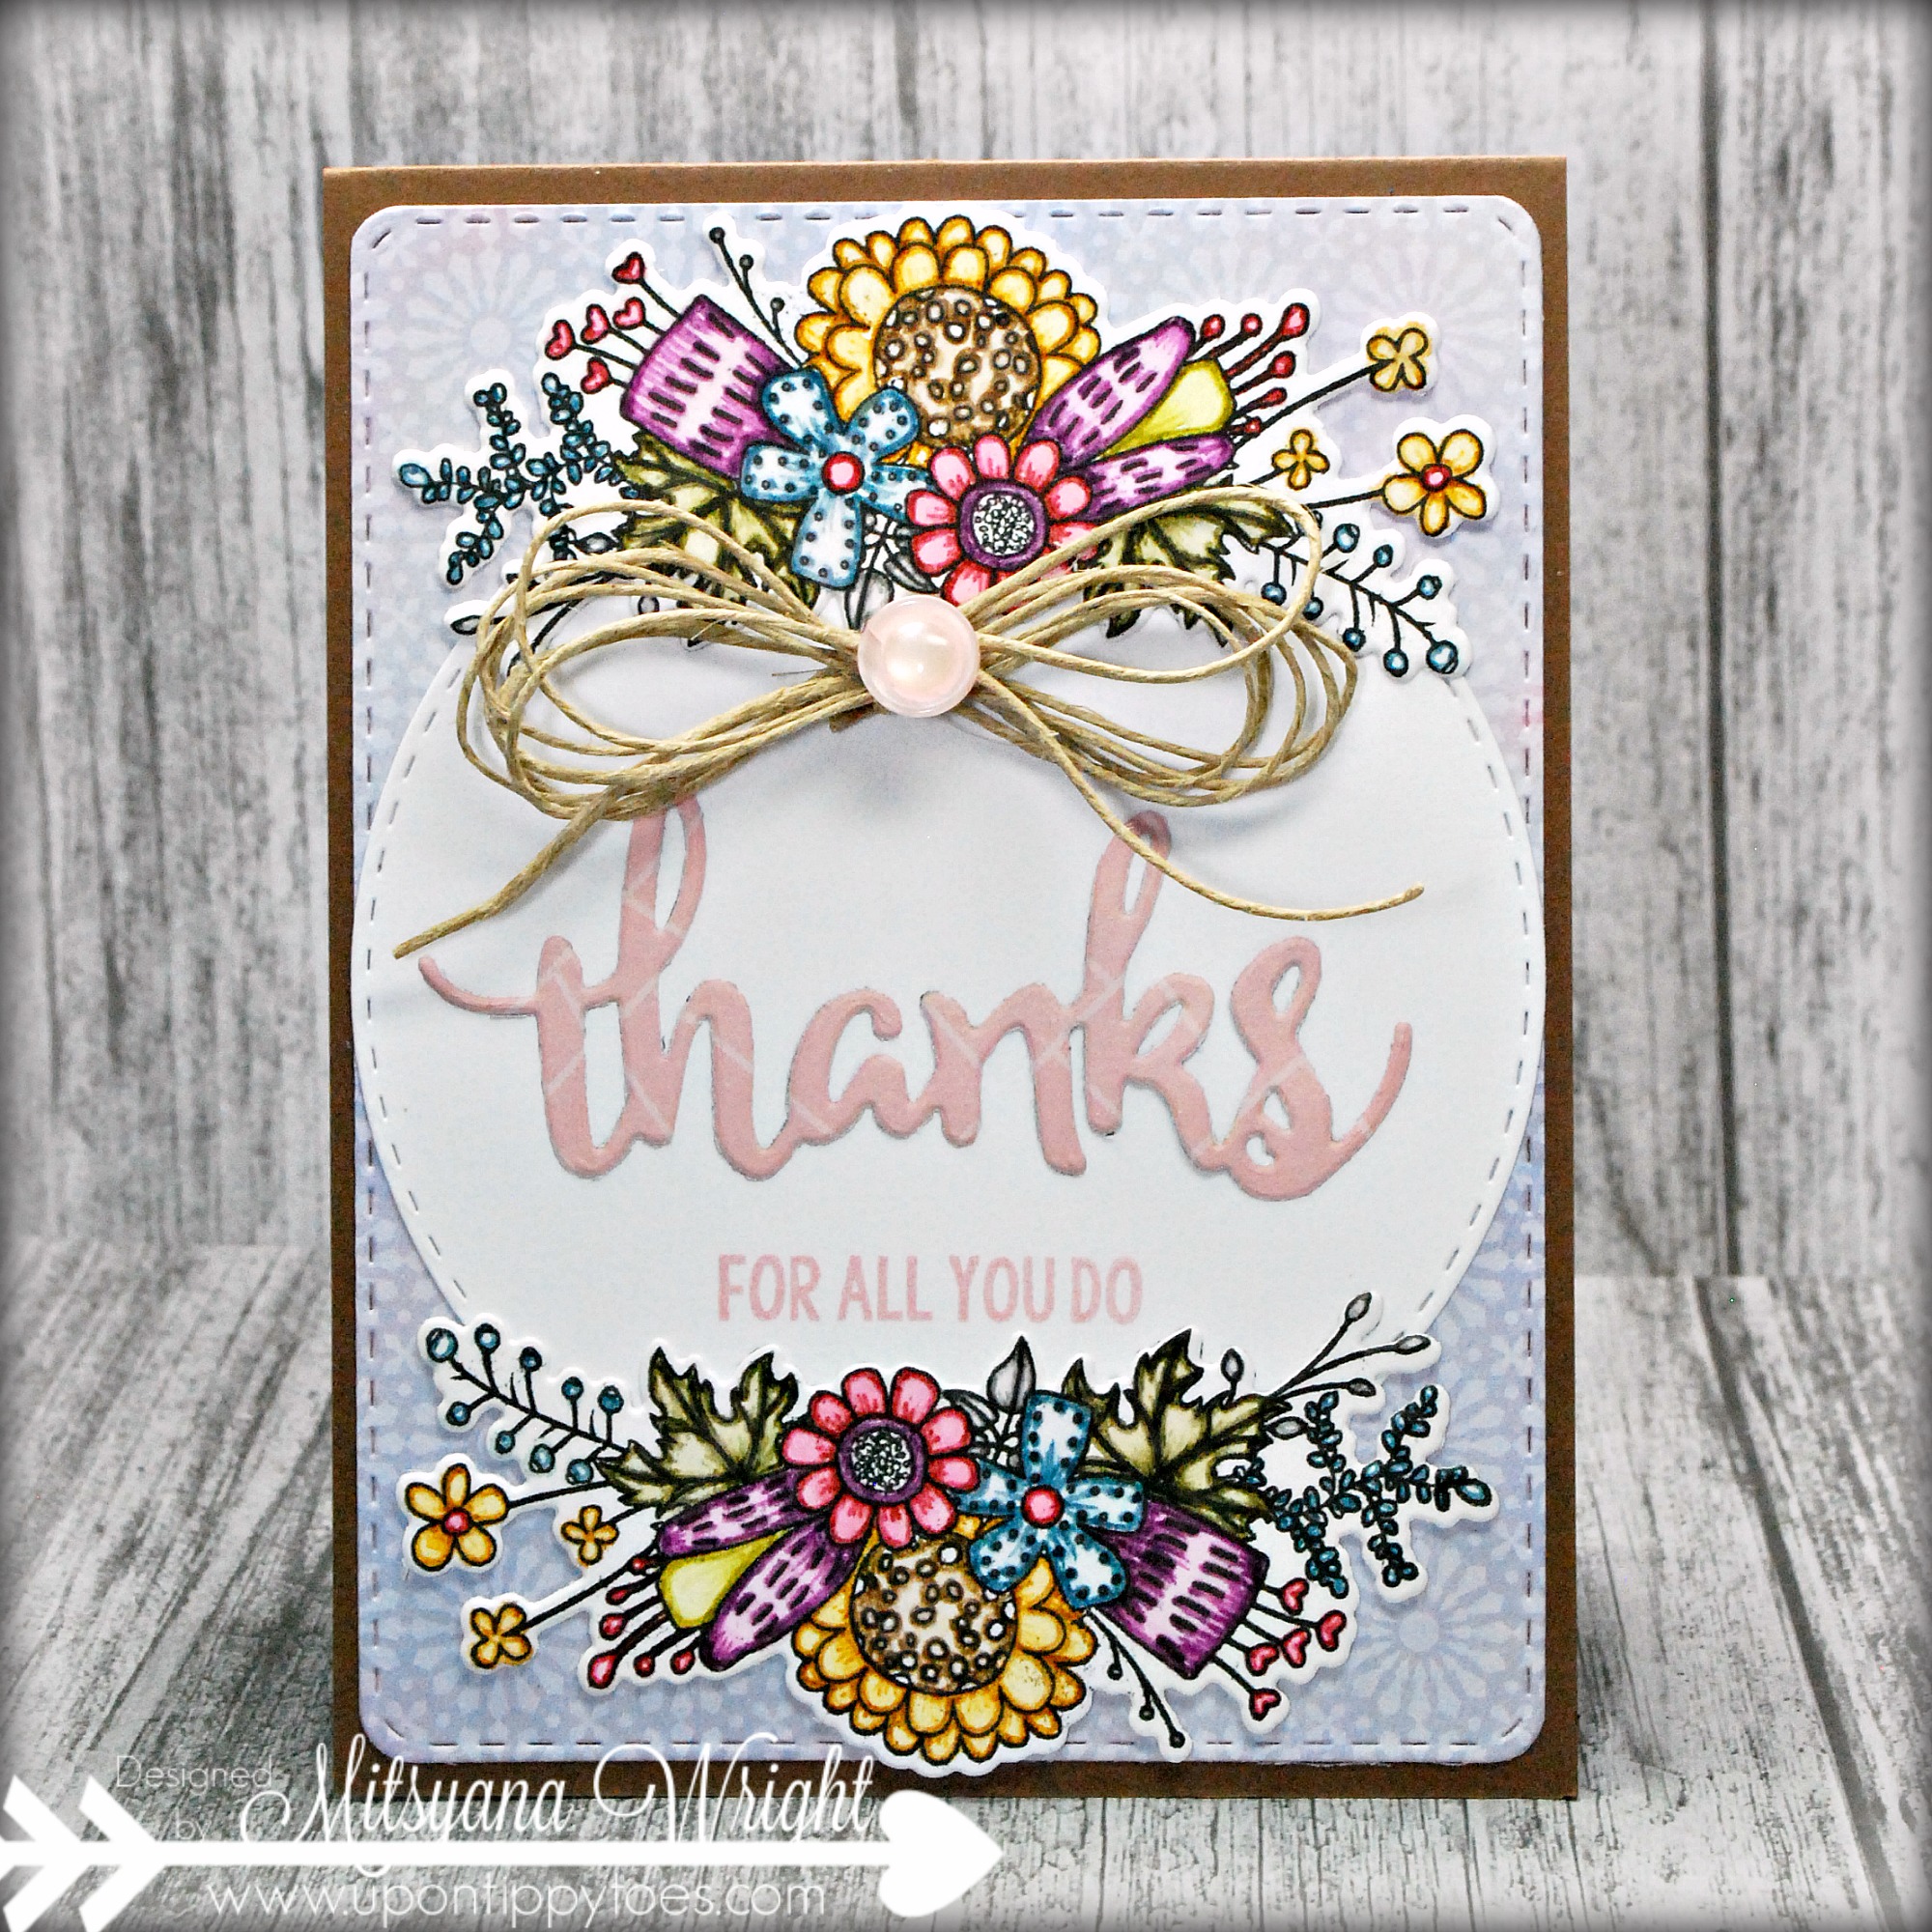
Thanks For All You Do

Hello, Crafty Friends!

I'm here with Team PINK today to share this gorgeous wildflower card I made with Pink and Main's NEW Fall Bouquets stamp set.


Even though this set is originally supposed to be a fall themed set, just simply coloring the image with bright colors will make this stamp set into a cheerful everyday set.

I used the following Pink and Main Products to create the beautiful card above...


I stamped my image onto 140 lb mixed media paper with black archival ink then colored it with water color markers and blended out with a water brush.

Once my images were completely dried, I simply die cut the images with the coordinating dies.


I used the Stitched Rounded Rectangle dies to cut a card mat from patterned paper and mounted it onto an A2 sized card base.

Then, die-cut a circle from white cardstock using the Stitched Circles die. I attached to the center of the card front and arranged the die-cut colored images on the upper and lower regions of the circle.


I die-cut the word thanks from light pink Patterned paper and adhered it to the center of the circle.

Then, stamped the phrase "FOR ALL YOU DO" in pink chalk ink.
For a finishing touch, I added a multi-looped bow made from hemp twine topped with a shiny pink button.

Other Supplies Used
 Patterned Paper- Peri & Peach Stack (DCWV)
Brown Cardstock
140lb Mixed Media Paper (Strathmore)
Mega Runner (Xyron)
VersaMagic- Pink Petunia (Imagine Crafts/ Tsukineko)
 VersaFine- Onyx Black (Imagine Crafts/ Tsukineko)
Twine
button


And here is my finished card...

A very simple yet beautiful card. A great way to say "THANKS" to just about anyone!

A great way to say "THANKS" to just about anyone!
Hope you enjoyed my card for today!


***Disclaimer***
This blog is compensated to provide opinion on products, services, websites and various other topics. Even though the owner(s) of this blog receives compensation for our posts or advertisements, I always give my honest opinions, findings, beliefs, or experiences on those topics or products.
The views and opinions expressed on this blog are purely my own. Any product claim, statistic, quote or other representation about a product or service should be verified with each manufacturer, provider, or party in question.

This blog may contain affiliate links, making a purchase through these links helps fund this blog at no additional cost to you.

Tuesday, August 1, 2017

Summer Looks Good On You

Hello, Crafty Friends!! 
I'm back again with more bikini cuties by Pink and Main!! These sunbathing beauties are just too irresistible! I just had to play some more!


Supplies Used
Sending Waves (Pink and Main)
Sending Waves Dies (Pink and Main)
Beach Babe 6x6 Paper Pad (Pink and Main)
Stitched Circle Dies (Pink and Main)
Scallop Waves Dies (Pink and Main)
VersaFine Onyx Black Ink (Tsukineko/ Imagine Crafts)
140 lb Mixed Media Paper (Strathmore)
Kraft Cardstock (DCWV)
Shimmering Cardstock- Coastal Pearl (Crafter's Companion)
Tim Holtz Distress Markers (Ranger)
Foam Dots

I stamped these little cuties on 140lb Mixed Media Paper using VersaFine Onyx Black ink. I colored them using Tim Holtz Distress Markers and blended out the color with a water brush. I added layers of color till I got the results I wanted. Then die-cut the images using their matching Sending Waves Dies.

I cut paper from the Beach Babe Paper Pad using the largest of the Stitched Rounded Square Dies. I also cut paper from the Shades of Spring Paper Pad with the largest of the Stitched Circle Dies.

For the beach scene, I used the second to the largest Stitched Circle Dies to cut the blue sky, sand, and ocean paper. Then die-cut sand mounds using just one of the stitched dies from the Scallop Waves Dies.  For the ocean, I used paper from the Beach Babe 6x6 Paper Pad, so I cut the individual waves out by hand.


Then I ran all my paper pieces through my Creative Station Lite and layered them onto each other.

Then I attached this little beach scene to a 5.5" x 5.5" card made from Shimmer cardstock and matted with Kraft cardstock.


I mounted all my colored images onto the card front using foam dots.

Then finally stamped my sentiment using more onyx black ink.


Here's a close up of my little bikini babes...
Love this little sweetie having a drink in her inner tube!

And simply adore this one wearing her heart shaped shade and tankini!

They are both too flipping cute!


And there ya have it MORE SUMMER FUN for ya!!

Hope you all enjoyed this card!

Until Next Time...
HAPPY CRAFTING!!!
~Mitsyana

***Disclaimer***
This blog is compensated to provide opinion on products, services, websites and various other topics. Even though the owner(s) of this blog receives compensation for our posts or advertisements, I always give my honest opinions, findings, beliefs, or experiences on those topics or products.
The views and opinions expressed on this blog are purely my own. Any product claim, statistic, quote or other representation about a product or service should be verified with each manufacturer, provider, or party in question.

This blog may contain affiliate links, making a purchase through these links helps fund this blog at no additional cost to you.

Wednesday, June 28, 2017

Forest Spirits Treehouse Card


Hi, Crafty Friends!! I'm here today with the Eileen Hull Inspiration Team. 
This month we partnered up with the awesome people at Stampotique to bring you some amazing projects featuring products from both Stampotique and Eileen Hull Designs!

And today I have this enchanting Treehouse card complete with tiny little "Forest Spirits".

If you follow me regularly on Facebook, you'll occasionally see my posts about Hayao Miyazaki and all things Studio Ghibli. And when I saw the Line Up stamp set from Stampotique it immediately reminded me of the movie My Neighbor Totoro

Totoro is a cat-like "Forest Spirit" or "Keeper of the forest". A beloved and iconic character of the Japanese animated movie that has become synonymous with Hayao Miyazaki and Studio Ghibli.

And is my main inspiration behind today's project.

Supplies Used
Big Shot (Sizzix)
Line Up (Stampotique)
Cardstock- Kraft, Brown, White (DCWV)
140 lb. Mixed Media Paper (Strathmore)
Tim Holtz Distress Markers (Ranger) 
Tim Holtz Distress Inks (Ranger)
Mega Runner (Xyron)
Versafine Onyx Black (Tsukineko/ Imagine Crafts)
Paper Flowers
Water Brush
3D Dots
Glossy Accents (Ranger)
Glue Pen 


First, I stamped my image ( cute line up of forest spirits) using VersaFine Onyx Black Ink onto 140lb mixed media paper.

Then colored them using Tim Holtz Distress Markers in (characters from left to right: Seedless-Preserves + Worn Lipstick, Hickory Smoke, Vintage Photo + Mowed Lawn, Stormy Sky +Worn Lipstick).

After my little cuties were colored, I cut each out by hand.


I wanted to do something a little different. So, I decided to stray away from the standard A2 sized greeting card. I chose to make my card a #10. Which is standard "Legal" size.  The great thing about making my card this size is that even though it is quite larger than the average crafter makes, it still only costs standard first class shipping price... one stamp!! How awesome is that, right?!!

So, I cut my card base to8"x 9" (4" x 9"- folded) and my card mat to 3-7/8" x 8-7/8".
I used Walnut Stain Distress ink to shade the edges of the mat, then used my Xyron Mega Runner to attach the mat to card base.

I used Eileen Hull Designs House/ Pocket Stitchlits to die cut paper from her Heartfelt 6"x12" Cardstock Pad and matching pieces in chipboard. Ran all the pieces through my 3" Sticker Maker and adhered them together. 

I shaded the edges of the rooftops using Tim Holtz Distress ink in Mowed Lawn, then lightly with Walnut Stain.

I added 2 sets of the rooftops to the front of my card, creating a 2-story looking treehouse.

All houses need windows and a front door, right... 
So, I die cut one square paneled window for the front of the door and one semi-circular window for above the door. I used the bright and cheery yellow patterned paper from Eileen's paper pad for the insides of all the windows. Look, it makes it look like someone turned on the lights inside!

Then for the second floor, I used 5 windows. I die cut and layered 2. 

And for the remaining three...

I cut out the panels of one to make a frame, adhered my little guy to the yellow background paper, attached the frame over him, then trimmed the excess. Then cut the other 2 windows so that they were just two stacked box panels. Then attached it to both sides of the previous window.

Now, the little forest spirit is at an open window with shutters!! Too cute!

I attached all my windows to the top level of the treehouse and added a chimney.


It's starting to really take shape now!

But what's a treehouse without tons of leaves?!!

This part may seem tedious but I found it quite relaxing... I made tons and tons of leaves... I think at least 25. And all die cut from plain kraft cardstock using Eileen Hull Designs - Leaves, Spring.

I shaded them first with Walnut Stain for the stems. Then blended on Mowed Lawn for the leaves. Don't worry about getting the colors shaded perfectly because they blend together perfectly and give a more "natural" look to the leaves.

Ok, I could have stopped there but wanted to add more detail to make them look even more realistic.

 I used my distress markers in Mowed Lawn. Forest Moss, and Vintage Photo for additional detail.

Then, I used an embossing stylus to add dimension to my leaves.
I used a Glossy Accents as a liquid glue to attach the leaves above the rooftops. I laid each stem down building up towards the peak. Wherever I had bald spots I filled with extra leaves I trimmed from any leftover stems.

I added foam adhesive to the backs of the remaining forest spirits and positioned them by the front door.

For a final touch, I added assorted paper flowers onto my covered rooftops.

And, here is my finished card...


I even added a couple more leaves (trimmed down) at the front door to look like little plants. 

Here are a close-ups...


You can really see all the details in the leaves. And look how adorable these little cuties are!!

I hope you enjoyed this adorable treehouse card!

For more crafty inspiration from our collaboration, please visit Eileen Hull Designs and Stampotique on Facebook and their other social medias!!

Until next time...
HAPPY CRAFTING!!
~Mitsy

***Disclaimer***
This blog is compensated to provide opinion on products, services, websites and various other topics. Even though the owner(s) of this blog receives compensation for our posts or advertisements, I always give my honest opinions, findings, beliefs, or experiences on those topics or products.
The views and opinions expressed on this blog are purely my own. Any product claim, statistic, quote or other representation about a product or service should be verified with each manufacturer, provider, or party in question.

This blog may contain affiliate links, making a purchase through these links helps fund this blog at no additional cost to you.