Showing posts with label buttons. Show all posts

Sunday, September 15, 2019

Elegant Gift Tags That Say Thanks!

Hey, Crafty Friends... It's September 15th! 
That means it's time for another challenge at the I am Roses Blog!! And today I made a set of gorgeous gift tags. These would be a great accessory to a wonderful thank you gift. They are simple and elegant but with a pop of color that is striking! 

Let me show you how I created them, keep reading down below.


Supplies Used
Mini Mixed Christmas (I Am Roses)
Soft Green Carnation (I Am Roses)

Other Supplies Used
Big Shot (Sizzix)
Mega Runner (Xyron)
Lace Border Dies (Diamond Press)
Thanks a Bunch Stamps (Diamond Press)
Cardstock- White, Kraft (Recollection)
Cardstock- Red, Green (Bazzill)
Versamark Ink Pad (Imagine Crafts/Tsukineko)
Clear Embossing Powder (Judikins)
MISTI (My Sweet Petunia)
Buttons (Buttons Galore)
Cutter Bee Scissors (EK Success)
Quick Grip Glue (Beacon)
Hemp Twine
Assorted Rhinestones
Heating Tool
Wooden Skewer (optional)

I started by creating the tag bases. I knew I wanted them to be frilly and eye-catching. 

I cut 2- 2.5"x 6" strips of white cardstock and ran them through my Xyron Sticker Maker. Then die-cut them using an intricate border dies by Diamond Press called Lace Borders.

I die cut the actual tag itself from both Kraft and white cardstock using the largest die from Tim Holtz's Tag Collection die set. 


I trimmed about a quarter-inch off the kraft tag and layered it onto the white tag using my Xyron Mega Runner.

Next, I peeled my lacy borders from their protective film and attached them onto the tag.


I used my MISTI to help me align my sentiments from the Diamond Press Thanks a Bunch stamp set. Once it liked the position I dusted my tag with an anti-static pouch, then inked up my stamp with Versamark ink and stamped directly onto the card.


I sprinkled clear embossing powder over the entire stamped sentiment and heat set it,
 

I set the tag aside. 

Then used Eileen Hull's Leaves, Spring dies to die cut leaves from red cardstock. I used only the top corner stemmed leaf and placed 3 layers of scrap paper on the die and cut them all out at the same time.

I inked the tips of the leaves using Distress Oxide ink in Black soot.


I repeated all the previous steps, this time, I swapped out the red cardstock for green and switched out the lacy flower border to a delicate butterfly border.


I also switched out the sentiment both are great "thank you" sentiments (and both come included in the thanks a bunch set)


And here is where the pop of color comes in...

After attaching the leaves onto the card, I build a little floral arrangement on each. 

I curled the stems of the flowers using a wooden skewer to create little swirly vines. Then attached the flowers onto the tag using a rally strong liquid adhesive.

Then scattered a few rhinestones here and there and attaching them using tiny amounts of more liquid adhesive.


Lastly, I attached a twine bow to each tag topped with a single button.

And here are my finished tags...


I really love how bold these colors look against the kraft and white cardstock. Because I used neutral colors as my base the color I did add really pops!!

I really love how these turned out and I hope you did too!!

Make sure to join in on the fun!! Head on over to the I am Roses Blog to learn more and to enter for your chances to win some amazing prizes

Hope to see your lovely creations soon!!

HAPPY CRAFTING!!
~Mitsyana 

Monday, April 2, 2018

2018 Stamping for Autism Awareness Blog Hop

Hi, Crafty Friends!! 
Today is Autism Awareness Day and I am participating in the 2018 Stamping For Autism Awareness Blog Hop! We are raising awareness and encouraging acceptance for individuals with Autism around the world.

We know that Autistic individuals don't communicate in a way that society deems normal. And sometimes everyday situations, easy tasks we take for granted, can be a struggle. But just because they are different doesn't mean they aren't capable. Capable to feel, to understand, or to do. They just have a different way of expressing themselves and communicating.

We are here to support and better understand our family and friends with Autism. And a great way to show support is to send words of encouragement. Just a little encouragement and "you can do it" can go a long way. You never know, a random act of kindness can mean the world to someone, no matter how small the gesture.

So, today I created this adorable card, especially for the hop.

 It goes to show that anyone can achieve great things!

Pink and Main Supplies Used

Other Supplies Used
Strathmore 140 lb Mixed Media Paper
Recollections 110 lb White Cardstock
Zig Clean Color Real Brush Markers
3d Dots
Hemp Twine
Button


I started by stamping my images from the Plane Sweet stamp set onto 140lb Mixed Media Paper with Black India Ink. 


Then colored them with Zig Clean Color Markers in:
No.43 - Olive Green, No. 46 - Mid Green, No. 72 - Beige, No. 64 - Oatmeal, No. 93 - Green Gray, No.91- Light Gray.


One of the many things I loved about this set is that there are little sentiments that fit right into this tiny banner... I used the one that says "take flight".


For my card base, I created a standard A2 (4.25" x 5.5"- folded) from white cardstock. I used the largest stitched rectangle to cut green striped chevron looking paper from the Spring Fling paper pad. Then I used the second largest banner from Large Fish Tail Banners to cut this blue polka dot paper from the Celebrate paper pad. Then I used the 5th largest circle (2.5") to cut plain white cardstock.

I layered the rectangle and banner onto my card front using my Xyron Mega Runner.

 Then shaded the edges of my circle die cute using Cape Cod (light blue) ink from the Boardwalk Petal Point Ink Pad.

I made little clouds from white cardstock and shaded the edges with Bahama dye ink.

Next, I stamped Sky's the limit onto more white cardstock and die cute it using a label from the Stitched Greetings Dies set. Then shaded around the edges using Olive (darker green) color, again from the Boardwalk ink pad.


I added 3D foam behind the little guy in the airplane and behind the banner.
Then arranged the circle and cloud onto the card. Then adhered the images to look like he was flying through the air.


I added more 3d dots to my sentiment and attached it to the bottom of the card.

Then, finally, tied hemp twine around the top of the card and topped with a button topped bow.

And here is my finished card...


I hope you enjoyed my project for today and it inspires you, not just creatively, but it inspired you to raise awareness for those with Autism. Encourage others. Educate yourselves and others on how they to can raise awareness.

Here are a couple of organizations that do just that...


And here are a few fabulous designers in today's line up...

**Just a little note**
 THIS IS NOT THE ENTIRE LIST
For more contributors, please click on InLinkz below. It will take you to the links of the 2018 Autism Awareness Blog Hop's Sponsors. From there, you can visit each of the sponsor's (and their team members) blogs.

Jennifer Ingle (Instagram)


An InLinkz Link-up

Thank you so much for stopping in and joining us!!
Happy Hopping!!

~ Mitsyana
(Pink & Main DT)

Friday, March 23, 2018

Pink and Main & MISTI Blog Hop


Happy Friday, Crafty Friends!!
I've got a special surprise for you all today... I am the first stop in the Pink & Main and My Sweet Petunia Blog Hop & Giveaway!! WOOT WOOT!!

So, first of all, WELCOME, WELCOME, WELCOME!!

We have such an amazing line up today, with both the Pink & Main AND the My Sweet Petunia design teams coming out to play!

I hope you are ready to be inspired, have fun, and (with a little bit of luck) maybe win something amazing too, because we have a couple of fabulous prizes to give away to 2 lucky individuals! More details will be listed below.

SO, LET'S GET STARTED!

Today, I have not ONE, or TWO, but THREE adorable EASTER cards for you...


Using the Joyful Easter Stamp set 


Supplies Used
Original Misti Tool (My Sweet Petunia)
Joyful Easter (Pink & Main)
Joyful Easter Dies (Pink and Main)
Stitched Circle Dies (Pink & Main)
Large Bow Dies (Pink & Main)
Beach Babe Paper Pad (Pink & Main)
Mega Runner (Xyron)
110 lb Mixed Media Paper (Strathmore)
India Ink (Clearsnap)
Glitter Cardstock (Crafter's Companion)
Clean Color Real Brush Markers (Zig/ Kuretake)
Hemp Twine 
Buttons

I love to use my original MISTI to stamp multiple images. The larger platform gives me the flexibility to created larger or multiple projects by making more room to stamp everything all at once. Especially, without having to worry about an image not stamping all the way. If I mss up, all I have to do is re-ink my image, close the lid, and stamp again in the exact same place!! TAH-DAH, no mistakes!!

And each images comes out perfect!! 
Just atke a close-ups of these finished cards...


I hope you like what you see and enjoyed all of my cards!! Thanks for stopping in! 
And hope you all have a very HAPPY EASTER!!

~Mitsyana

Don't forget hop on over to our next talented designer's blog!!
Ilina Crouse is up NEXT!!


WHOA... You didn't think we were done yet, did you?!

Before you go... How would you like to win one of these amazing prizes??!!...

**PRIZES**
1- $50 Shopping Spree at www.mysweetpetunia.com
1- $50 Shopping Spree at www.pinkandmain.com 

All you have to do to enter is, leave a comment on each participating blog. Please keep it kind, encouraging, and respectful. Following each blog is not necessary to enter but would be greatly appreciated.  All comments must be received by April 1, 2018 by 11:59 (Central Time).  Winners will be chosen at random and be announced on the Pink & Main and My Sweet Petunia Blogs on Tuesday, April 3.

Keep on hopping till you get back to the My Sweet Petunia Blog. If at any time you get lost refer to the complete list down below...

Check out our complete list of  fabulous Designers:

Mitsyana Wright (YOU ARE HERE)
Ilina Crouse (GO HERE NEXT)
My Sweet Petunia (THE END)

HOPE YOU ALL HAVE AN SUPER CRAFTY DAY!!

Friday, December 15, 2017

Merry Christmas w/ Xyron and Wild Whisper

Hello, Friends!!
It's been a busy week and I'm back again, closing out the week with Team Xyron, Wild Whisper, and another beautiful Christmas card. With the big day just over a week away and one can never have enough gorgeous cards to give to family and loved ones.


Supplies Used
Mega Runner (Xyron)
Red Flowers- Florde Pascua (Little Birdie Crafts)
Teal Flower- Elsie Celeste (Little Birdie Crafts)
Black Cardstock 
Glitter Paper
Twine
Vellum
Star Rhinestones
Versafine Onyx Black Ink (Tsukineko/ Imagine Crafts)
VersaColor Cardinal Ink (Tsukineko/ Imagine Crafts)
Clear Embossing Powder (Judikins)
Red Button
Liquid Glue

I am head over heels in love with Wild Whisper's Home For The Holidays paper. This paper has a nice smooth magazine like finish to it that really makes the colors and patterns just pop!


These are also double-sided papers so one sheet can go a long long way. Like it did for my card today. I created my card front using this fun candy-striped paper. It has this beautiful snow covered pine trees on the opposite side.

I cut the striped piece to measure  4-7/8" x 6-7/8" and then cut a second piece using the opposite side to measure 4-3/4" x 6-3/4".

I wanted to add a sentiment directly to the paper but with the sleek finish, I was afraid I'd smudge the pretty print. Instead, I opted to stamp my sentiment onto a piece of  2"x 6" vellum.

I used VersaFine Onyx Black Ink to stamp the large "Christmas" word stamp from the Home For the Holidays Stamp Set and covered it with clear embossing powder then heat set it.  I wrapped the vellum around the card front and used my Xyron Mega Runner to adhere the end around the back side.

 Then I stamped "Very Merry" in VersaColor Scarlet Ink and covered it in clear embossing powder and heat set it. Then I ran the entire card front through my Xyron Creative Station Lite and attached it to glitter cardstock.

 I attached the Striped paper onto a 5" x 7 " card base. then attached tiny stars using a toothpick dipped in glue. When you don't have a fine tipped applicator for your liquid glue bottles, I find that an old fashion toothpick works great!! It has a tiny tip for precise application. 

Then with more glue, I added a few flowers and a twine bow to the corner. I didn't like the center of my teal flower so I replaced it with a red button.

And here is my finished card...
I love how the winter scenery is on display in the background and how the teal really draws more attention to all the red throughout the card.


Thanks for spending time with Team Xyron and Wild Whisper this week...

I really hope that today's tutorial inspired you to create your own gorgeous Christmas cards.

Until next time...
Happy Crafting, Friends!!
~Mitsyana

***Disclaimer***
This blog is compensated to provide opinion on products, services, websites and various other topics. Even though the owner(s) of this blog receives compensation for our posts or advertisements, I always give my honest opinions, findings, beliefs, or experiences on those topics or products.
The views and opinions expressed on this blog are purely my own. Any product claim, statistic, quote or other representation about a product or service should be verified with each manufacturer, provider, or party in question.

Tuesday, August 15, 2017

Thanks For All You Do

Hello, Crafty Friends!

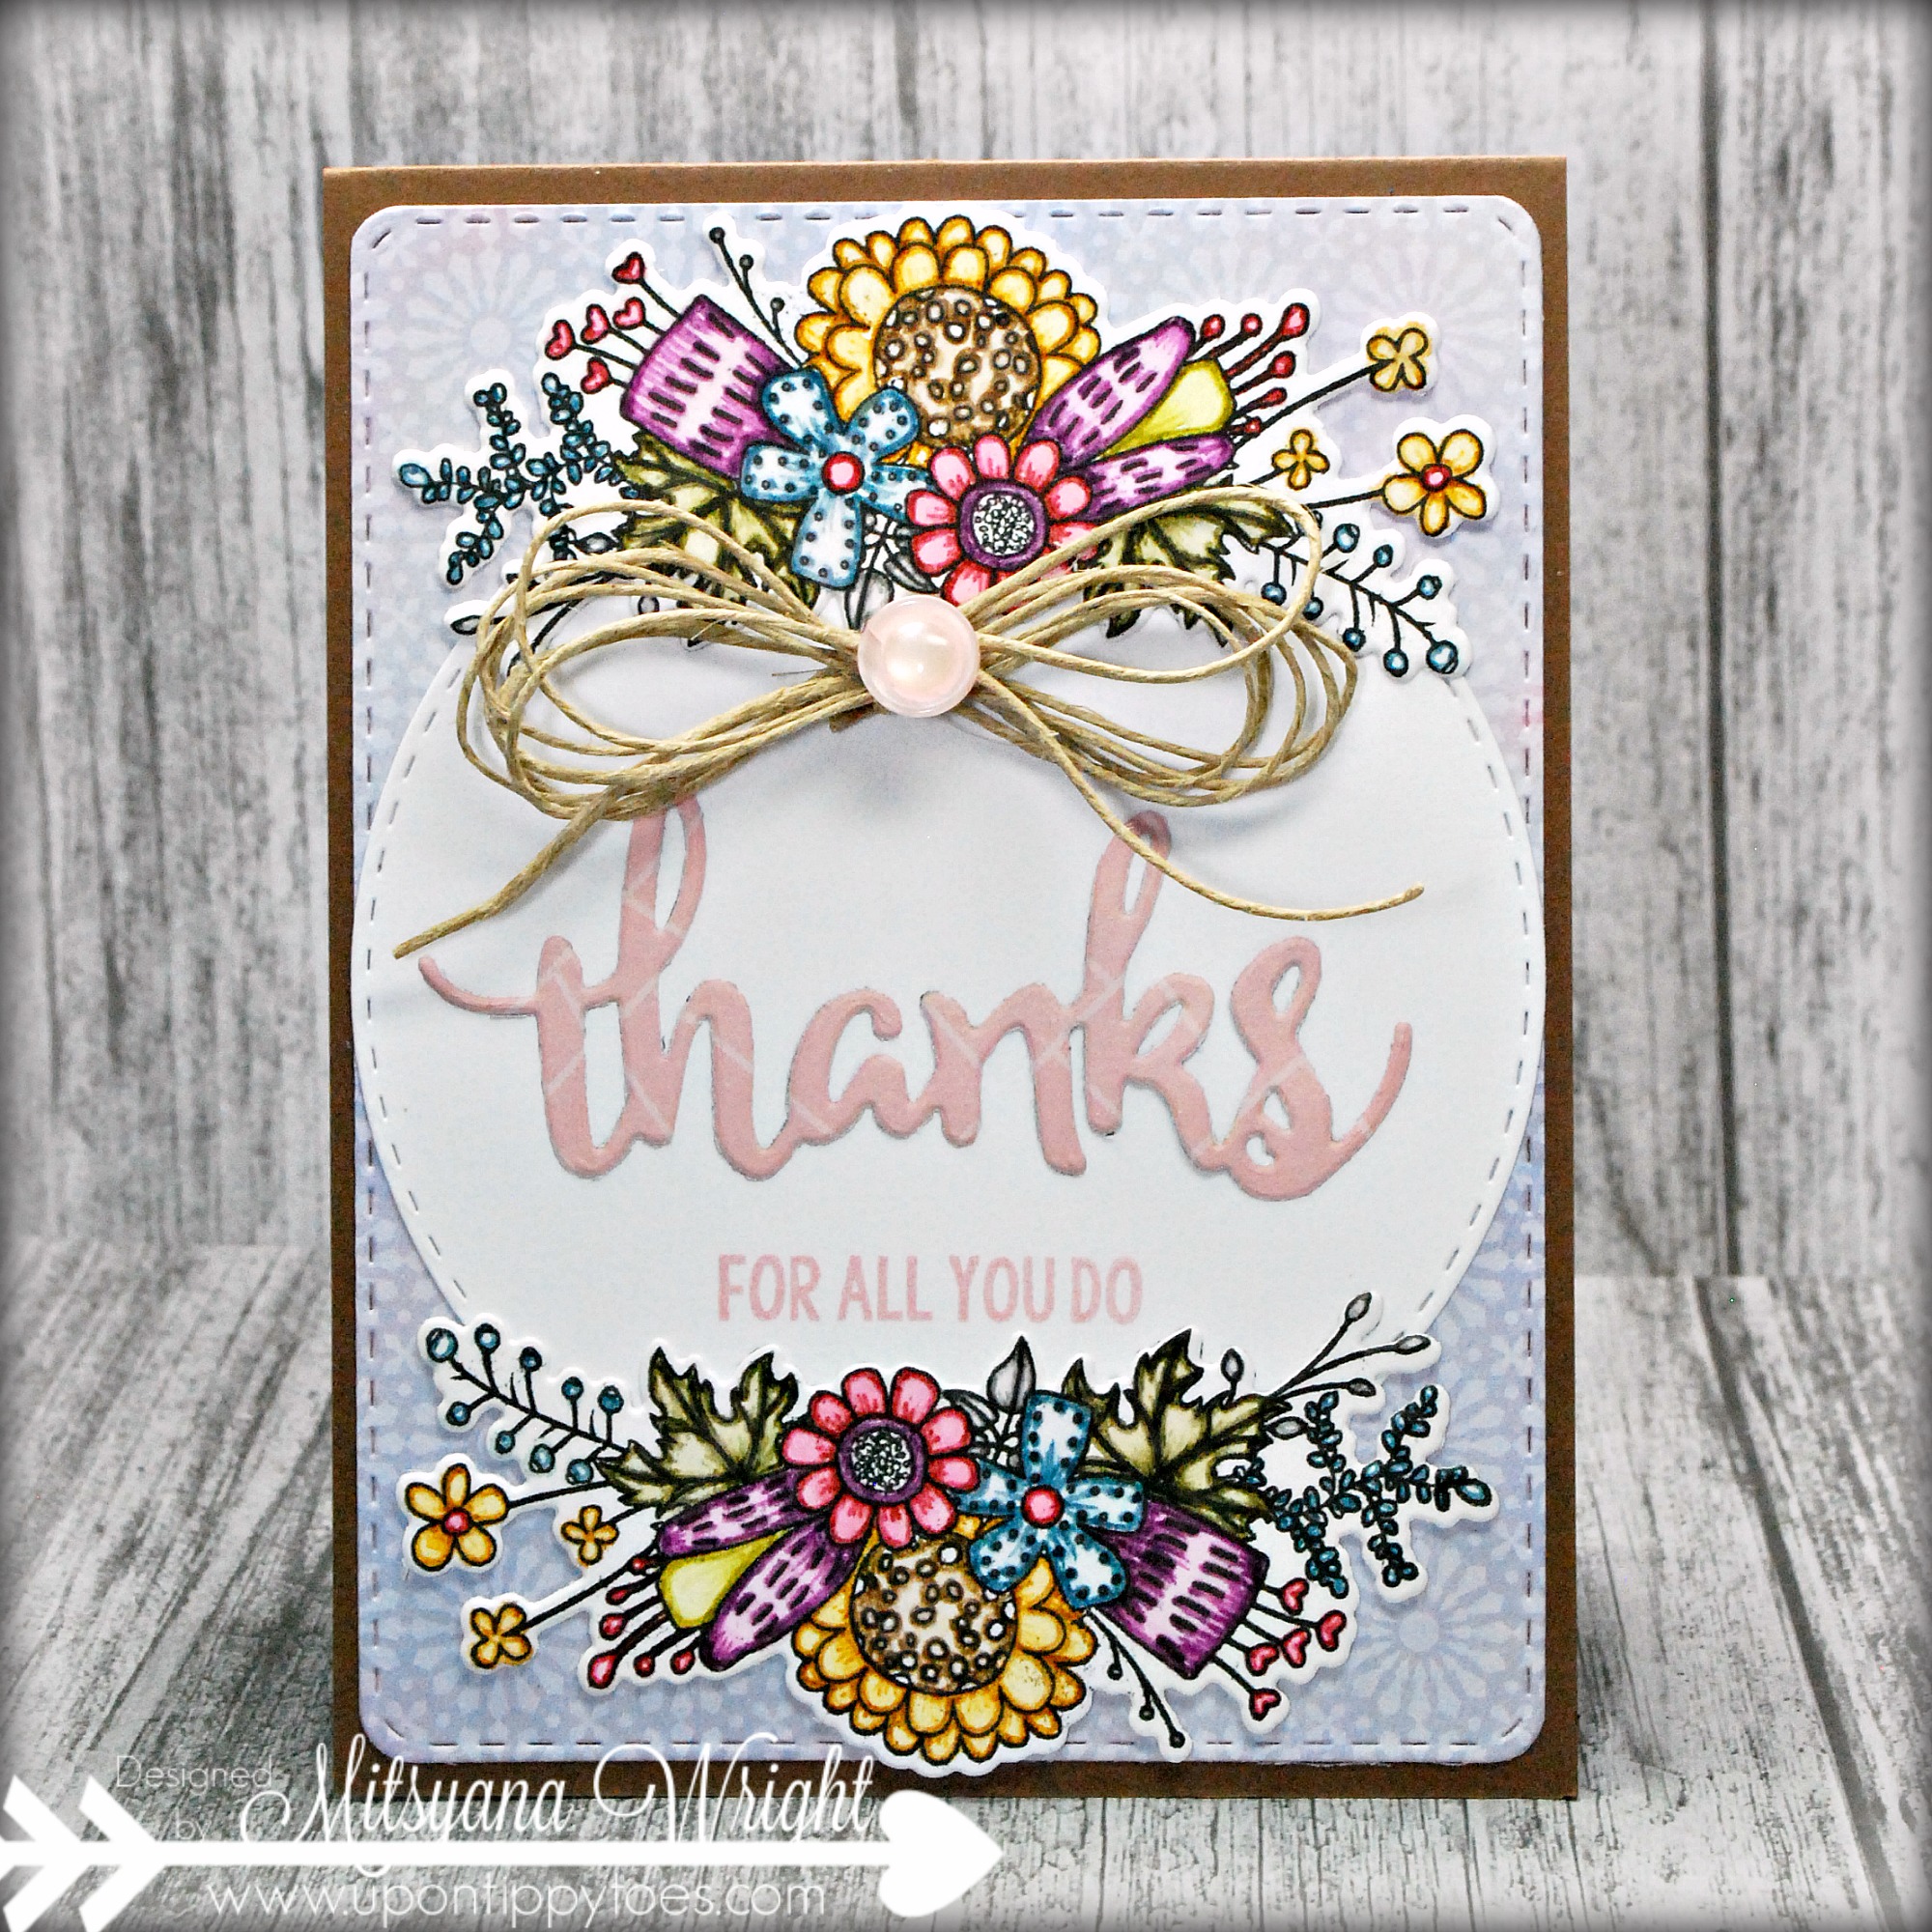
I'm here with Team PINK today to share this gorgeous wildflower card I made with Pink and Main's NEW Fall Bouquets stamp set.


Even though this set is originally supposed to be a fall themed set, just simply coloring the image with bright colors will make this stamp set into a cheerful everyday set.

I used the following Pink and Main Products to create the beautiful card above...


I stamped my image onto 140 lb mixed media paper with black archival ink then colored it with water color markers and blended out with a water brush.

Once my images were completely dried, I simply die cut the images with the coordinating dies.


I used the Stitched Rounded Rectangle dies to cut a card mat from patterned paper and mounted it onto an A2 sized card base.

Then, die-cut a circle from white cardstock using the Stitched Circles die. I attached to the center of the card front and arranged the die-cut colored images on the upper and lower regions of the circle.


I die-cut the word thanks from light pink Patterned paper and adhered it to the center of the circle.

Then, stamped the phrase "FOR ALL YOU DO" in pink chalk ink.
For a finishing touch, I added a multi-looped bow made from hemp twine topped with a shiny pink button.

Other Supplies Used
 Patterned Paper- Peri & Peach Stack (DCWV)
Brown Cardstock
140lb Mixed Media Paper (Strathmore)
Mega Runner (Xyron)
VersaMagic- Pink Petunia (Imagine Crafts/ Tsukineko)
 VersaFine- Onyx Black (Imagine Crafts/ Tsukineko)
Twine
button


And here is my finished card...

A very simple yet beautiful card. A great way to say "THANKS" to just about anyone!

A great way to say "THANKS" to just about anyone!
Hope you enjoyed my card for today!


***Disclaimer***
This blog is compensated to provide opinion on products, services, websites and various other topics. Even though the owner(s) of this blog receives compensation for our posts or advertisements, I always give my honest opinions, findings, beliefs, or experiences on those topics or products.
The views and opinions expressed on this blog are purely my own. Any product claim, statistic, quote or other representation about a product or service should be verified with each manufacturer, provider, or party in question.

This blog may contain affiliate links, making a purchase through these links helps fund this blog at no additional cost to you.