Showing posts with label Creative Station. Show all posts

Thursday, December 23, 2021

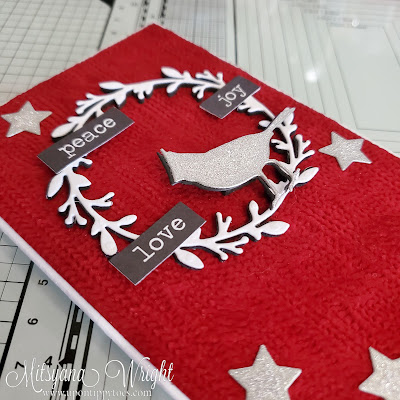
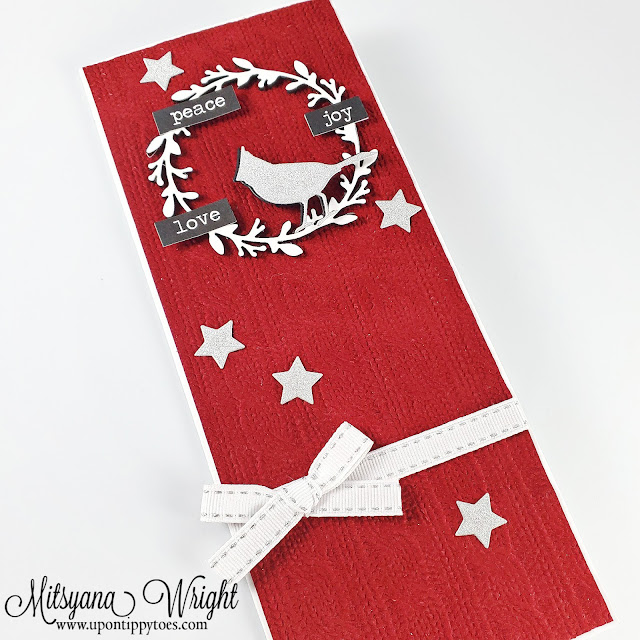
Christmas Sweater Slimline Card

Hello Crafty Friends!

Today, I'm sharing a festive card that  LOOKS & FEELS like a warm knit Christmas sweater! These are so quick and easy to make so if you are a last-minute kind of guy or gal (like me), you could easily crank these babies out in no time flat.

**Disclaimer**

This website uses affiliate links. A small percentage of sales made through these links goes toward supporting this blog at no additional cost to you.


Supplies Used

Creative Station (Xyron)

Big Shot Foldaway (Sizzix)

Eileen Hull 3D Textured Impressions Embossing Folder- Sweater (Sizzix)

Eileen Hull Wreath & Snowflake Dies (Sizzix)

Black Craft Foam (Creatology)

White Cardstock (Accent)

Silver Glitter Cardstock (Recollections)

Red Velvet Paper

Chitchat Stickers 

Paper Trimmer

Stitched Grosgrain Ribbon


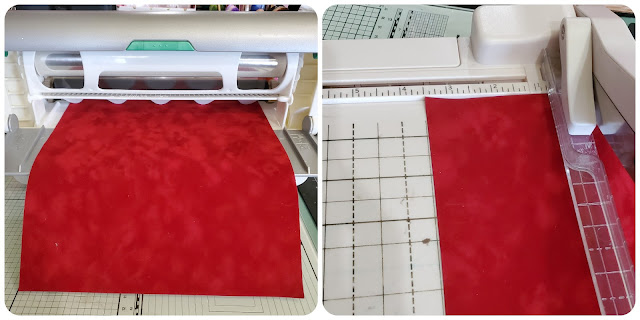
I started a 3-1/2"x 8-1/2" card base made from 110 lb white cardstock. Next, I ran a sheet of Red Velvet Paper through my Xyron Creative Station. Then cut it down to 3-3/8" x 8-3/8".

Before continue I made sure to run all my materials for this card through my Xyron Creative Station. This enables me to create quicker by adding adhesive directly behind all the materials so that once everything is cut all I need to do is peel and stick it all together.

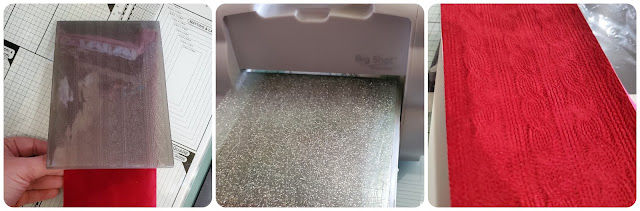
Then I inserted the Red Velvet Paper strip into my  Sizzix Big Shot Foldaway using the Eileen Hull 3D Sweater Embossing Folder. This folder is a standard A2 size. So after embossing one end I embossed it a second time on the other end, carefully lining the embossing up to look like a continuous pattern. 

Keep in mind that this is also a 3D embossing folder so the sandwich for your machine will differ. 


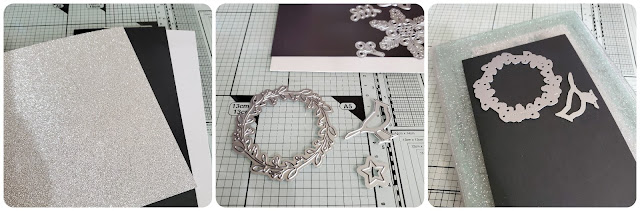
Then I die-cut The bird and stars from glitter cardstock. I also die-cut an additional bird from black craft foam. Then I die-cut the wreath from white cardstock and more black craft foam.

This is where having that adhesive on the backs of my surfaces plays an integral part in my card making...


All I need to do is PEEL & STICK!! Layering those die-cuts is super easy and I don't have to worry about waiting for the liquid adhesive to dry or worry about it spilling over the edges and potentially making a sticky mess!! 


I just added the words Peace, Joy, & Love onto the wreath and then added a line of ribbon and a simple bow, and called it good!!

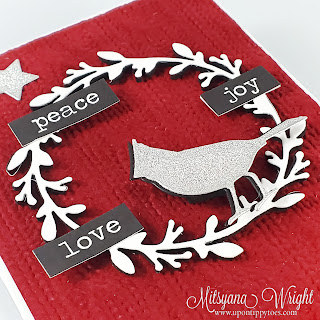
And here is my finished card...


So simple and elegant! 


I love the detail of this sweater embossing folder, it very much LOOKS like it was made from a real knit sweater... and making it from the red velvet paper makes it FEEL like it was too!!

Wednesday, September 15, 2021

Beautiful Winter Wishes Card

Hey, Crafty Friends! I'm back with Team Eileen and today I'll show you how to create this simple and elegant slimline card.

The summer heat is barely dying down but I'm looking forward to cooler weather already. It's still getting into the late 90s here and I would really love it if mother nature blew a few flurries my way! There's just something about snow that is so beautiful and serene. I think that there is something lulling about the way it blankets everything after heavy snowfall. 

So, today, I'll be using Eileen Hull's Wreath & Snowflake die to create this flurry-laced card.


Supplies Used
Eileen Hull Wreath & Snowflake (Sizzix)
Mega Runner (Xyron)
White Cardstock
Red Cardstock
Gold  Glitter Cardstock
Vellum
Gold Foil Stickers (Scrapbook.com)

I started by running a sheet of white cardstock through my Xyron Creative Station. 

Then, I used the Snowflake die from the Wreath & Snowflake die set to die cut about 7 or 8 snowflakes.


I cut a piece of red cardstock down to measure 
3-1/2" × 8.-1/2" and adhered my snowflakes onto the front. 


I spread the snowflakes out along the card front until I was happy with the way it looked. Then, I trimmed off any overhanging pieces.


I used the star included in the Wreath & Snowflake set to die cut 6 stars from gold cardstock. Then adhere them in between the snowflakes.


Using my Xyron Mega Runner, I mounted my card front onto a 3-5/8"x 8-5/8" piece of gold cardstock. Then attached it to a white 9" x 4" slimline card base.

I cut a 1-1/2" strip of vellum and laid it across my card at a diagonal and attached the sides around the back so the adhesive was not visible. Then I used gold foil stickers to spell out the word WINTER across the vellum. Lastly, I word from Tim Holtz's Big Chat sticker stack to complete my card sentiment.

And here is my finished card...


I love how this card turned out!

Even though there were a few steps, it came together pretty quickly.


I hope you enjoyed my card for today! 
Thanks so much for stopping by!

Until next time...
Happy Crafting, Friends!!

For more creative inspiration head on over to my Instagram account where I post even more crafty projects...
www.instagram.com/mitsyana/


Wednesday, August 11, 2021

Loads of Love- Vintage Truck Wobbler Card


Hello, Crafty Friends!! It has been a while since I posted here on my blog but I am so glad to be back and posting for the Eileen Hull Inspiration Team!

Today, I created this fun and adorable slimline card featuring Eileen Hull's New Vintage Truck from Sizxix... with a bonus fun factor, IT WOBBLES!!
Supplies Used
Eileen Hull Vintage Truck Box (Sizzix)
Eileen Hull Grass #660326 (Sizzix)
Mat Board (Sizzix)
Action Wobbles (Hampton Arts)
Heart Punch (EK Success)
Sentiment Stamps (Diamond Press)
Distress Oxide Inks- Black Soot, Mowed Lawn, Lucky CloverCandied Apple (Ranger Ink)
Paper- Blue, Teal Gingham, Pink (Kingston Crafts)
Versamark (Tsukineko/ Imagine Crafts)
White Embossing Powder (Imagine Crafts)
Heat Embossing Tool
White Cardstock (Accent)
Black Cardstock (Recollections)
Light and Dark Green Cardstock (Recollections)
Silver Foiled Cardstock (Grafix)


 This Vintage Truck Die is a ScoreBoards die, and like most of Eileen's dies are meant to cut an array of thicker materials. Which makes it much more versatile. This die was designed to create a box but I'm going to use it without the box feature and use it to create a slimline card instead.

The Truck section of the die measure around 7"×3-1/2", this was not an exact measurement. I cut a 7" piece of Mat Board to accommodate,  allowing a little wiggle room off all sides for shifting when I die cut it through my Big Shot machine. 


I also cut a piece of blue navy blue Kingston Craft paper to 7"×5". I ran the paper through my Xyron Creative Station with permanent adhesive and adhered it onto the piece of Mat Board. 


Next, I cut off a 7" × 3-1/2" portion and placed it over the main Truck portion of the die. Then I used the remaining piece of Mat Board to die-cut the fender pieces. I also Die cut the tires from black cardstock and the hubcaps from silver foiled cardstock.


I inked all my Truck pieces with Black Soot Distress Oxide Ink to make all the edges of the pieces stand out.


 I ran my Fender & Wheel pieces through my Xyron 3" sticker maker. Turning my die-cut pieces into stickers makes for quick and easy placement with absolutely NO drying time. Then I just peeled and stuck all the pieces in place and set my truck to the side.


I used my Eileen Hull Grass Die ( I'm so sad that this one was discontinued-sorry) to die cut 2 pieces each of dark and light green cardstock. I inked the edges of the grass with Lucky Clover & Black Soot Distress Oxide Inks and set my grass to the side while I worked on my slimline card base.


The card base itself is a 9"x8" piece of white cardstock scored and folded in half lengthwise to create a 9"x 4" card. 

I cut a mat for the card base measuring 8-3/4"x3-3/4" piece of navy blue Kingston Craft paper. Then cut an 8-1/2"x3-1/2" piece of teal and white gingham paper to mat that one. But before attaching it, I adhered the die-cut pieces of grass and trimmed off any overhang.


Then used my Xyron Tape Runner to adhere the panels onto my card base.


Next, I used more light green and dark green cardstock to die-cut pine trees. I cut out 4 of each color and inked them with Mowed Lawn and Black Soot Distress Oxide Inks. Then attached them onto my card front hiding the tree stumps behind the grass.


I punched out a couple hearts from pink Kingston Crafts paper using an EK Success Heart Punch. It's an old favorite and I'm not sure if it is even produced anymore. But you can substitute whatever heart die you have laying around. 

I inked the edges of my hearts with 
Candied Apple Distress Oxide Ink and then stamped them my Diamond Press "Wishing you loads of LOVE" sentiment using Versmark ink. I sprinkled white embossing powder over the top and then heat set it.

I attached the heart on top of the truck bed.

Then attached an action wobble spring to the back. I first found the center of my die-cut, an area that would be "balance" my truck without tipping or leaning more towards one side, then traced around the wobble spring for exact placement before attaching it.


Once I was happy with the placement, I attached it to my truck and then attached the truck onto my card.

And here is my finished card...


Check it out in action!!

How FUN & CUTE is this??!!


I hope you enjoyed my quick tutorial! I hope to be posting more fun tutorials so be sure to come back soon!

Thanks for stopping by!

And until next time...
HAPPY CRAFTING!!
~Mitsyana 


Thursday, April 15, 2021

IAR April 2021 Blog Challenge

Hey, Friends!! It's that time again! It's time for another I Am Roses Blog Challenge!
If you don't already know... Every 15th of the month, I Am Roses holds a Blog Challenge. To enter, all you have to do is create a project using I Am Roses products and link them up onto their blog. The winners of the challenge will receive gift vouchers to the I Am Roses website. More details are available on the IAR Blog.

Here is what I created for this month's challenge...


I Am Roses Products Used

Other Products Used
Sending Hugs Die Set (Diamond Press)
Faith-Based Foliage Dies- Berries (Diamond Press)
110 lb Cardstock- Greens, Cream (Recollections)
Shimmer Cardstock- Purple (DCWV)
Quik Grip Glue
Craft Foam

These deep purple (mauve) Indian Jasmine Rose are what really inspired this card. The darker hue really caught my eye and I built this card around those particular flowers. Usually, when creating, I build my project around the biggest flower... but not this time. This time I focused on the smaller deeper colored flowers and went through my stash to find the perfect accompaniment to them.


Even though it is smaller in stature, these Mauve Indian Jasmine Roses have a much bigger impact compared to the much larger Lavendar Sweet Moon Roses. Depth and richness of color will do that when laid alongside softer and more muted colors.


I added sprinkles of natural-white Achillea Cottage Flowers for balance and they actually pop from their lack of color since it's such a stark contrast.

Then, I kept my wired stems, created spiraled accents, and tucked them in between the flowers to act as a filler.


It looks like a little garden and I couldn't be happier with my results!


I hope you really enjoyed my Blog Challenge creation!!

Don't forget to head over to the I Am Roses Blog for more details on how to enter this month's challenge and to see what the rest of the team created!!

Until next time...
HAPPY CRAFTING!
~Mitsyana


Monday, March 15, 2021

IAR Monthly Challenge - You Are Loved Card

Hello Crafty Friends! 
It's March 15th and time for another I Am Rosses Blog Challenge!!

If you are unfamiliar with the IAR Blog Challenge,  Every month, on the 15th, there is a new Blog Challenge. Create a project using I Am Roses products and link your project to their blog by the end of the month and winners will be chosen to win some amazing prizes. I recommend you head on over to their blog to check it out!! There you will see inspiration from the I Am Roses Design Team and what other creators such as yourself are making.

For more info or to participate and link your project, go to the I am Roses Challenge Blog.

Here is what I created for this month's Challenge...


IAR Supplies Used


Other Supplies Used
Big Shot Foldaway  (Sizzix)
Eileen Hull Mandala Die (Sizzix)
Rejoice Sentiment Dies- You are Loved (Diamond Press)
Mega Runner (Xyron)
Patterned Paper  (Kingston Crafts)
110 lb White Cardstock
Blending Tool, Mini Ink Blending Tool (Ranger)
Heart Rhinestones (Buttons Galore)
Clear Drying Liquid Glue

I started by building my card base from a 5 1/2" x 11" piece of 110 lb white cardstock folded in half to create a 5 1/2" squared card. Then attached a 5 1/4" piece of Kingston Crafts' teal and white polka dot patterned paper using my Xyron Mega Runner.


To create the intricate doily, I ran more white cardstock through my Creative Station machine and die-cut it using my Eileen Hull Mandala Die through a Big Shot Foldaway machine. Because this is a very intricate die, I substituted one cutting plate for a chrome precision plate to ensure that it would cut out each tiny detail. Then poked out all the tiny tidbits with ease with the help of my die brush tool.


I created a simple shadow for my doily by placing my mandala die flat onto a piece of pink paper, also from Kingston Crafts, and tracing out its silhouette. Then cut it out by hand with a scissor.

I adhered the mandala die-cut on top and inked around the edges using Picked Raspberry Distress Oxide Ink and a mini blender tool then attached it to my card base.


Finally, I can start building up those beautiful flowers...

I usually start with the biggest which is the Pink Belinda's Dream Rose. This one I wanted in the center of the arrangement.

Then I surrounded the big rose with a bundle of three Pink Variegated Cherry Blossoms on each side.


Next, I tucked in Pale Green Leaves. I used a total of six.

Then I tucked in draped small Hot Pink Variegated Rose Buds. I used a total of ten of them. You will see all of them in the final card pictures.


I planned on sending this card to a dear friend of mine who is going through a difficult time so I wanted the sentiment big and heartfelt. So I chose this sentiment that says "You are Loved" and die cut the background from vellum and the words itself from more white cardstock. 

Then to blended on more Picked Raspberry ink onto the die-cut to tie it onto the card better.


Lastly. I used these tiny heart-shaped rhinestones and attached them by sticking them onto my mega runner and peeling them up. It applied instant adhesive to the backs of my rhinestones without having to wait for any glue to dry. Then I simply added the gems to my card.


And here is my finished card...


I hope you enjoyed today's project and are inspired to create something beautiful of your own!

Don't forget to head on over to the I am Roses Challenge Blog for more inspiration 
OR
To enter and link up your projects!!

Thanks for stopping by and 
HAPPY CRAFTING!!
~Mitsyana


Thursday, January 28, 2021

DIY Dimensional Sticker Embellishemnts

Hello, my crafty friends!!

I have been getting tons of questions on my social media in regards to how I create my 3D embellishments. How do I make my die-cuts look so dimensional? Here is my quick answer... with craft foam and my handy-dandy Xyron Creative Station !!

Today, I will show you how you can create 3D Stickers with the dies you have!! Follow along with me as I use this technique to create this gorgeous Mandala Zendoodle Card!


Supplies Used
Mega Runner (Xyron)
Eileen Hull Mandala Die (Sizzix)
Eileen Hull Folio Page, Pocket & Flowers (Sizzix)
Blending Tool, Mini Ink Blending Tool (Ranger)
Craft Foam
110 lb Black Cardstock
110 lb White Cardstock
Cutterbee Scissors (EK Success)
Paper Trimmer (Swingline)
White Gel Pen
Pencil


I started by making a background for my Mandala... this die is very intricate so I wanted to give it a little bit of heft, ground it, and draw the eye directly to the Mandala and make it the focal point(s).

So, I used the Mandala Die as a stencil and traced around the die with a pencil onto white cardstock.
Then hand cut out the traced image using my scissors.


I blended Distress Oxide inks in Mermaid LagoonWilted Violet, and Picked Raspberry in kind of a "bullseye" pattern, overlapping each color slightly.


Now, here is where the fun and magic begin...

To make my die-cuts 3D, I first run my cardstock through my Creative Station and die-cut it with my Mandala die.


Then, I run my craft foam through my Creative Station and die cut the same Mandala from the foam.


Now, I have a Mandala from both cardstock and foam... and layer the cardstock onto the craft foam!

Then, I adhered that onto the inked background.

I wanted to create a slimline card and decided to distribute the Mandala across the card by cutting it in half.


Then attached the split pieces diagonally across the card front. I could have run my background Mandala through my Creative Station but the thought totally slipped my mind. So, I ended up just running my Xyron Mega Runner across the back instead.

Wow, these really pop off the card!


Even though the die-cuts were absolutely gorgeous "As-Is', I wasn't feeling all the blank space. 
So, I took a white gel pen and Zendoodled throughout the blank spaces...

I hand drew a simple striped border. Then outlined each mandala half and added a scalloped border.


I drew arches that I filled with more arches. And even used a leaf die from Eileen Hull's Folio Page, Pocket & Flowers set as a stencil to add leaves.

Then, I filled in some of my patterns for a bolder look and added little polka dots into the remaining blank spaces.


I made a simple sentiment for my card using word stickers from Tim Holtz's Big Chat stack and inked them using more Distress Oxide Inks in Mermaid Lagoon and Wilted Violet.

I adhere the words onto a 1/4" strip of black cardstock. 


But I didn't want these to be flat and wanted them to be dimensional too, so I added - you got it- more craft foam behind the words to make them pop up!


And here is my finished card...


Look at how much dimension there is! I angled my card for better viewing...


And even though this card is pretty thick it does not weigh very much. Using craft foam doesn't just make it dimensional, it also makes the die-cut embellishments very lightweight too!


I hope you liked this technique!! For more inspiration, here are a few other cards I created using this same technique using Craft Foam in my Creative Station...


As you can see, this technique is a real game-changer that can transform your cards from flat and boring to dimensional and STUNNING!!

That's it for today!! Thanks for stopping by and I hope to see you again soon!!

Until then...
    HAPPY CRAFTING!!
~Mitsyana