Showing posts with label christmas cards. Show all posts

Thursday, December 23, 2021

Christmas Sweater Slimline Card

Hello Crafty Friends!

Today, I'm sharing a festive card that  LOOKS & FEELS like a warm knit Christmas sweater! These are so quick and easy to make so if you are a last-minute kind of guy or gal (like me), you could easily crank these babies out in no time flat.

**Disclaimer**

This website uses affiliate links. A small percentage of sales made through these links goes toward supporting this blog at no additional cost to you.


Supplies Used

Creative Station (Xyron)

Big Shot Foldaway (Sizzix)

Eileen Hull 3D Textured Impressions Embossing Folder- Sweater (Sizzix)

Eileen Hull Wreath & Snowflake Dies (Sizzix)

Black Craft Foam (Creatology)

White Cardstock (Accent)

Silver Glitter Cardstock (Recollections)

Red Velvet Paper

Chitchat Stickers 

Paper Trimmer

Stitched Grosgrain Ribbon


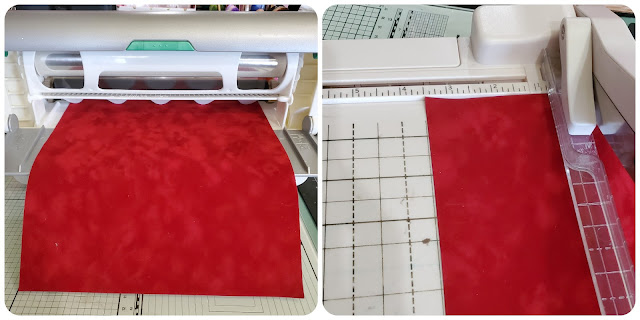
I started a 3-1/2"x 8-1/2" card base made from 110 lb white cardstock. Next, I ran a sheet of Red Velvet Paper through my Xyron Creative Station. Then cut it down to 3-3/8" x 8-3/8".

Before continue I made sure to run all my materials for this card through my Xyron Creative Station. This enables me to create quicker by adding adhesive directly behind all the materials so that once everything is cut all I need to do is peel and stick it all together.

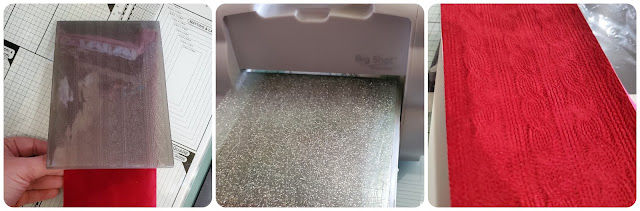
Then I inserted the Red Velvet Paper strip into my  Sizzix Big Shot Foldaway using the Eileen Hull 3D Sweater Embossing Folder. This folder is a standard A2 size. So after embossing one end I embossed it a second time on the other end, carefully lining the embossing up to look like a continuous pattern. 

Keep in mind that this is also a 3D embossing folder so the sandwich for your machine will differ. 


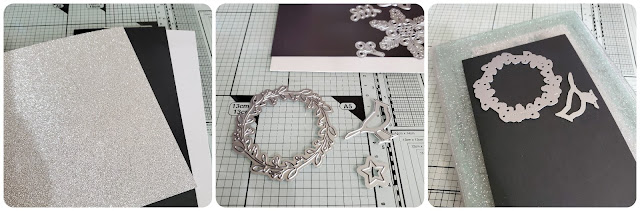
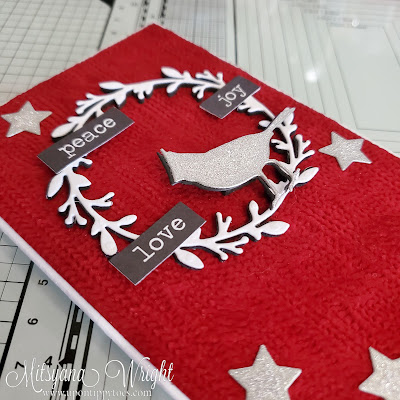
Then I die-cut The bird and stars from glitter cardstock. I also die-cut an additional bird from black craft foam. Then I die-cut the wreath from white cardstock and more black craft foam.

This is where having that adhesive on the backs of my surfaces plays an integral part in my card making...


All I need to do is PEEL & STICK!! Layering those die-cuts is super easy and I don't have to worry about waiting for the liquid adhesive to dry or worry about it spilling over the edges and potentially making a sticky mess!! 


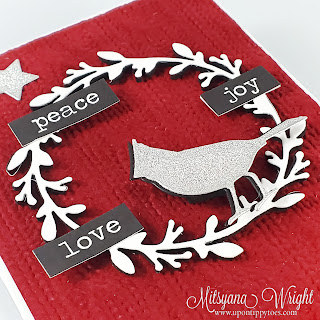
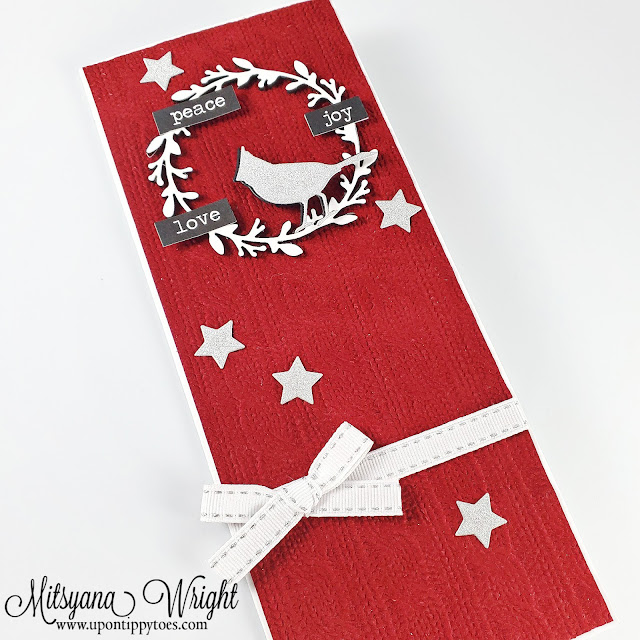
I just added the words Peace, Joy, & Love onto the wreath and then added a line of ribbon and a simple bow, and called it good!!

And here is my finished card...


So simple and elegant! 


I love the detail of this sweater embossing folder, it very much LOOKS like it was made from a real knit sweater... and making it from the red velvet paper makes it FEEL like it was too!!

Wednesday, December 15, 2021

Gnome For The Holidays Blog Hop


WELCOME to the I Am Roses "Gnome for the Holidays" Blog Hop!

Season's Greetings from all of us at I AM ROSES! There will be no IAR Challenge this month but we have a festive blog hop for you. We'd like to THANK YOU from the bottom of our hearts for all your support this year. There will be TWO Prizes up for grabs!
 
(2) $50 Voucher


Sit down and relax with a warm hot cocoa or the holiday drink of your choice.


Here’s how to play:


Hop along to each of the Designers’ blogs and be sure to comment on their individual IAR Blog Hop Post


  • There are 2 HIDDEN BLOG CANDY PRIZES up for grabs spread throughout our  Designers’ blogs!

  • Be sure to Subscribe/Follow the I Am Roses Challenge Blog

  • Commenting along the way highly increases your chance of winning a Prize Voucher.

  • Comments will be CLOSED on 11:59pm PST on December 21st (This blog hop has a duration of one week)

  • We will be randomly selecting 2 winners from the comments made on our Designers' blogs and will announce the winners here on the I Am Roses Challenge Blog on January 1st!

Let's get this hop started!
 
(*November Challenge Winners will be posted tomorrow on the 16th)


And now it's time for some holiday inspiration... Here is the card I created for this month's Blog Hop!


Here are all the different I Am Roses Flowers I used...


And here are close-up views of my card...


I am Roses Products Used

Other Products Used
Santa Claus Paper- (Authentique)
Red Polka-Dot Paper
White Cardstock
Scalloped Background Die (Diamond Press)
Mega Runner (Xyron)

Don't forget to visit my crafty design team sisters!!

 
Enjoy the hop! Please come back here and comment that you finished!

 GOOD LUCK!!


Wednesday, September 15, 2021

Beautiful Winter Wishes Card

Hey, Crafty Friends! I'm back with Team Eileen and today I'll show you how to create this simple and elegant slimline card.

The summer heat is barely dying down but I'm looking forward to cooler weather already. It's still getting into the late 90s here and I would really love it if mother nature blew a few flurries my way! There's just something about snow that is so beautiful and serene. I think that there is something lulling about the way it blankets everything after heavy snowfall. 

So, today, I'll be using Eileen Hull's Wreath & Snowflake die to create this flurry-laced card.


Supplies Used
Eileen Hull Wreath & Snowflake (Sizzix)
Mega Runner (Xyron)
White Cardstock
Red Cardstock
Gold  Glitter Cardstock
Vellum
Gold Foil Stickers (Scrapbook.com)

I started by running a sheet of white cardstock through my Xyron Creative Station. 

Then, I used the Snowflake die from the Wreath & Snowflake die set to die cut about 7 or 8 snowflakes.


I cut a piece of red cardstock down to measure 
3-1/2" × 8.-1/2" and adhered my snowflakes onto the front. 


I spread the snowflakes out along the card front until I was happy with the way it looked. Then, I trimmed off any overhanging pieces.


I used the star included in the Wreath & Snowflake set to die cut 6 stars from gold cardstock. Then adhere them in between the snowflakes.


Using my Xyron Mega Runner, I mounted my card front onto a 3-5/8"x 8-5/8" piece of gold cardstock. Then attached it to a white 9" x 4" slimline card base.

I cut a 1-1/2" strip of vellum and laid it across my card at a diagonal and attached the sides around the back so the adhesive was not visible. Then I used gold foil stickers to spell out the word WINTER across the vellum. Lastly, I word from Tim Holtz's Big Chat sticker stack to complete my card sentiment.

And here is my finished card...


I love how this card turned out!

Even though there were a few steps, it came together pretty quickly.


I hope you enjoyed my card for today! 
Thanks so much for stopping by!

Until next time...
Happy Crafting, Friends!!

For more creative inspiration head on over to my Instagram account where I post even more crafty projects...
www.instagram.com/mitsyana/


Wednesday, November 11, 2020

Tea Cup Christmas- Santa Paws Card

Hey, Crafty Friends... It's been a while but I'm back with the Eileen Hull Inspiration Team!
Christmas is inching closer and it's time to get into Christmas card making mode!! Here's a card for those pet lovers out there! These little teacup cuties are sure to put a smile on anyone's face!


Supplies Used
Eileen Hull 3D Teacup & Spoon (Sizzix)
Jen Long Snowflake Wreath- Snowflake (Sizzix)
Christmas Greetings (Authentique)
PITT Artist Pen (Faber-Castell)
Distress Oxide Ink- Black Soot (Ranger Ink)
110 lb White Cardstock
Glitter Cardstock- Gold
Chipboard
Foam Adhesive
CutterBee Scissors (EK Sucess)
Craft Knife

For today's card, I will be using Eileen Hull's new 3D Teacup & Spoon Die along with festive papers from Authentique's Christmas Greetings Collection.

I started by cutting my patterned papers and chipboard into 4"x 6" pieces. I'll be making a stack of three cups so I'll need 3 pieces of each.

Then, I ran my patterned paper through my Xyron Create-A-Sticker machine to adhesive onto the backs of each of the papers. I peeled them from the film then attached them onto the chipboard pieces.


After I mounted each piece, I die cut the chipboard using Eileen Hull's 3D Teacup die. I only needed the teacups so I didn't need to cover the entire die, just the teacup portion, making sure to place it over the die with the patterned paper side DOWN.

To get the handle to appear on the opposite side of the cup. I placed the chipboard with the patterned paper face side UP.


This way, when I stack my cups, it will stagger... Handle- No Handle- Handle.

But before stacking my cups, I wanted to give the illusion of three-dimensional cups that could actually be filled. So, I used another cup and flipped it over to trace a line with a Faber-Castell PITT Artist Pen. Which gave my cups a lip. Then I outlined the cups with the same pen to make the lines consistent throughout all the cups.

Next, I took a craft knife and made a slit right above the "lip". I did not cut this lip completely across, but just enough so another cup can nestle inside.


Then, I fussy cut this cute kitten and puppy from one of my sheets of paper. Authentique's Christmas Greeting Collection has an entire sheet of just puppies and kittens and like sentiments. I found these little guys and they were the perfect sizes for my teacups!


For my card base, I created a 5"x7" card base from white cardstock and matted it with gold glitter paper and a red polka-dotted background paper, each piece had a 1/8" difference between them.

Base: 5"x7"
Gold Glitter: 4-7/8"x 6-7/8"
Red Polka-Dot: 4-3/4"x 6-3/4"

I layered and adhered the pieces together using my Xyron Mega Runner.

Side note: 
At the last minute, before adhering the red polka-dotted paper, I inked the edges of it with Black Soot Distress Oxide Ink.


I also inked the edges of all my teacups with the same Black Soot ink. Then, I nestled each cup inside one another and mounted foam adhesive onto the backside.

I attached the stack of cups onto the from of my card. Then I added more foam adhesive onto the backs of my kitten, puppy, and the sentiment, and attached them onto the card front.


For the final touch, I cut out white snowflakes using the snowflake die from Jen Long's Snowflake Wreath Stamp & Die set and staggered them throughout the background.

And here is my finished card...


How adorable are these little guys!!


This card is perfect for any pet lover in your life or even for your family vet!


I hope you enjoyed today's tutorial and you are inspired to use your Eileen Hull Teacup die in a new way!

Thank you so much for stopping by!

Until Next Time...
   HAPPY CRAFTING!!
~Mitsyana


Monday, December 16, 2019

Star Filled Sky Christmas


Hey, Crafty Friends!!
I back again with another adorable card for Team Xyron! 
Today I'll show you how to create a dimensional star-filled sky using my Xyron Mega Runner!


Supplies Used
Crossover II (Crafter's Edge)
Beary Christmas Stamp Set (Maker's Movement)
Beary Christmas Die Set (Maker's Movement)
VersaFine Onyx Black Ink (Tsukineko/ Imagine Crafts)
140 lb Mixed Media Paper
Cardstock- White, Kraft
Tim Holtz Distress Oxide Ink - Salty Ocean (Ranger Ink)
Tim Holtz Distress Oxide Ink - Blueprint Sketch (Ranger Ink)
Life Changing Blender Brushes (Picket Fence Studios)
Starry Sky Sparkletz (Buttons Galore)
Watercolor Pencils (Derwent Academy)
Water Soluble Markers (Derwent Academy)
MISTI (My Sweet Petunia)
White Gel Pen (Sakura)


For those of you who have been following me for a while, you know that I love to color. I am by no means a professional colorist. Nor do I pretend to know what I'm doing. If I love the results of my coloring then that's all that really matters to me. And if others like my results, that's just extra, I'll take that as a pat on my back too.

A lot of times when I color I tend to stamp several images at once and color them all. Sometimes I use all the images and sometimes I don't. 

I've been coloring a lot of these bears lately. They are just too cute and I became absolutely addicted! And I have made several cards already with this awesome set. But I found that I had an extra bear (that tall guy on the left) leftover that still needed a "home". I didn't want him tossed on the side to get lost or even *GASP* thrown out! So, what else was I to do but to make a new card?


I started with the background. For this project, it became the most important feature. I blended shades of Salty Ocean and Blueprint Sketch onto a 4" x 5 1/4" piece of white cardstock using my Life Changing Blender Brushes.

 I took a mini water-filled spritzing bottle and unscrewed the cap and flicked on drops of water over the ink shaded areas. Then, I blotted the excess water using a clean and dry paper towel.

The reactive "bleached" out effects of the water are stunning! This technique always gives me so much joy!


But... that was just the beginning of my star-filled sky! For dimension and a whole lot of bling, I wanted to fill that blue sky with literal stars!!

I hate the messy process of wet glue. the sliding around, smeared glue, possibly ruining my ink job and the ever horribly time-consuming/ soul-sucking DRYING TIME. I absolutely loathe waiting for things to dry!!

Thank goodness for my Xyron Mega Runner! I simply uncap, face the application point up, and adhere all the tiny things onto the sticky microdot adhesive strip! So easy-peasy! And the best part... ABSOLUTELY NO DRYING TIME!!

Then, I simply attach the stars onto the blue speckled sky starting from the biggest and trickling down to the smallest stars.

Then I attached the background to an A2 (4 1/4" x 5 1/2") card base made from kraft cardstock.


I didn't have any extra houses or trees leftover so I needed to stamp and color a few of those. Then I die cut them with the coordinating dies.


Then I created a little snowy village landscape using the houses and trees. I simply flipped each image over and used my Xyron Mega Runner to apply adhesive and attached them to the card front.

Then I created a sentiment strip and attached it across the bottom of my village with the little bear peeking out holding a gift.


And here is my finished card...


How gorgeous are those stars?!


I hope you enjoyed this quick tutorial and create a starry sky of your own!!

Thanks for stopping by!

Until next time...
HAPPY CRAFTING!!
~Mitsyana


Sunday, December 15, 2019

IAR Season's Greetings Blog Hop - Hello Deerie Card


WELCOME to the I Am Roses "Season's Greetings" Blog Hop!
Season's Greetings from all of us at I AM ROSES! There will be no IAR Challenge this month but we have a fabulous blog hop for you. We'd like to THANK YOU from the bottom of our hearts for all your support this year! There will be THREE Prizes up for grabs!

(2x) $50 Voucher
and
GRAND PRIZE $100 Voucher

Are you ready to win some beautiful I Am Roses flowers?

Here’s how to play:

  • Hop along to each of the Designers’ blogs and be sure to comment on their individual IAR Blog Hop Post
  • There are 3 HIDDEN BLOG CANDY PRIZES up for grabs spread throughout our  Designers’ blogs!
  • Be sure to Subscribe/Follow the I Am Roses Challenge Blog
  • Commenting along the way highly increases your chance of winning a Prize Voucher.
  • Comments will be CLOSED on 11:59pm PST on Saturday, December 21st (This blog hop has a duration of one week)
  • We will be randomly selecting 3 winners from the comments made on our Designers' blogs and will announce the winners here on the I Am Roses Challenge Blog on January 1st!
Let's get this hop started!

Here's the card I created for today's blog hop. Sometimes I feel that Santa gets all the credit and the "little guys" are often overlooked. So, I decided to make his important helpers front & center of this holiday card!


I Am Roses Supplies Used

Other Supplies Used
Big Shot (Sizzix)
Maltese Lace Frame Set (Sharon Callis Craft Designs)
Honey Silk Frame Set (Sharon Callis Craft Designs)
VersaFine Onyx Black Ink (Tsukineko/ Imagine Crafts)
Hello Deerie Stamp Set (Darcie's)
140 lb Mixed Media Paper
Watercolor Pencils (Derwent Academy)
Procolor Pencils (Derwent)
Kraft Cardstock (Recollections)
Green Cardstock (DCWV)
Foam Adhesive
Patterned Paper (Echo Park)
Sprinkletz- Very Cherry (Buttons Galore)

I started with a 5.5" square card base then I layered it with a 5 5/8" x 5 5/8" piece of green cardstock.

I used the outer frame die of the Maltese Lace Die set to cut my poinsettia paper and adhered all the layers together with my Xyron Mega Runner.


Then, I used the larger of the Maltese Frames to die-cut kraft cardstock.

I also die-cut mixed media paper using the inner ornate oval frame from Honey Silk Lace set.


At first, I stamped my reindeer image (from the Darcies Hello Deerie set) into the white oval frame die-cut but then I realized I also wanted to fit the little elf on there and there simply wasn't enough room. So, after I finished coloring him, I fussy cut him out with scissors.

Then I stamped my elf onto more mixed media paper.

I used an assortment of Derwent Academy watercolor and Derwent Procolor markers to color in both images and the little banner.

And hand cut all the images.


I die-cut another oval frame out of white cardstock and attached both the Kraft cardstock frame and the white oval frame onto my card base.

I glued 2 Olive Green May Roses to anchor my corners. These roses are bold in color and size.
Then I surrounded the large May Rose with White Cherry Blossoms & Red Arabian Jasmine Roses.

Then, I added adhesive foam behind my reindeer and elf and attached them to the center of my card.


I added tiny little peppermint accents around the corners opposite to my flowers for a bit of balance.

And here is my finished card...


I thought these two were absolutely adorable... look they're even holding hands! How cute is that?!


I hope you enjoyed my card for today's blog hop and that it inspires you to create some wonderful cards this holiday season!

Don't forget to check out all my wonderfully talented design team sisters over on their blogs...

Check out the full blog hop line-up here:

Happy Hopping!!
~Mitsyana