Showing posts with label 3D Embossing Folders. Show all posts

Thursday, December 23, 2021

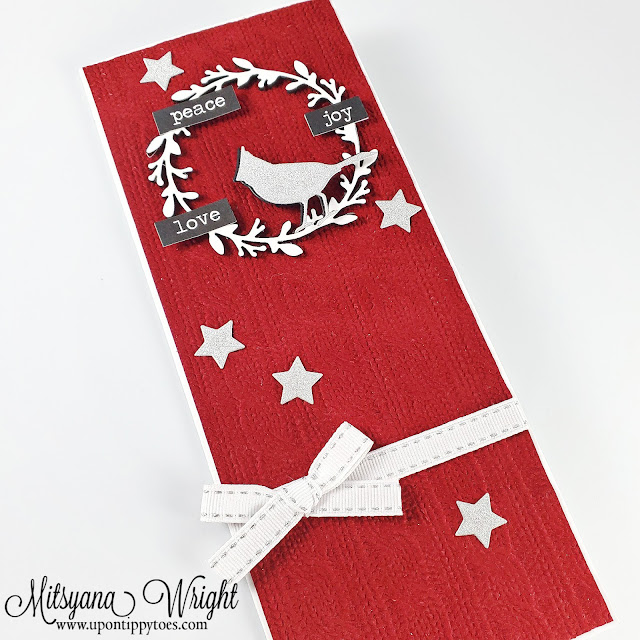
Christmas Sweater Slimline Card

Hello Crafty Friends!

Today, I'm sharing a festive card that  LOOKS & FEELS like a warm knit Christmas sweater! These are so quick and easy to make so if you are a last-minute kind of guy or gal (like me), you could easily crank these babies out in no time flat.

**Disclaimer**

This website uses affiliate links. A small percentage of sales made through these links goes toward supporting this blog at no additional cost to you.


Supplies Used

Creative Station (Xyron)

Big Shot Foldaway (Sizzix)

Eileen Hull 3D Textured Impressions Embossing Folder- Sweater (Sizzix)

Eileen Hull Wreath & Snowflake Dies (Sizzix)

Black Craft Foam (Creatology)

White Cardstock (Accent)

Silver Glitter Cardstock (Recollections)

Red Velvet Paper

Chitchat Stickers 

Paper Trimmer

Stitched Grosgrain Ribbon


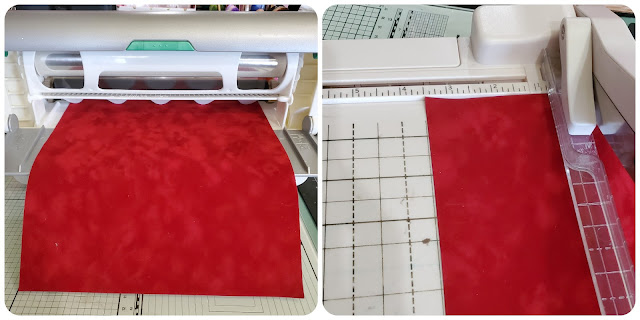
I started a 3-1/2"x 8-1/2" card base made from 110 lb white cardstock. Next, I ran a sheet of Red Velvet Paper through my Xyron Creative Station. Then cut it down to 3-3/8" x 8-3/8".

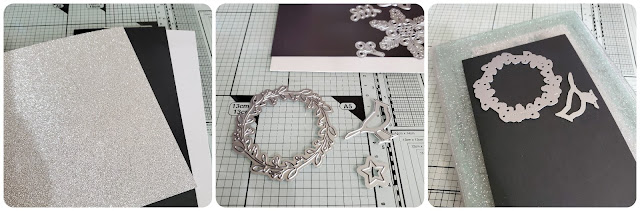
Before continue I made sure to run all my materials for this card through my Xyron Creative Station. This enables me to create quicker by adding adhesive directly behind all the materials so that once everything is cut all I need to do is peel and stick it all together.

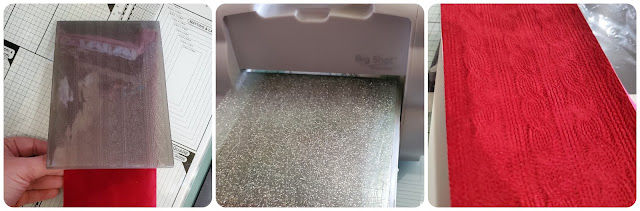
Then I inserted the Red Velvet Paper strip into my  Sizzix Big Shot Foldaway using the Eileen Hull 3D Sweater Embossing Folder. This folder is a standard A2 size. So after embossing one end I embossed it a second time on the other end, carefully lining the embossing up to look like a continuous pattern. 

Keep in mind that this is also a 3D embossing folder so the sandwich for your machine will differ. 


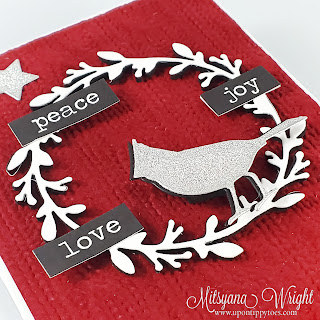
Then I die-cut The bird and stars from glitter cardstock. I also die-cut an additional bird from black craft foam. Then I die-cut the wreath from white cardstock and more black craft foam.

This is where having that adhesive on the backs of my surfaces plays an integral part in my card making...


All I need to do is PEEL & STICK!! Layering those die-cuts is super easy and I don't have to worry about waiting for the liquid adhesive to dry or worry about it spilling over the edges and potentially making a sticky mess!! 


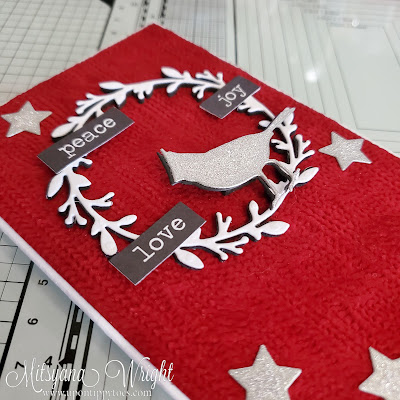
I just added the words Peace, Joy, & Love onto the wreath and then added a line of ribbon and a simple bow, and called it good!!

And here is my finished card...


So simple and elegant! 


I love the detail of this sweater embossing folder, it very much LOOKS like it was made from a real knit sweater... and making it from the red velvet paper makes it FEEL like it was too!!

Saturday, February 15, 2020

February IAR Challenge - Trust Your Heart Card

Hey, Crafty Friends!! I hope everyone had a wonderful Valentine's day and was showered with love. Though I firmly believe love should be shown and expressed every day and not just one day a year, which is why I created this gorgeous card for this month's  I Am Roses Challenge!


Are you new to the I Am Roses Challenges? Head on over to their blog (HERE) for more details on how to enter, amazing prizes you could win, and lots of inspiration from the IAR design team and previous winners!

Now, for my card, I used the following...

I Am Roses Supplies Used
Other Supplies Used
Big Shot (Sizzix)
Double Stitched Heart Dies (Pink and Main)
Coral Couture Stack (DCWV)
Double-sided Colored Cardstock (DCWV)
110 lb Cardstock- White, Kraft (Recollections)
Natural Hemp Twine
Self Adhesive Flower Jewels
Liquid Glue

I started with a 5"x7" card base made from 110 lb white cardstock, a 5"x7" piece of bright orangey-red cardstock, and a 4 3/4"x 6 3/4" Piece of teal patterned paper from the Coral Couture Stack. Then layered and attached them together using my Xyron Mega Runner.

 
Then I used my Sizzix Big Shot and Pink and Main'sDouble Stitched Heart Dies to cut a heart from Coral Red polka-dot paper from the Coral Couture Stack.

And then I die cut kraft cardstock using a leaf die from Diamond Press' Foliage Stamp & Die Kit.

I then attached the heart onto the card front using my Xyron Mega Runner. And used liquid glue to attach my leaves in a curve around the heart.


Here's where it really starts to come to life...

Next, I added I Am Roses Small Green Leaves and followed the same curve as the kraft leaves.

Then, I added all the smaller flowers.  First, the Mini Peach Round Roses...
then, the Small White Lillies & White Achillea Cottage Flowers.

Then added a single Medium White Lilly before filling up the gaps with three Medium Salmon Red May Roses.


I curled discarded stems for swirly vines and a randomly tucked them throughout my floral swag.
Then, I  made a multi-loop bow from hemp twine and tucked it neatly under a couple of leaves.

I added the TRUST YOUR HEART sentiment from Tim Holtz Quote Chips and surrounded the heart with self-adhesive flower jewels which I also sprinkled throughout.


And here is my finished card...


I hope you enjoyed my card for this month's IAR Challenge and it inspires you to join in on the fun!!
You could win some amazing prizes!


Thanks for stopping by!!
~Mitsyana


Monday, January 7, 2019

My Favorite Xyron Tool & Giveaway

Hello, Crafty Friends!
Can you believe it's a new year already?!! Sadly, with the beginning of this new year, my term with Xyron is at its end. This will be my last post for the term and I can't thank Xyron enough for having me on their design team for another wonderful year!

To celebrate my 4 years with Xyron I decided to do a GIVEAWAY... 
read all the way through my post to find out what I'll be giving away!! I know, pretty messed up, right! Ha!! Well, they say, good things come to those that wait! And trust me you're going to be glad you did!!

As our last assignment, we were to create a project using our favorite Xyron product. And I must say that this tool is one of the most used tools in my arsenal! It's portable, versatile, and has a Big Sister... 

If you guessed the Xyron Creative Station Lite, then you are absolutely correct!!

This little baby can make stickers and magnets and laminates too! 

I've personally used it on:
 paper
felt
fabric
 lace
ribbon
 burlap
cheesecloth
wood veneers
 thin metal
cork
chipboard
cardboard
mat board
and foam

It does a huge job but it's compact enough to easily take to crops and travel with!

And another bonus feature...

I can switch between 5" cartridges and 3" cartridges with ease! Which is ideal for me because I am a die-hard card maker!

And so, for my last project for this term, I created a card to show my appreciation...


Supplies Used
Mariposa Stack (DCWV )
Eileen Hull Credit Card Sleeve & Tags (Sizzix)
Eileen Hull Journaling Cards, Hearts (Sizzix)
Eileen Hull Leaves, Spring (Sizzix)
Eileen Hull Floral Arch (Sizzix)
ColorBox Chalk Petal Points - Primary Pastels (Clearsnap)
Blending Stylus handle (Clearsnap)
Blending Tip (Clearsnap)
Tim Holtz Idea-OlogySmall Chat Stickers (Advantus)
Trimmer (Swingline)
110 lb Black Cardstock 
110 lb White Cardstock
Clear Liquid Glue
Glue Pen
Flatback Pearls
Crinkle Ribbon


I wanted this to be a tall #10 sized card... I often get bored of making A2 (4 2/4"x 5 1/2") sized ones and sometimes an A7 (5"x 7") just won't cut it. Bigger is better, right?!!

So, I start off by creating my card base. I folded my black cardstock in half lengthwise. Then cut it down to 9 1/8" x 4". 

Then trimmed a sheet of corrugated cardstock down to 3 7/8"x 9".

Next, I ran the corrugated cardstock through my Xyron Creative Station Lite and adhered it to the front of the card base.


Using a Sizzix Big Shot and Eileen Hull's Journaling Cards, Hearts and Credit Card Sleeve & Tags, I die cut 2 scalloped rectangles and 1 rounded rectangle from patterned paper from the Mariposa Stack.

I shaded the edges of the die cuts with Tangerine ink form the Colorbox Chalk Petal Point and a Blending Stylus.


I also die cut 6 floral stems from Black cardstock using the Floral Arch die and 4 stemmed leaves using the Leaves, Spring die from white cardstock.


I die cut leftover patterned paper using Eileen Hull's Journaling Cards, Flowers & Leaves to cut 2 batches of flowers. I inked them with Lipstick Red ink from the Chalk Petal Points. Then added dimension and shape to the flower petals by rolling a stylus over the back of the flowers. I layered the flowers and adhered them together using clear liquid glue. I finished each flower off with a flatback pearl center.

I also die cut 4 leaves from green cardstock. Then added little details using my stylus.

To mount my journaling cards to my card front, I ran them through my Xyron Creative Station Lite. Because the corrugate is very textured, I wanted to be sure that my die-cuts had an edge to edge adhesive... But because these had a smaller surface area, I decided to switch my 5" cartridge out for my 3" to avoid any unnecessary waste.

Before I attached the last journaling card I arranged and tucked my floral arches and stemmed leaves behind the journaling card and adhered them into place.

I found this "I am thankful for you" phrase from Tim Holtz's Ideology Small Talk stickers and thought it paired beautifully with the word "Friend" from Eileen Hull's Floral Arch die set. 

I finished the card off by adhering my finished flowers, leaves,  and a crinkle ribbon bow.


Wow, look at all the gorgeous detail!!

And here is the finished card...


I really love all these textures!


And the black and white cardstock really pop against these neutral colors!


I really loved how this card turned out! And I hope you did too!


I really hope this card inspires you to create something beautiful today!

Now...

Here is my BIG THANK YOU to everyone for sticking with me till the very end...

I love this tool so much and wanted to share that love with a couple of lucky people! So, I am giving away my favorite Xyron tool!! I have 4 Brand New Creative Station Lites to GIVEAWAY!!

Yes, you heard me right, I said 4!! I bought one machine for each of my terms that I was on the Xyron Team! This team, this company, has given me so much... I wanted to give back! 

I have 2 that I'm giving away here on my blog 

AND

I have 2 more that I'm giving away on My Instagram account!!

I know I have said this more than once but I'll say it again... My Xyron Team are more than just friends, they are FAMILY!

And I want to share my love for my family with a few lucky winners!

Each winner will receive:
 1 (one) Brand New Creative Station Lite
and
1(one) 3" Permanent Adhesive Refill Cartridge.

As Pictured Below

All you have to do is:

Leave a wonderful comment down below in the comments section. Please, sweet thoughts and kind wishes.

Follow this blog. It must be with an account that is reachable. This is how I will contact the winners.

AND

If you can be so kind...
Head on over to the Xyron Facebook Page and give them some LOVE for making such an awesome product and let them know Mitsyana sent ya! 

NOW, HEAD OVER TO MY INSTAGRAM for 2 more chance to WIN!!

Winners will be chosen at RANDOM from the comments section below. 
Winners will be chosen on Friday, January 11, 2019. 
And announced Monday, January 14, 2019. 
Winner must claim their prize within a week or forfeit their prize.


I wish you all the best of luck!!
And I'm so very thankful for you all!!
~Mitsyana

DISCLAIMERS
*This giveaway is not sponsored, endorsed, or affiliated with Facebook, their partners, or subsidiaries.*

**This blog is compensated to provide opinion on products, services, websites, and various other topics. Even though the owner(s) of this blog receives compensation for our posts or advertisements, I always give my honest opinions, findings, beliefs, or experiences on those topics or products.
The views and opinions expressed on this blog are purely my own. Any product claim, statistic, quote or other representation about a product or service should be verified with each manufacturer, provider, or party in question.

***This blog contains affiliate links, clicking and shopping through these links helps to support and run the Up On Tippy Toes blog at no additional cost to you..***

Thursday, September 20, 2018

Tropicool Greetings- Hello Card

Hey, Crafty Friends!
Summer is at its end and the summer heat is finally dying down. That doesn't mean we can't still can't take advantage of all this beautiful sunshine. Its rays are inspiring and its vibrancy, mesmerizing! I'll let all that light soak in and fill me with joy. I find that people are often the product of their environment and are often what they surround themselves with. And personally, I LOVE to LOVE. I love to feel HAPPY. I love to LAUGH. I love ENERGY. I also find that when I'm filled with those things and give off those things, the people around me do too. 

Today, I'm sharing some LOVE with this BRIGHT & CHEERFUL Tropical Tucan Card using dies from Sizzix's Tropicool Collection by Lynda Kanase.


First, I gathered my materials...

Supplies Used
Big Shot (Sizzix)
Lynda Kanase- Tropicool Banner (Sizzix)
Lynda Kanase- Card Front, Tropicool Leaves (Sizzix)
Stitched Ovals (Sizzix)
3D Textured Impressions- Tropical Leaves (Sizzix)
ColorBox Premium Dye Ink Pads-  Olive, Coral, Pewter, Black Bean (Clearsnap)
ColorBox Petal Point- Enchantment, Boardwalk (Clearsnap)
Cardstock- Gray, Moss Green, White, Yellow (Open Stock- Hobby Lobby)
Vellum (Open Stock- Hobby Lobby)
Mini Spray/ Misting Bottle
Makeup Brush
Liquid Glue
Hemp Twine
Seed Beads
White Gel Pen (Sakura)
Heat Tool (optional)

I started by spritzing down a 4.25" x 5.5" piece of white cardstock with clean water. Then, inserted it into the Tropical Leaves Textured Impression folder and ran it through my Sizzix Big Shot.

I removed it from the folder and let it dry. Then, applied Lettuce ink from Clearsnap's Boardwalk ColorBox Petal Point with a Colorbox Stylus and Tip.


Then, applied Olive (also from the Boardwalk PetalPoint) just over the raised areas.

I die-cut tucan pieces and monstera leaves using Lynda Kanase's Tropicool Banner dies by Sizzix. 

I die-cut the majority of the tucan from a light gray cardstock then added depth by inking and shading the body and wing. I used a ColorBox Stylus and Tip to apply Pewter ColorBox Premium Dye Ink all around the perimeter. Then darkened the shading by adding Black Bean ink on the edges using a ColorBox Art Dauber.

I die cut the feet and beak from yellow cardstock then shaded it with Coral ColorBox Premium Dye Ink

When the ink was completely dried, I layered and assemble the paper pieces to create the tucan. Then, I added foam adhesive to give the wing dimension. 

To finish the tucan, I used a white gel pen to draw highlights.

I die-cut the monstera leaves from green cardstock. Then, shaded it with Olive ColorBox Premium Dye Ink using a ColorBox Stylus and Tip.

I used the hibiscus die (also included in the Tropicool Banner set to cut white cardstock. I shaded the centers using Pink from the Enchanted ColorBox Petal Point and a small makeup brush.

Once the centers were completely dried, I spritzed each flower with water using a mini mister. Then, I twisted each petal to add texture and heat set them to hold the added dimension. 

I layered and adhered 2 flowers together using a clear drying liquid glue. Then added a dollop to each center and sprinkled on seed beads.


The beads were set once the glue turned clear.


I wrapped twine across the top of my card and tied it into a bow. 

Then, die-cut an oval from vellum using Sizzix's Stitched Ovals. I ran the oval through a Xyron Creative Station Lite and adhered it directly to the embossed card front.

I added small strips of foam adhesive to the back of the monstera leaves then positioned them around the oval.


I added more foam adhesive behind the tucan and attached it over the leaves. Then attached the flowers with liquid glue.

Finally, I die-cut my cards sentiment out of white and black cardstock. I used the "hello" die from Lynda Kanase's Card Front, Tropicool Leaves set and layered the two pieces together and slightly overlapping one of the die-cuts to give the appearance of a shadow. 

And here is my finished card...


I hope you enjoyed this card and the rest of his summer weather because Fall will be blowing in real soon!

Until next time...
HAPPY CRAFTING!!
~Mitsyana

DISCLAIMERS
This blog is sometimes compensated to provide opinion on products, services, websites, and various other topics. Even though the owner of this blog receives compensation for my posts or advertisements, I always give my honest opinions, findings, beliefs, or experiences on those topics or products.

The views and opinions expressed on this blog are purely my own. Any product claim, statistic, quote or other representation about a product or service should be verified with each manufacturer, provider, or party in question.

This blog also contains affiliate links, clicking and shopping through these links helps to support and run the Up On Tippy Toes blog at no additional cost to you.


Wednesday, July 25, 2018

Tropical Thank You Card

Hello, Crafty Friends!! I'm back again with Team Xyron today and we're teaming up with Derwent all week long!! 

\Summer is in full-blown HEATWAVE mode down here in Texas. With temps easily reaching well over a hundred! GAH!! I am melting and dreaming of the beach in a far away tropical location... home! This island girl wants to get back to her island! But that doesn't look like it's gonna happen anytime soon. **SIGH**

Oh well, I can dream.

At last those dreams do stir up my imagination and creativity... Like for this Tropical Thank You card, I created for today's project using Derwent's Watercolour Pencils, Paper, and Brushes!! Keep on reading to see how I made it!


Supplies Used
Pam Bray Flamingo Row Red Rubber Stamps (Blank Page Muse)
Pam Bray Pineapple Red Rubber Stamp (Blank Page Muse)
VersaFine Onyx Black Ink (Imagine Crafts)
ColorBox Premium Dye Ink- Olive, Coral, Black Bean(Clearsnap)
3D Textured Impressions Embossing Folder- Tropical Leaves (Sizzix)
Eileen Hull Leaves, Spring (Sizzix)
Eileen Hull Bookplate, Hinges,& Label (Sizzix)
Lynda Kanase Card Front Tropicool Leaves (Sizzix)
Tim Holtz Stitched Ovals (Sizzix)
Glossy Dots (Pink and Main)
White Cardstock (Recollection)
Chalkboard Cardstock (DCWV)
Tim Holtz Stamping Platform (Tonic)
PITT Artist Pen X (Faber-Castell)
3D Foam Dots
Glue


If you have never tried Derwent Academy Products before, you must give them a try!
The quality is absolutely amazing. I was super impressed with the thickness and quality of the paper. It holds up great to water and moisture with very minimal warping. So far I am loving it!! 


And these watercolour pencils are HEAVEN!! When water is added the pigment practically pours from off the tips!! So creamy, so rich, so yummy!! I know, it sounds a lot like I'm talking about food! I think once you try them you'll want to gobble them up too!


Ok, back to creating...

I started by using my stamps in a stamp platform. I inked up the flamingo from the Flamingo Row set with Onyx Black ink and stamped the same image a couple times for a deep and dark impression. I found when watercoloring outlines tend to fade. Stamping a couple of times helps preserve the dark outlines.


Then I used my Derwent Watercolour Pencils to color in the image. I applied water with a brush from the Artist Brush Set and blended the color out.

For deeper richer pigment, I dipped the tip of my watercolour pencil directly into the water. Then applied the dampened tip onto the areas that I wanted concentrated color... it spread like BUTTER!! OMG... I'm in love!!!


After my image was fully dried, I hand cut out my flamingos and set them aside to work on my card base and background.

I took out a fresh sheet of textured watercolor paper and scribbled light green color pencil over half the surface. Then with the other half, I scribbled dark green.

Then with a wide brush applied water over top to create a two-toned watercolor wash.


For my card base, I used 110 lb white cardstock to create a top folding A2 sized card. I inserted the front flap into my Tropical Leaves 3D Embossing Folder to emboss just the front. For 3D folders, it's important to only us one cutting plate when running it through. Otherwise, you could severely damage your machine.

I cut down my colorwash sheet down to 4"x 5.25" piece centering the gradient of color. Then also embossed it with the Tropical Leaves embossing folder.


I applied Olive dye ink and Coral dye ink over the embossed areas to really make all the details pop.

Then used my Tim Holtz Stitched Oval Dies to cut an opening to create a frame.

I removed the center oval. Then inked all the edges with Black Bean dye ink.

I stamped out these pretty flowers from the Flamingo Row Stamp set. I used the leftover watercolour paper from my flamingos so I wouldn't be wasteful of this fabulous paper. I've noticed when I find awesome products I tend to treat them like gold... and nothing goes to waste.

I wasn't' going to use the stems and leaves so it didn't need to be stamped perfectly. As long as I had a great impression from the flowers, that's all that mattered.

I also stamped out some pineapples on more remnant watercolour paper, then colored my flower and pineapple images with my pencils and blended them out with water.

Once my images dried, I hand cut them all out.


See, I told you I treat awesome products like gold... I used this big leftover piece from my color wash to die cut stemmed leaves.

Then added tiny details and outlined the leaves using an XS PITT Artist Pen.


I ran my embossed frame through my Xyron and attached the frame to the embossed card front.

I attached foam adhesive dots to the backs of my flamingos and attached them to the card, tucked their lags behind the frame, and had their bodies peeking out the center opening.

Then I adhered the leaves, flowers, and pineapples around the opening of the frame.


I die cut the word "thanks" from plain white cardstock using a die from Lynda Kanase's Tropicool Leaves Card set. Then attached it to a black label I created using a die from Eileen Hull's Bookplate, Hinges, and Label set from Chalkboard cardstock.

I adhered the word to the label. Then ran the label through my Xyron Creative Station. I switched out my 5" cartridge for a smaller 3" refill to cut down on waste...  this is another "GOLD" product... so I barely make waste. 

For a final touch, I added glossy dots to all of the centers of my flowers.

And here is my finished card...


I hope you all enjoyed today's tutorial!!

I really enjoyed using the Derwent products. The quality was just amazing!!

I hope you are inspired to give them a try!!

Thanks for stopping by!

Until next time...
HAPPY CRAFTING!!
~Mitsyana

DISCLAIMERS
This blog is compensated to provide opinion on products, services, websites and various other topics. Even though the owner(s) of this blog receives compensation for our posts or advertisements, I always give my honest opinions, findings, beliefs, or experiences on those topics or products.
The views and opinions expressed on this blog are purely my own. Any product claim, statistic, quote or other representation about a product or service should be verified with each manufacturer, provider, or party in question.

This blog contains affiliate links, clicking and shopping through these links helps to support and run the Up On Tippy Toes blog at no additional cost to you.