Showing posts with label handmade gifts. Show all posts

Wednesday, December 4, 2019

Eileen Hull Christmas Mash-up


Hey, Crafty Friends!! 
Can you believe it is December already? This holiday season is flying by so fast and Christmas will be here in just 3 weeks!! And it's time to kick the Christmas gift making into gear!! I'm here with Team Eileen Hull with a Holiday Mash-up of some of my favorite EH Christmas projects...


I made these four projects with several Classic Eileen Hull dies.

I've included the names of these Classics, along with links to their tutorials. Please note that these dies are retired and although they may be discontinued, you may still be able to find them online with certain retailers or selling sites. These are highly sought after and make an excellent addition to any die-cutting collection.


I hope these projects bring you tons of inspiration for your holiday gift-giving ideas! Be sure to check out each tutorial for detailed instructions, a full list of supplies used, and tons of additional pictures!

Thanks for stopping by 
AND 
Until next time...
HAPPY CRAFTING!!
~Mitsyana


Wednesday, June 6, 2018

Quick & Easy Mermaid Decor


Hi, Crafty Peeps!!
And HELLLLLO, SUMMER!!

Yup, the summer heat is here and it's time to hit the water! You could say I take to it like a fish in water... but I'd say, you're WRONG!! I'm not a fish in water... I'm a MERMAID!

And if you're a mermaid or LOVE everything mermaid, you'll love this quick and easy "Mer"-decor! Yes, Mer-decor is a thing!! Which is why it's a good thing that I am here today with Team Xyron and this week's amazing partner, my good friends from DCWV!! Because I'll be playing with their new Ocean Wonder Stack and it's gonna help take my home decor from awesome to "MERMAZING"!!


Supplies Used
Ocean Wonder (DCWV/ American Crafts)
Glitzy (DCWV/ American Crafts)
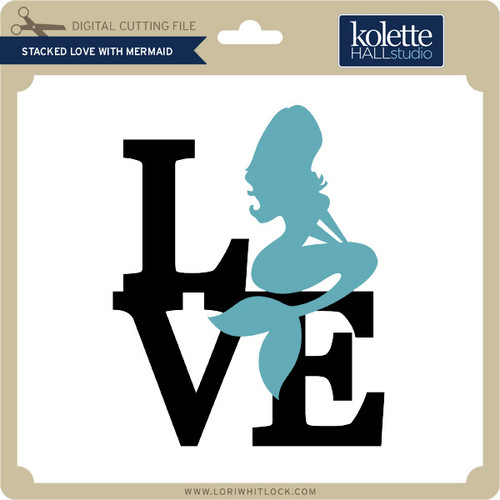
Stacked Love with Mermaid SVG File (Kolette Hall Studio)
Creative Station w/ 9" Permanent Cartridge (Xyron)
White Cardstock
Craft Foam
Picture Frame


When I saw this paper I immediately thought of Mermaids! And I found the super cool SVG file by Kolette Hall that was absolutely perfect!

Image 1

I downloaded it onto my computer and loaded it into my ecal software.

When loaded into my software, the default size was too big for what I had in mind. So I resized it.


I simply adjust the sizing in the panel to the right of the screen. I used the drop-down arrow in the width section (which is simply labeled with a "w") and clicked it from it's 8.563" default sizing till it got to, what I thought was just right, at 7.060".


These pieces are also attached together (by default) and I want to cut multiples to stack them for a thicker three-dimensional look so I right-clicked, then clicked on "Ungroup" to separate them.


I knew I was going to be working with lots of colors and patterns and didn't want them to get lost or distracting. So, I broke it up by adding a .015" border around my "LOVE" word.

Simply, right click on the word, go to "Appearance", then "Add Shadow Layer...".


Then, set the sizing box to 0.15".

You can set what color you want your border to be, and in this case, I wanted it white. But that color blends into my virtual cutting mat. So I simply adjusted the outline to black. Go to the paint palette icon on the right of the screen, Go to "Stroke" box, then click in the color box and choose black.

Now, I can see that awesome border around my words!

I did those same steps to fill in color to my shapes too. but in those cases, I entered my selections in the "fill" box.

Both of these steps are optional, they just help me see what I'm doing better and help me get a better visual of what I am creating.

I separated my shadow onto another cutting mat. Remember, I wanted to create a stacked/ thick chipboard type of look. I only need to stack the shadow to achieve that look. So I duplicated 3 more and spread them over an entire mat.


Cutting multiple images is easier when you group like colors together and cut them all at once.

For the shadow, I cut in plain white cardstock. But for the main LOVE stacked word, I used this AMAZING or should I say MERMAZING fish scaled paper with a beautiful gradient and gold foil outlines and for my mermaid silhouette, I used this gorgeous pink glitter paper (also from DCWV).


I ran all my die cut pieces through the Xyron Creative Station, then layered all the LOVE stacks together.


I wanted the mermaid to have dimension but it seemed pointless to cover a bunch of glitter paper. So instead, I ran a piece of craft foam through the creative station and made my own foam adhesive to prop up my mermaid.

I attached the foam to the back of her head and torso only since her fins will be attached to the LOVE stack.

For my background, I used this deep purple paper with dotted waves. I think it looks a lot like deep sea currents. But it could just be me... HA!

I cut it down to fit inside my 7"x 10" frame... I know... what an awkward size! But use whatever size frame you can find and adjust accordingly.


 I took my stacked LOVE... look how nice and thick this piece is... and attached it to the center of my background paper, then inserted it into my frame and closed it up.

And there ya have it, EASY-PEASY!!


These papers are absolutely GORGEOUS and when the light hits it... Oh my gosh... STUNNING!!


This is clean and simple!
Aaaaaand...
 makes for perfect decor or gift for all those mermaid lovers out there!

Hope you enjoyed this tutorial!
Thanks for stopping by!!

Until next time...
HAPPY CRAFTING!!
~Mitsyana


**Disclaimer**
This blog is compensated to provide opinion on products, services, websites and various other topics. Even though the owner(s) of this blog receives compensation for our posts or advertisements, I always give my honest opinions, findings, beliefs, or experiences on those topics or products.
The views and opinions expressed on this blog are purely my own. Any product claim, statistic, quote or other representation about a product or service should be verified with each manufacturer, provider, or party in question.

Sunday, February 11, 2018

Pretty Painted Matted Passport

Hello, Crafty Peeps. It's been a while that I did some much-needed crafting. But I'm back!! And today I'm playing with my oh-so-fun Eileen Hull Passport Die by Sizzix!! I've made passport projects before but not with this unexpected medium I used for this one.

Today, I will show you how I used a plastic TABLE MAT (from the dollar store)...


to make this detailed "faux-embossed" and hand-painted passport book.


Supplies Used
Big Shot (Sizzix)
White Gesso (Liquitex)
Acrylic Paint- Opal Magic Magic Pink-Blue  (Prima Marketing)
Acrylic Paint- Blue Lagoon, Turf Green, Woodland Green, Canary, Orange Sherbert, Purple Sunset (DecoArt)
Elastic Cord- 2 mm 
1" Elastic Band
Rhinestone Ribbon Slide (Dritz)
110 lb White Cardstock
Fabri Tac(Beacon)
Paintbrush
Heat Gun
Scissors
Mini Clothespins *optional*

For my project today, I decided to use the mat on the far right of the picture below, the one with the huge flowers down the center. I wanted to incorporate those beautiful and flowers as the main design of my cover.


I laid my matboard within the perimeter of the flowers to make sure that it would fit. It did with lots of room to spare! 

Instead of adding adhesive to my mat, I added it to my matboard by running it through my Xyron Creative Station Lite. Then, I peeled the protective film off the back and applied the mat board to the section of the mat I wanted to use.

The great thing I found out about using these mats is it easily removed if I didn't like the placement. Just as long as it wasn't completely tacked down. I slowly and gently peeled it back and used a rocking motion from side to side to get the last corner off. Then I was able to re-adhere back onto my mat. 

When I was finally happy with the placement, I flipped it over onto its front and gave the mat a good firm burnishing. I used my fingers to give them a good rub.

Then took scissors to trim off the excess. What was left was a gorgeously covered piece.

I took my piece of covered mat board and die cut it using my Sizzix Big Shot and Eileen Hull Passport Die. I positioned my covered mat board to only cover and spine and cover panels only. Then ran it through my Big Shot machine. Then, moved the remaining uncut piece down and die cut a second cover piece.

I folded the spine only on the outer 2 crease lines. Then attached my cover pieces flush against the folded and creased flap. I secure the covers in place with mini clothespins to help keep them in place while they dried.

Once the glue was dried, I painted over the entire front cover with white gesso. It took a couple coats for the gold not to show through. 

I used a heat gun to speed up drying time in between coats. I made sure to not keep the heat gun too long in any particular area because the mat is plastic and I didn't want it to melt or warp and distort the image. 

Once my gesso was dried,  I dry brushed over top with Opal Magic Pink Blue acrylic paint.


With a fine paintbrush, I shaded in the recessed areas to add more details.


For the inside of the passport, I just die cut 110 lb white cardstock using the same Eileen Hull Passport die. This time I only covered the pages side of the die. Each die cut creates two pages, so I die cut a total of 12 double pages.

 I did not bind my pages! Instead, I left them loose. 

There are notches at the top and bottom of the SPINE of the passport cover... I used 2 mm white elastic and tied a strand of elastic into each notch.
I grouped my pages into 3 piles (4 double pages in each) and just folded in half at the crease to create book inserts. Remeber, I did not bind them. you can if you want to but it is totally optional.

Then, I lifted each elastic and slid an insert under.

EASY PEASY!!

They fit quite snugly and don't shift. And if you plan on giving this as a gift, your recipient can take each page out and customize and embellish each because they can easily be removed and placed back in.

I didn't want to take away from all the pretty flowers and shading so I simply embellished with it with an elastic band with a rhinestone buckle to use as my closure.

And here is my finished PAINTED PASSPORT...


Here is a shot of the entire outside cover once done.


I often get asked what I do with my books and journals I create...
Well, this one is going to my friend, Eileen Hull! She loves the color TEAL and when I was creating it I instantly thought of her!

I hope she likes it!!

And I hope you all enjoyed my FIRST of my "MATTED" series of projects. Yes, I have plans to do many more! In fact, There was so much of the mat leftover from this one that I can easily do about 3 more projects... and as you can see, I bought quite a few other mats too.

Don't be afraid to use things other than their intended purpose!! You'll be surprised at all the amazing possibilities there are!!

Thanks for stopping by and be on the lookout for the next one (WINK, WINK)... it's already in the works!!

Until Next Time...
HAPPY CRAFTING!!
~ Mitsyana

Disclaimers
**This blog is compensated to provide opinion on products, services, websites and various other topics. Even though the owner(s) of this blog receives compensation for our posts or advertisements, I always give my honest opinions, findings, beliefs, or experiences on those topics or products.
The views and opinions expressed on this blog are purely my own. Any product claim, statistic, quote or other representation about a product or service should be verified with each manufacturer, provider, or party in question.

***This blog contains affiliate links, clicking and shopping through these links helps to support and run the Up On Tippy Toes blog at no additional cost to you..***


Thursday, January 12, 2017

Winter Care Kit

Hello Crafty Friends!! 
It's been a while but I'm back! This will be my last project of the term for Team Xyron. What an amazing ride!! It has been an absolute pleasure working with so many talented and creative ladies and many more amazing companies!! Hopefully I'll be back again for next term to do it all over again! I love my Xyron Family!!

Well, as you all know, it's still winter (aka , cold and flu season). And my household has been going through a bout of the sniffles lately. Partially due to allergies and the other  part because of the weather. 

Our Texas weather is inconsistent and highly erratic. We recently had all of winter poured into one weekend. One day we had 70-80 degree weather and then the next day it dropped to 19... what the heck?!! And that is why we get sick so easily. Warm, cold, warm, cold, wet dry wet, dry. Why can't the weather just make up it's mind already!! AAHHH!!!

My family isn't the only ones affected. Lots of peeps have been getting sick. So I decided to make Winter Care Kits for friends and family who get hijacked by coughs and sniffles!


Supplies Used
Eclips 2 (Sizzix)
eCAL 2 Software (Craft Edge)
Blazing Poppy Die (Heartfelt Creations)
Get Well (Pink and Main)
VersaMagic Midnight Black (Imagine Crafts/ Tsukineko)
Brads
Glossy Accents (Ranger)


The boxes I used to make these kits are a FREE SVG download from SVG Cuts. It is their Cozy Socks Gift Box . I downloaded it onto my computer, extracted the files, then opened them using my electronic cutting software.

One panel is too big to fit on one page, so I opened each piece onto their own page.


Then loaded my paper onto the cutting mat and into my cutter, then let the machine do all the work! It was done cutting in no time!


I loaded a different, yet coordinating, paper for each panel. All paper is from DCWV's Elegant Holiday Stack.
Once my panels were done cutting, I folded them on their perforated crease lines. Next, I used my Xyron Mega Runner on the bottom and side flaps (basically all the narrow flap), leaving the top open flaps adhesive free. 
I used my bone folder to burnish my flaps down securely for maximum adhesion.

 Then, I inserted my "Care Kit" items. Nice warm socks for cold days. Facial tissue for running noses, Cough drops for sore throats. And there still a little more room for packets of tea or pain reliever if I wanted to add those. It's a pretty nice sized box!

 I decided that this box was too plain even with all the pretty paper. So I made a belly band for it.
I cut a strip of paper measuring 1.5" x 12". Then scored it at 2-1/4", 4", 8", and 9-7/8". Folded on the score lines, slightly overlapped the ends and adhered with my Xyron Mega Runner.

I found a tag in my Elegant Holidays stack that went perfect with my box, I cut it out and stamped it with "get well soon" just under the For You.

Then I die cut flower petals and made a couple blooms (one large, one small). And also attached to the belly band.

And here is my finished Winter Care Kit...


Hope you enjoyed this project...

And maybe even make your own Winter Care Kits of your own!

Thanks for stopping by!

~Mitsy

Monday, November 30, 2015

Kcup Caddy Gift Box - w/ Free SVG Template Download


Supplies Used
Winter Wonderland Double-Sided Cardstock 12"x12"- Frosty (Pebbles)
Winter Wonderland Double-Sided Cardstock 12"x12"- Toasty Warm (Pebbles)
Winter Wonderland Double-Sided Cardstock 12"x12"- Flurries (Pebbles)
Winter Wonderland Chips Die-Cut Shapes - Glitter Snowflakes(Pebbles)
Winter Wonderland Puffy Stickers- Snowflakes & Crowns (Pebbles)
Pink and White Twine (Recollections)
Enamel Dots (Virginia Turtle)
Diamond Glaze (Judikins)
4 New/Unused Kcups (Any Flavor)
Electric Die Cutting Machine with SVG cutting capabilities 
Kcup Caddy Templates (For Personal Use ONLY)

First, download the Kcup Caddy Templates. Remember, these are for personal use only.
In downloading these files, you acknowledge and agree to my terms (read full terms and conditions here).

 Then using your electric Die cut machine and editing software, open the file marked kcupbox-n-handle1.

You will need a 12"x12" sheet of cardstock for this. I used this pretty paper by Pebbles Inc. called Frosty.

The template is pre-scored so all you need to do is fold on the perforations. The two holes face up. fold the sides and back flap down and glue in place. I used my Xyron Mega Runner for this part so I didn't have to wait for drying time. You will need 2 of these boxes.

Then open the files marked kcupbox-n-handle2. This will make the handle for the caddy and mat/insert. You will need to of each.

 After cutting out my handles and inserts, I ran them through my Xyron Creative Station. I attached one insert to one handle and then glued both sets back to back to make it double sided and identical on both sides.

I then used my Xyron Mega Runner to attach my boxes to my handle.

For my box panels, I used the TOP HALF of the file marked kcupbox-n-handle3. The top half of this file is for the 4 cup Kcup panels. And the BOTTOM HALF are panels to turn your caddy into a 2 cup caddy. 

To make your caddy a 2 cup caddy, skip making the handles and replace with the back panels. The 2 square panels are the side panels for the 2 cup box (1 for each side).

Since I made a 4 cup caddy, I used the bigger panels. Then ran them through my Xyron Creative Station and attached them to my box.

For decorative accents, I used Pebbles "Chips" Glittered Snowflakes and cut it onto quarters. I used my diamond glaze to attach onto my box. I repeated this step for both sides of my box. 

Then I used more Diamond Glaze... this time leaving my snowflakes whole and applying only on the bottom half of my snowflakes and attaching to each side of my caddy. I also administered a small dot of adhesive at each top point of my snowflakes, attaching to the caddy. I held a gentle pressure on the tip until the adhesive set.

Then I topped it off with some twine. And finished it with a snowflake sticker with and enamel dot center.

Here is my finished Kcup Caddy...


 FRONT VIEW

BACK VIEW


I hope you enjoyed my project for today. 

And, even more so, I hope you enjoy my Kcup Caddy Templates!!

I love to see your creations! So, if you decide to make this caddy please post your pics to my Facebook Fan Page HERE! I can't wait to see your creations!! While you're there don't forget to like my page!

Until next time...
HAPPY CRAFTING!!
~Mitsy