Showing posts with label coffee. Show all posts

Wednesday, November 14, 2018

Creating Two Seasons with One Stamp Set

Hey, Friends!! I'm back again with Team Xyron today!!
And brrrrr... It's cold outside!! It's not even Thanksgiving and temperatures have begun to dip. I'm hoping that Mother Nature makes up her mind. I mean, it is still technically fall, right?!  Supposedly we still have 37 more days of fall to go... say what?!! Yup, that's right, winter doesn't officially begin until December 21!!  I don't know about your neck of the woods, but in my area, the frigid air here screams WINTER!!

So what is one to do... Craft for Fall or craft for Winter??

Well, if you're ever stuck in that sort of dilemma, let me give you a tip, buy products that are dual or multi-purpose! Like this set from Waffle Flower called Hello Pumpkin.


This set can be used throughout your year-end holiday seasons. It's filled with jack-o-lanterns, pumpkins, and sweater wearing mice!! And did I mention the cute latte and coffee/ cocoa accessories? 

You can literally use this set to craft from Halloween to Christmas just with this one set!

But since Halloween has already passed, I'll show you how I created these winter and fall cards below. 


Supplies Used
Hello Pumpkin (Waffle Flower)
Mega Runner (Xyron)
Procolour Pencils -24 Count(Derwent)
Stitched Circle Dies (Pink and Main)
Paper Trimmer (Swingline)
Watercolor Paper (Strathmore)
Misti Stamping Tool (My Sweet Petunia)
Twine- Natural Hemp, Black
Button
Mixed Media Glue

I started by using my Misti Stamping Tool to stamp my images from Waffle Flower's Hello Pumpkin onto a piece of watercolor cardstock with ColorBox Wicked Black Dye Ink. I colored all the stamped images in using Derwent's Procolour Pencils. The watercolor paper is quite textured and it has a nice tooth for the pigments in the pencils to grab onto. 

The trick with these pencils is to have a light hand. Apply gentle pressure and work in layers. If you apply too much pressure you burnish the color down and rid the paper of its tooth so the paper can no longer grip anymore color. 

Here's a trick to change seasons... switch out your color palette! Yes, it's that simple. With the exception of stamps that are obviously specific to a certain holiday or event, simply changing the color palette can result in a different feel and theme.

For example, I colored some images in oranges, greens, and browns (fall colors), while others were blues and purple (cool winter tones) or greens and reds (traditional Christmas colors).

Once I was done coloring I cut my little munchkins out by hand. The matching set of dies is available for this set but I find hand cutting images relaxing so I don't mind the fussy cutting.

 Coloring images can help set the mood and determine theme but so can paper!! Paper is, in my opinion, the biggest & easiest way to change the feel of your project. 

Again, I opted for more neutral tones... greens, oranges, browns, and yellows...
These shades make up the palette of my Fall card. And all my patterned paper came from one paper stack... DCWV's Fall Basics Stack.

I cut the card base to 9 1/4"x 8" and folded it in half (9 1/4"x 4" -folded).
The yellow striped mat measures 9 1/4"x 3 1/4".
And the plaid paper measures at 9 1/4" x 3".

I used my Mega Runner to adhere the first mat to the base. Adhering the piece straight down the center of the card.

I used my Big Shot with the magnetic platform and a circle die to cut 3 windows down the center of the mat. Then again, used my Mega Runner to adhere to the yellow striped paper.


I attached the leaves at the top center of my card. Then attached a small twine bow over top.
Then, I topped off the bow with an acorn center.

I added foam adhesive to the back of my critters to give them a little dimension and placed them each into a window.

Then to finish this card, I simply stamped the sentiment "Hello Pumpkin" in black ink.

Look how adorable it is! So simpl and oh so cute!!


For my Winter card... 

Even more quick and easy... Remember, I had already colored some of my images in winter and Christmas colors...

Then, I created this easy A2 (4 1/4"x 5 1/2") sized card base matted it twice giving each mat a difference of 1/4"

Mat #1- 4" x 5 1/4"
Mat #2- 3 3/4" x 5"

Layered and attached them with my Mega Runner.
Stamped the "You & me" sentiment towards the center of the card. Then added my "dimensional" mice (one on each side of the sentiment).

I almost forgot to give them their little beverages... I love how this set comes with the little latte and cup of hot cocoa (it can also double as coffee for all you coffee lovers)!!

Then, finally added my bow and stamped the words "perfect blend" underneath the little mice.


And...

TAH-DUH!!


EEEEKKK!! Yup, I'm squealing like a little mouse! These are just too flipping cute! I'll be definitely getting tons of use from this set for sure!

Well, I hope you enjoyed today's double feature!

Remember if you can't choose, always go for BOTH!! LOL

Until next time...
HAPPY CRAFTING!!
~Mitsyana

DISCLAIMERS
**This blog is compensated to provide opinion on products, services, websites, and various other topics. Even though the owner(s) of this blog receives compensation for our posts or advertisements, I always give my honest opinions, findings, beliefs, or experiences on those topics or products.
The views and opinions expressed on this blog are purely my own. Any product claim, statistic, quote or other representation about a product or service should be verified with each manufacturer, provider, or party in question.


***This blog contains affiliate links, clicking and shopping through these links helps to support and run the Up On Tippy Toes blog at no additional cost to you..***

Tuesday, October 17, 2017

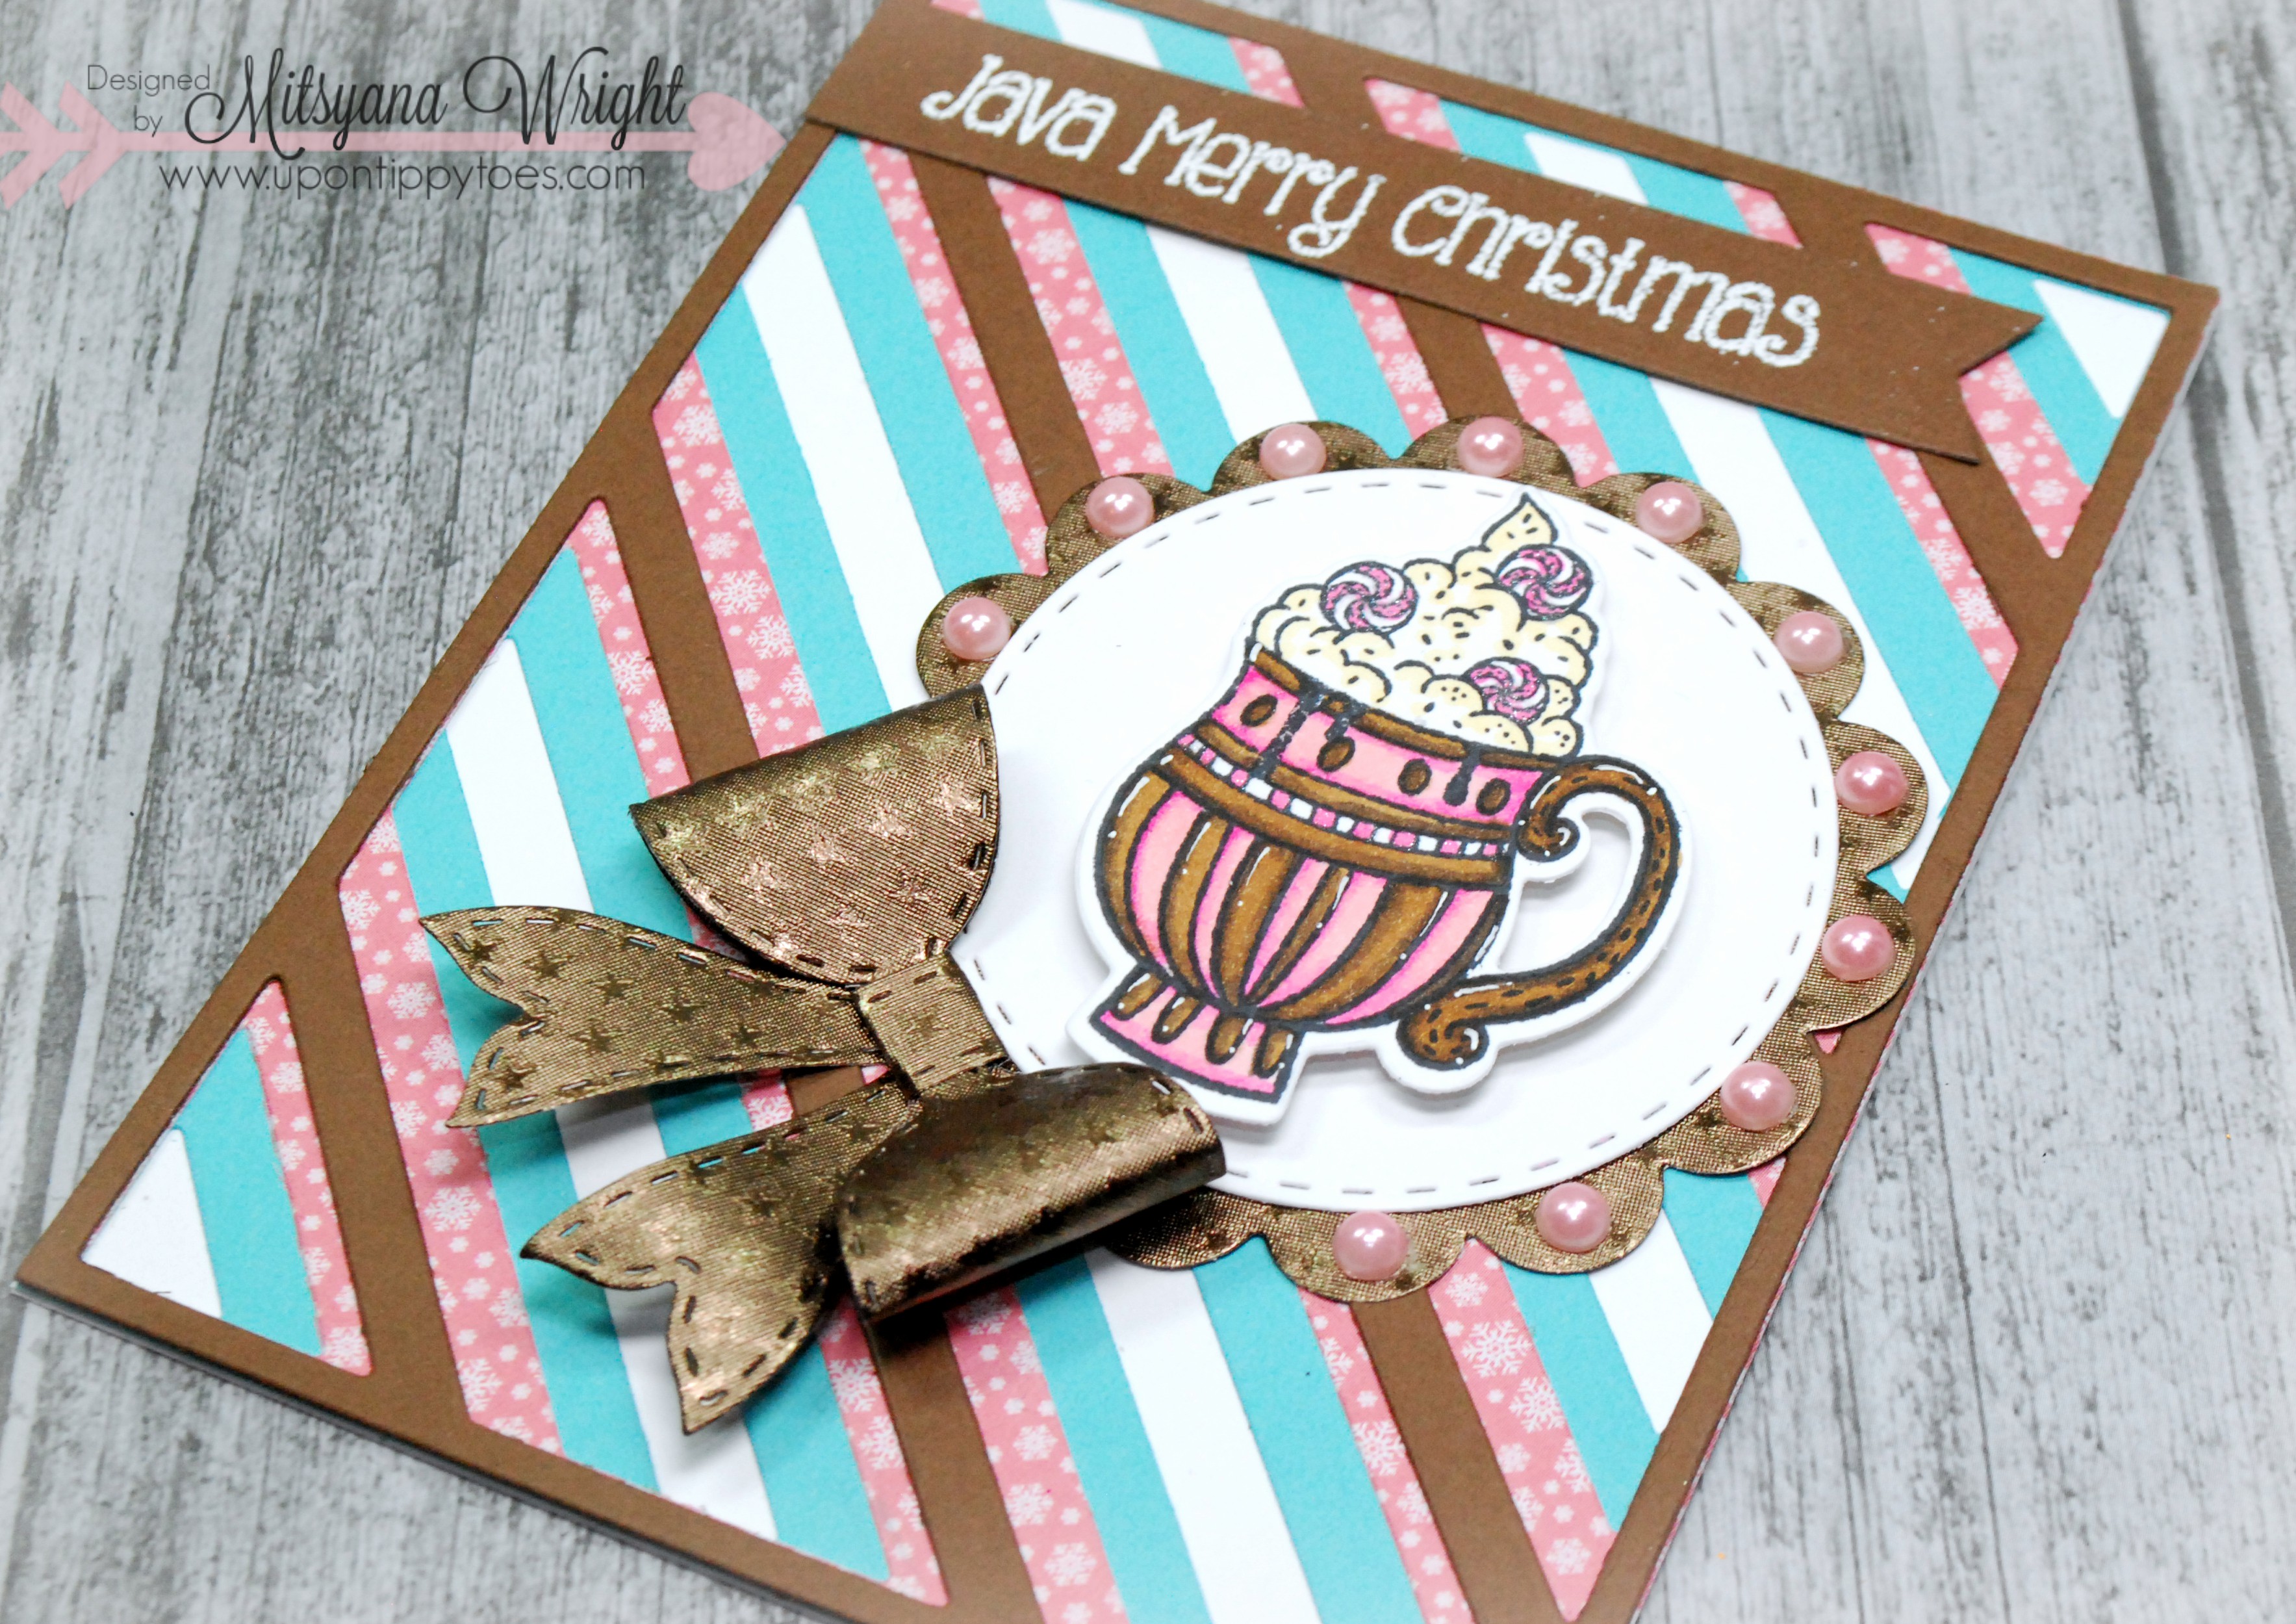
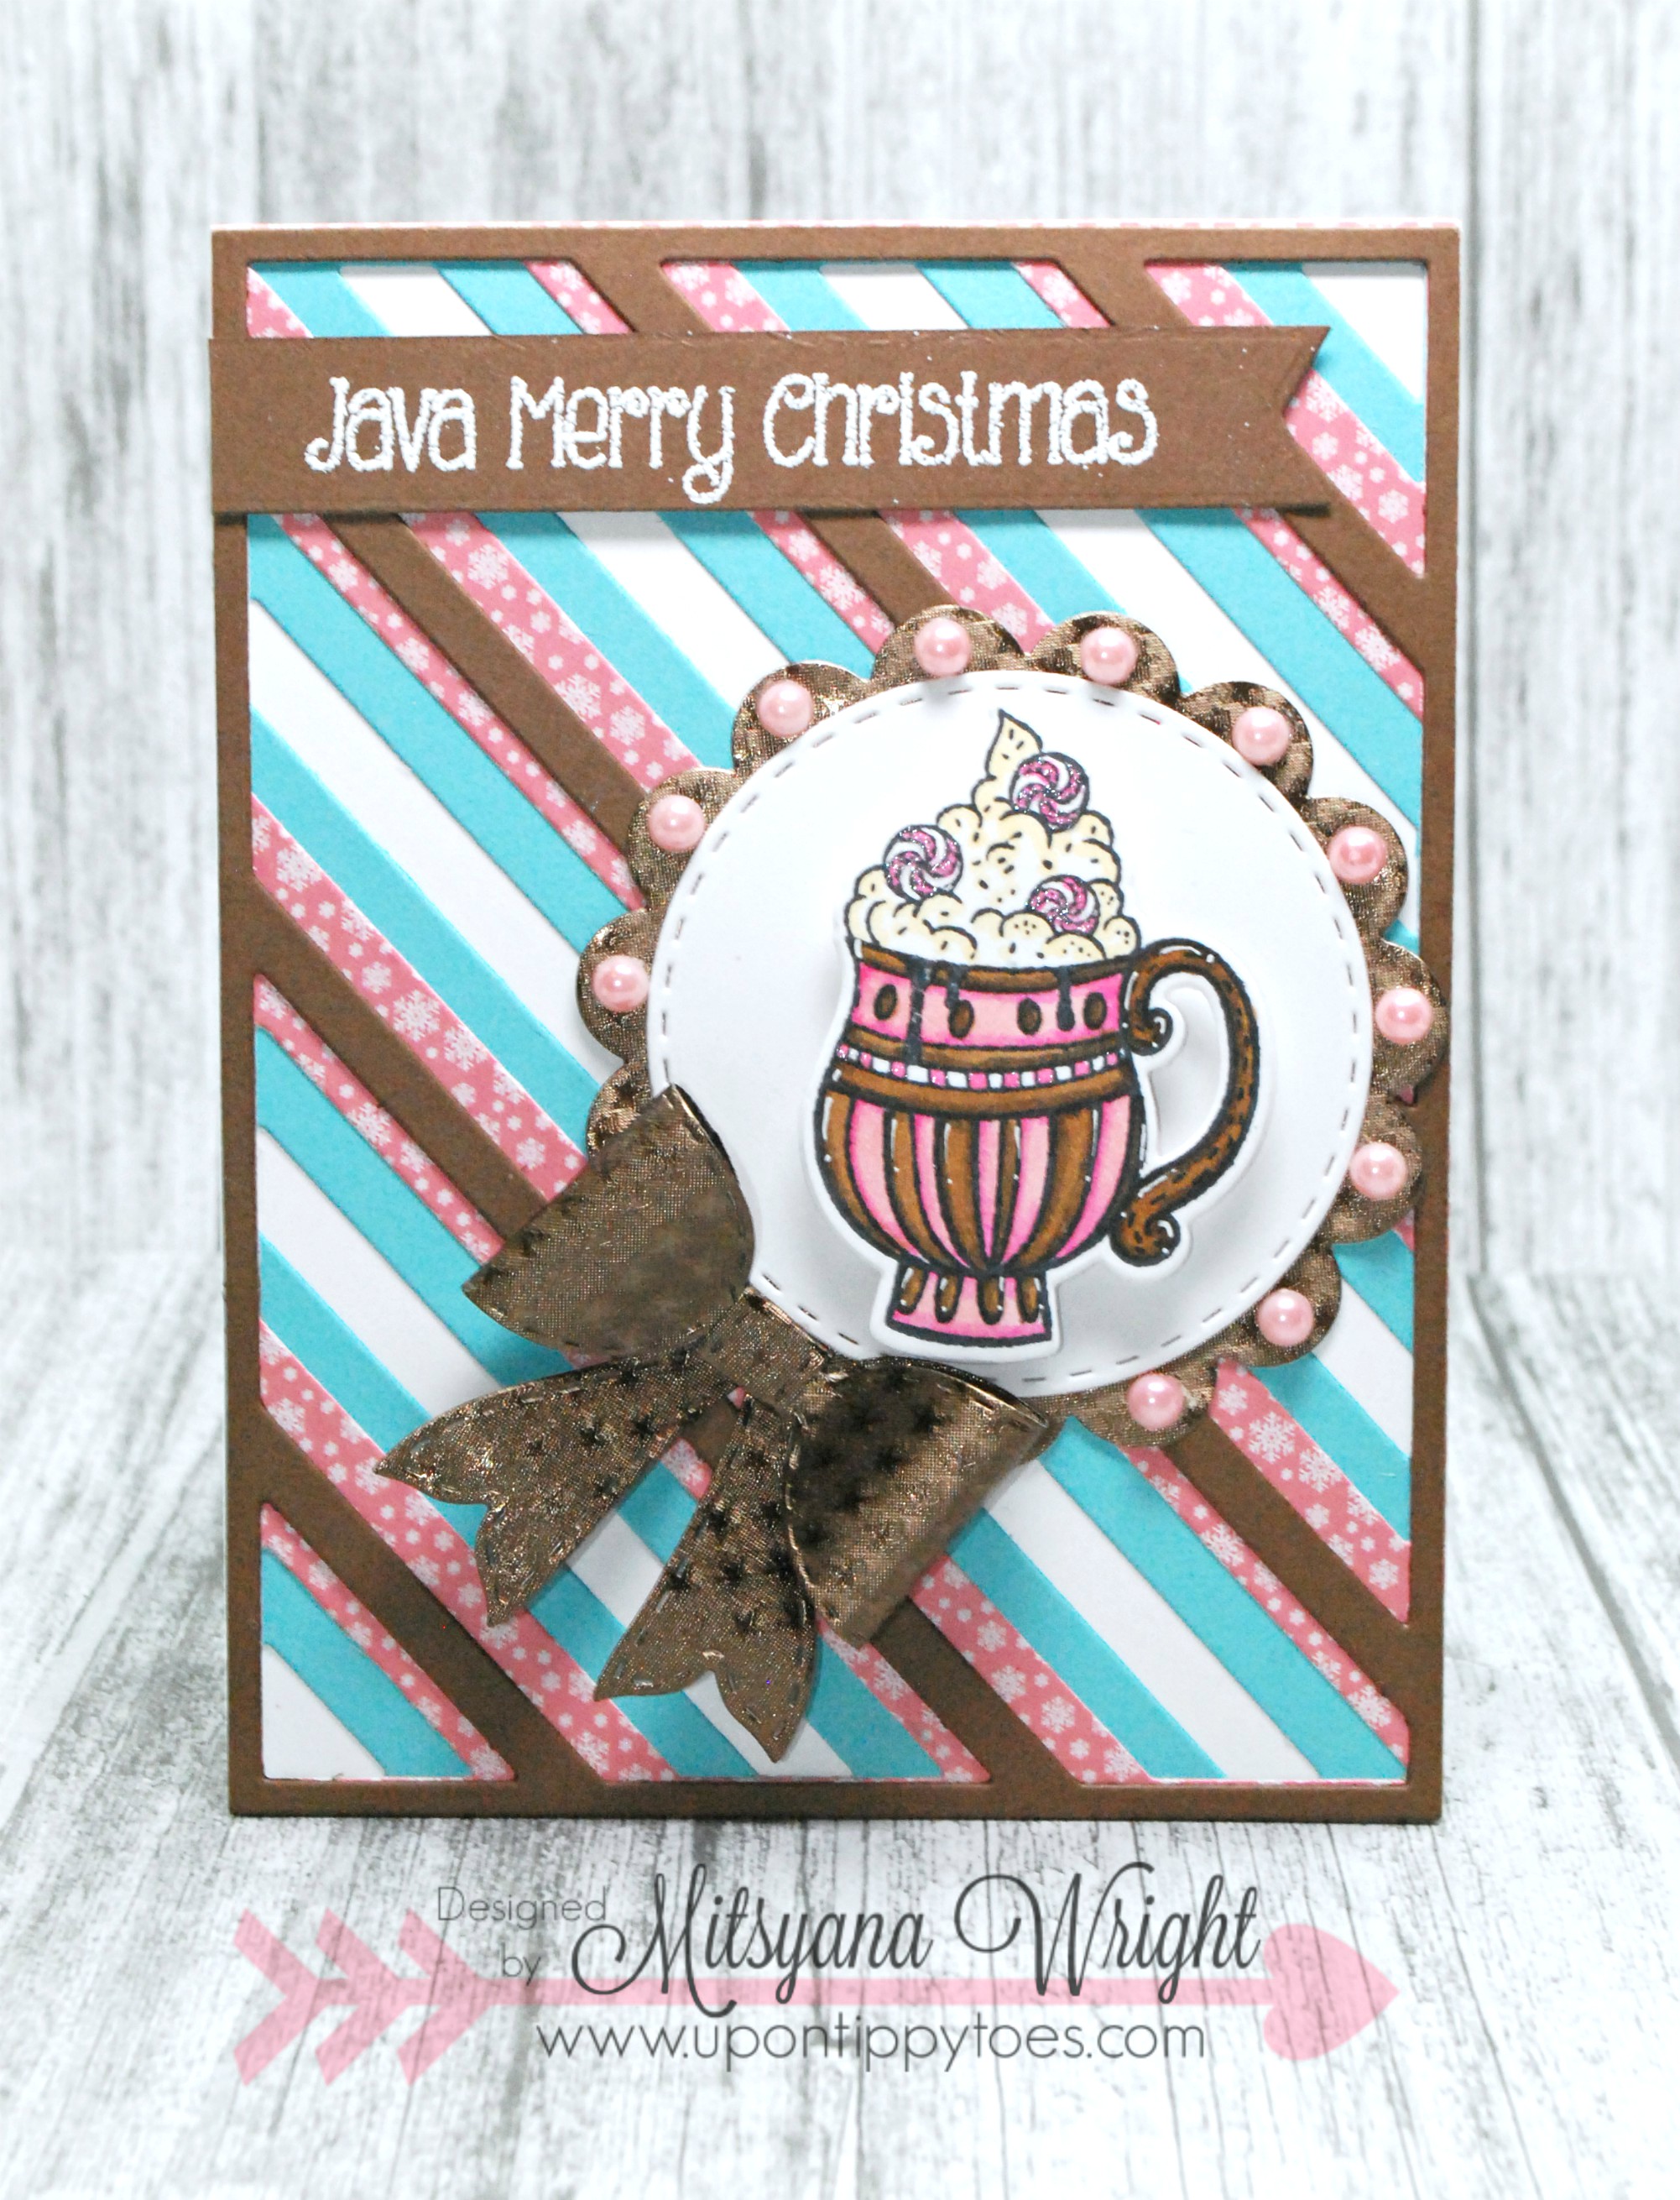
Java Merry Christmas

Hello, Friends!! Welcome back!!
I'm up on Day 2 of the Rinea and Pink & Main collaboration!

All week long we will be featuring amazing projects from our talented Design Team Members using both Rinea and Pink & Main products. And if tons of crafty inspiration was not amazing enough, You can enter to win a $25 Gift Certificate to the Pink and Main Store. All you have to do to enter to win is stop by the Pink and Main blog each day this week and leave a wonderful comment on the featured post!! Easy-peasy!!

For my project today, I created this card...


Supplies Used


Other Supplies Used
Big Shot (Sizzix)
Ultra Smooth Premium Cardstock (Crafter's Companion)
Spectrum Noir Illustrator Markers- AB1, AB3, PP1, PP6, EB2, EB7, FS9 (Crafter's Companion)
Momento Tuxedo Black Ink (Tsukineko/ Imagine Crafts)
VersaMark (Tsukineko/ Imagine Crafts)
White Embossing Powder (Tsukineko/ Imagine Crafts)
Self Adhesive Flatback Pearls
Mega Runner (Xyron)


I started by stamping my images from Pink and Main's Christmas Mugs stamp set onto ultra smooth cardstock with Momento ink. I always stamp more images than I need "just in case".

Tip: can use any brand ink as long as it is dye based ink. It needs to be dye based so that the ink doesn't smear or bleed when coloring with the alcohol based markers.

I colored my images using my Illustrator Markers.

Cup on the LEFT I used:
AB1, AB3, PP1, PP6, & FS9

Cup on the RIGHT I used:
PP1, PP6, EB2, EB7, & FS9

Once my images were colored, I cut them out using the matching Christmas Mugs Dies.

Then I die cut Rinea's Star Struck Mocha Brown foil paper from the Autumn Variety Pack using Pink and Main's Scalloped Circle and Large Bow Dies.

These are just too cute and so much fun to make. And when cutting them with Rinea's foil paper you can curve and mold them for added dimension and the will stay!How cool is that?!!


Then, to make the background to my card I used Pink and Main's Layered Stripes Dies and cut each layer to the background in different colors. The thick lines in aqua, the medium in pink, and the thin lines in a chocolate brown.

I adhere them together using my Xyron mega runner starting with the thickest stripe at the bottom and working my way to the thinnest stripe on top. Then mounted my background stripes onto an A2 sized card made from white cardstock.

I stamped my sentiment onto more chocolate brown cardstock using a Versamark ink pad and covered it with white embossing powder. Then heat set it, cut it into a flag, and mounted it over the top of the card.

Then lastly, I attached the scallop circle and bow onto the front of my card. I used foam adhesive dots to adhere my little mug and attached little flatback pearls in the center of each scallop.

And here is my finished card...


Here is another close-up...

I hope you enjoyed my card for today! 

Don't forget to head on over to the Pink and Main Blog and leave a comment below to enter into our GIVEAWAY!!

HOPE YOU ALL HAVE A SUPER CRAFTY DAY!!
~Mitsyana


***Disclaimer***
This blog is compensated to provide opinion on products, services, websites and various other topics. Even though the owner(s) of this blog receives compensation for our posts or advertisements, I always give my honest opinions, findings, beliefs, or experiences on those topics or products.

The views and opinions expressed on this blog are purely my own. Any product claim, statistic, quote or other representation about a product or service should be verified with each manufacturer, provider, or party in question.

Wednesday, August 10, 2016

Hello, DONUT!!


Hello, Crafty Friends!! I'm back with a super easy project that you will just devour!! But then again, it might just be too pretty to eat!! LOL


I cut out my pretty paper to make this cute little treat box. The box was cut from a die designed by Eileen Hull. It is her Flower Pocket die. And I was sooooo overjoyed and giddy with excitement when I realized that her box was the perfect size for... DONUTS!! How fab is that!!! Seriously... this just made me the happiest big little kid EVER!!!

These fabulous papers just made an inexpensive treat look tres chic!! And who doesn't love DONUTS, right??!!

Supplies Used
Double Sided High Tack Tape (Xyron)
Flowers
Leaves
Bling
Hemp Twine
Hot Glue
Coffee Bevarage w/ Straw (optional)


Today, I will be using gorgeous papers from DCWV's Hello Darlin' Stack. This stack is available at Joann Stores and On their website! I bought mine online here.


This entire stack is GORGEOUS!! Just look what a flipped to on the very first page!!


There were lots of other beautiful prints but ultimately this was the patterned I decided on using.


I started by cutting my 12'x12' paper in half. Now, I have two 6"x12" pieces.


I took one piece and completely covered just one of the panels (there are 2 on there). I do this because the die itself is about 13 inches long and my sheet is only 12. I if I just ran covered the entire die I would have a huge piece missing from one of my die-cuts. But If I cut each panel separately they both can fit on one 6"x12" piece of paper. 


Here is where the piece that was left over after my initial cut. I just turned the leftover piece to accommodate the second panel and presto both panels fit on one 12"x6" piece. This stretched my paper and now I can get 2 whole boxes from 1 12"x12" sheet of paper.


SEE!! 


Assemble is super easy. Just fold along the score lines and attach together by adhere the flaps to the panels. I like using a high tack tape for really strong hold!

And tah-dah!! This box is just too cute!!


And then when I thought this cute little ox couldn't get any cuter... I added a few pretty embellies to the front of my box. I secure them all place with a bit of hot glue.

And presto... Pretty Breakfast To-Go or To Gift!! Who would love to see this sitting on their desk waiting for them??


I'm thinking of making an arsenal of these pretty treats for my kiddos teachers and school staff  on a first day of school and start this school year with a delicious BANG!!

I hope you all enjoyed my project for the day. 
HAVE A SUPER SWEET & CRAFTY DAY!!!

~Mitsy


Thursday, April 21, 2016

My Favorite Things & Xyron Blog Hop


Hi Crafty Friends!! Welcome to fabulous day #2 of the MFT & Xyron Blog Hop!! We have some exciting projects from 2 amazing teams!! And IF you missed day #1, that's ok... there is still more awesome projects to see today and tomorrow. And... Do you want to hear more amazing news?! Xyron will be giving away one $50 Gift Certificate each day of the hop (Wednesday, Thursday, and Friday) to the My Favorite Things website. 
How freaking cool is that??!! Eeeeek!!!

Visit the Xyron Facebook page and leave a comment on any of the amazing MFT/ Xyron Hop Featured Posts... and Xyron will randomly choose a visitor/commenter to win. Yup, it's that simple!!

Now onto the crafty inspiration...

When I saw MFT Cool Cup die I knew I just had to get it!! I am a coffee lover and I absolutely am head over heals in love with frosty ones!! Maybe because it more closer to a dessert at that point! MMMMmmmm, they are so super yummy!! I don't care!! It's still coffee and so so delish! So I figured I'd indulge myself by making coffee themed projects!LOL 


Supplies Used
My Favorite Things Die-Namics Blueprints 18
My Favorite Things Pierced Traditional Tag Stax
My Favorite Things Die-Namics LLD Cool Cup
My Favorite Things LLD Stay Cool
DCWV Mini Album Stack & Stencil Projects Stack
Cut'n'boss (Craftwell)
eBrush (Craftwell)
Spectrum Noir Markers- GB9, EB3, JG5
White Cardstock (Bazzill Basics)
Heavy Vellum
VersaFine Onyx Black Ink Pad (Tsukineko)
2Way Glue Pen (EK Success)
1.5" Circle punch (EK Success)
Hemp Twine
3D Lacquer

I started by using my Cool Cup die to cut out all the cup pieces in white. The I ran it through again just cutting out the dome piece out of vellum.

Here I used my eBrush to airbrush my cup with a Spectrum Noir GB9 and the whipped cream with EB3 markers. Then ultimately decided I like the plain white better so I cut out a new topping and just left it white.

For the straw I went right over the top and colored it with a Spectrum Noir marker in JG5. This made it look like it came from a certain coffee house that is so popular.

Then I used my glue pen an attached my pieces together and added the dome

Then I ran my completed piece through my Creative Station Lite machine.


For my card base I standing A2 (4.25"x5.5") sized card made from craft cardstock.

Then I die-cut the tag from MFT's  Pierced Traditional Tags set. The double stitched circle and star is from the Blueprints 18 die set.
I used my Mega Runner to attach all my components to my card base. I used the Stay Cool stamp set and stamped my sentiment in Versafine Onyx Black Ink. Next, I attached a hemp bow  onto my card front.... And, for a cute little touch I hand drew stitch lines and highlights with a white gel pen.

For the coffee caddy ... All I did was used the box that came with my coffees and traced around it to make a template. Then I traced & cut my templates out. Then I ran all my panels through my Xyron Creative Station Lite. 

For the front of the caddy I mimic the same look of the card. Die cut a circle and star in coordinating patterned papers and attached with my Xyron Mega Runner. 

For the caps I didn't do much. I really like the taupe color but did cover up the coffee brand/ logo. I used a 1.5" circle paper punch. It was enough to cover the dark green of the logo but not enough to bury the taupe color I like! AWESOME!!

For the thin green strip I used the long thin rectangle die in the Blueprints 18 set an cut it out in coordinating paper. Again attaching with my Mega Runner then trimming off any excess.

Lastly, I wrapped twine around the handle and tied it into a bow.

And here is my Coffee Caddy and Matching Card!!! I hope you enjoyed this project!!


Don't forget to stop by the Xyron Facebook page HERE...for a chance to win that awesome $50 Gift Certificate from My Favorite Things!! **
Also, hop on over the MFT page HERE as well... For even more awe inspiring projects and maybe even a couple surprise too!! Share some love too and tell them that Mitsy form the Xyron Team sent ya!!

Hope you all continue to have a wonderful day!!

Until next time...
HAPPY CRAFTING!!
~ Mitsy


Monday, November 30, 2015

Kcup Caddy Gift Box - w/ Free SVG Template Download


Supplies Used
Winter Wonderland Double-Sided Cardstock 12"x12"- Frosty (Pebbles)
Winter Wonderland Double-Sided Cardstock 12"x12"- Toasty Warm (Pebbles)
Winter Wonderland Double-Sided Cardstock 12"x12"- Flurries (Pebbles)
Winter Wonderland Chips Die-Cut Shapes - Glitter Snowflakes(Pebbles)
Winter Wonderland Puffy Stickers- Snowflakes & Crowns (Pebbles)
Pink and White Twine (Recollections)
Enamel Dots (Virginia Turtle)
Diamond Glaze (Judikins)
4 New/Unused Kcups (Any Flavor)
Electric Die Cutting Machine with SVG cutting capabilities 
Kcup Caddy Templates (For Personal Use ONLY)

First, download the Kcup Caddy Templates. Remember, these are for personal use only.
In downloading these files, you acknowledge and agree to my terms (read full terms and conditions here).

 Then using your electric Die cut machine and editing software, open the file marked kcupbox-n-handle1.

You will need a 12"x12" sheet of cardstock for this. I used this pretty paper by Pebbles Inc. called Frosty.

The template is pre-scored so all you need to do is fold on the perforations. The two holes face up. fold the sides and back flap down and glue in place. I used my Xyron Mega Runner for this part so I didn't have to wait for drying time. You will need 2 of these boxes.

Then open the files marked kcupbox-n-handle2. This will make the handle for the caddy and mat/insert. You will need to of each.

 After cutting out my handles and inserts, I ran them through my Xyron Creative Station. I attached one insert to one handle and then glued both sets back to back to make it double sided and identical on both sides.

I then used my Xyron Mega Runner to attach my boxes to my handle.

For my box panels, I used the TOP HALF of the file marked kcupbox-n-handle3. The top half of this file is for the 4 cup Kcup panels. And the BOTTOM HALF are panels to turn your caddy into a 2 cup caddy. 

To make your caddy a 2 cup caddy, skip making the handles and replace with the back panels. The 2 square panels are the side panels for the 2 cup box (1 for each side).

Since I made a 4 cup caddy, I used the bigger panels. Then ran them through my Xyron Creative Station and attached them to my box.

For decorative accents, I used Pebbles "Chips" Glittered Snowflakes and cut it onto quarters. I used my diamond glaze to attach onto my box. I repeated this step for both sides of my box. 

Then I used more Diamond Glaze... this time leaving my snowflakes whole and applying only on the bottom half of my snowflakes and attaching to each side of my caddy. I also administered a small dot of adhesive at each top point of my snowflakes, attaching to the caddy. I held a gentle pressure on the tip until the adhesive set.

Then I topped it off with some twine. And finished it with a snowflake sticker with and enamel dot center.

Here is my finished Kcup Caddy...


 FRONT VIEW

BACK VIEW


I hope you enjoyed my project for today. 

And, even more so, I hope you enjoy my Kcup Caddy Templates!!

I love to see your creations! So, if you decide to make this caddy please post your pics to my Facebook Fan Page HERE! I can't wait to see your creations!! While you're there don't forget to like my page!

Until next time...
HAPPY CRAFTING!!
~Mitsy