Showing posts with label ek success. Show all posts

Friday, June 3, 2016

Planner Fun

Hello, Crafty Friends!!
Xyron and our Friends at Simple Stories have partnered together to bring you today's super easy project! And this lucky gal got to play with Simple Stories Bloom and Grow Collection. If you are a garden lover or gnome fanatic this collection is for you!! 

Today, I  will show you how to transform your daily planner for plain and ordinary to bright, cheerful, and most importantly... FUN!!

All you need are a few supplies.

1. A planner
2. Scrapbook Paper / Cardstock ( I used these awesome papers from Simple Stories)


3. Paper Punch or Paper Trimmer
4. Xyron Creative Station Lite
5. Fine Tip Black Marker

Here is a cool way to make your own decorative panels for your planners...


Simply use a paper punch to cut out patterned paper or cardstock. The one I used was a 2 " square punch. This fit nicely into each section.

 I used a combination of a few different papers for my Bloom & Grow Collection Kit. Each paper is double sided adding more coordinating options.

I cut these 9 different squares from only 3 sheets of paper.I love how each of them are different yet still go with and compliment each other.


Then I ran all my 2" panels into the Xyron Creative Station Lite, turning them into decorative sticker panels.

Then I randomly placed them into my planner squares. I love these bright bold colors! The definitely brightened up my pages.


I decorated my pages even further by adding a variety of stickers from my Bloom and Grow kit.


Because I covered up a few of my calendar dates, I used additional stickers to add those missing date back on. You can totally handwrite the numbers back in if you wanted to. I just prefer to do it this way because I loath my handwriting!

As another cool trick I hand drew the shadows to my new numbers. It gives the illusion that the numbers are three dimensional and helps make them pop off the patterned paper.


OMG... look how stinkin cute these gnomes are!! I just had to sneak a couple in for good measure! LOL

I also added a scalloped border to the "Notes" section and also added flowers. The Bloom and Grow also comes with border stickers, you don't have to stick with just decoration your days!! These were a bit long so I used scissors to trim off the excess and continued around the top and bottom of the lined area.

And here is my new decorated planner pages. Now, to fill in my important dates!!


Hope you enjoyed this quick tutorial on how to give your planner pages a crafty and colorful make-over!!

Until next time...
Happy Crafting!!
~Mitsy

Supplies Used
Bloom & Grow Collection Kit  (Simple Stories)
 Xyron Creative Station Lite
PITT Artist Pen S (Optional)
2" Paper Shapers Square Punch (Ek Success)
Planner


Saturday, March 28, 2015

Easter Fanpage Hop

Hello Crafty Friends I hope you all are having an awesome weekend!!
And speaking of awesome, I hope you all didn't miss the awesome line-up in the KaDoodle Bug/ Little Scraps of Heaven fanpage hop!! If you haven't there is still time!! 

Start here at he KBD fanpage...


Files used:

Chick and eggs- Eggsploding Sweetness (KaDoodle Bug Designs),
Bunny, flowers, & planter- Gnome in my Garden Collection (Little Scraps of Heaven Designs),
Stitched scalloped ovals & rectangles- Faux Stitched Mats (Little Scraps of Heaven Designs)


Additional tools used
Anna Griffin Embossing folder


CARD #2 


Additional tools used 
Sizzix Originals Designer Bookplates Die (retired)
Embossing Folders:
 Bunny- Swiss Dots (Cuttlebug), 
Dragon- Japanese Scales (Cuttlebug- Asian Bundle),
Jolie Lace (Cuttlebug- Anna Griffin)
Punches:
Cherish (Martha Stewart/ EK Success)
Four Petal Eyelet (Martha Stewart/ EK Success)
Lacy Days of Summer (Fiskars)


Card #3
This adorable Bunny is KaDoodle Bug Designs Hop FREEBIE #1 


Additional tools used
Doily-Pocket Die (Teresa Collins/ Craftwell)
Scallops Sizzlit Border Die (Hello Kitty/ Sizzix)
Stamp sentiment- Bunny Lovin' (Virginia Turtle)

And, as always...
All paper piecing have been airbrush with my eBrush machine by Craftwell


For more info on the hop visit the KaDoodle Bug or Little Scraps of Heaven fanpages!!

Hope you all have an awesome weekend and have fun hopping!!

~ Mitsy


Friday, March 13, 2015

Happy Birthday Monkey and KBD HOP


 Hello Crafty Friends... We are doing something special today!
We are celebrating KaDoodle Bug Designs' 4th birthday!!

Help us celebrate by taking part in an awesome Facebook fan page hop!! Start off at the KaDoodle Bug fan page and go down the line-up by visiting the next designated link. For info and instruction visit the KaDoodle page here!

~My page is 3rd in the line up... And here is my KDB birthday creation.~

All tools and supplies (besides KBD files) listed in this post are not that of our sponsors for this hop and is in no way affiliated with these companies. 


This sweet little guy is from KDB's Celebrate and Go Bananas file.

Celebrate And Go Bananas 

This is one of the newest Birthday sets Melissa Deuss has created and also is one of my favorites! Hey, it's has cupcakes in it, what can I say?! I LOVE CUPCAKES!!!


LOVE these stamps! They are from Pink and Main. I used the Stitched Greetings and Soda Pop sets. Love the fact that I can mix and match  my sentiment stamps with any of the stitched labels... as long as the sentiment fits in the open area it's fair game for play.


Surprisingly I only ebrushed my paper pieced monkey in this card! Usually I shade everything including the mat and sentiments. LOL 

But I love how it turned out!! 

Hope you enjoyed my project! Make sure you check out the rest of the hop line-up for more awesome projects!!

~DT Mitsy

Additional Supplies used:
Sizzix Eclips with ecal software
Ebrush
Spectrum Noir Markers ( FS4, FS9, CR8, IG1, GT1, LY3, DG2)
Sharpie Markers (brown, mustard) 
 Black PITT artist pen (Faber-Castell-XS)
White gel pen (Ranger)
Momento ink pad ( Tsukineko- Tuxedo Black)
 Scalloped Scallops Border Punch (EK Success)
Sizzix Originals Dies (Rectangle Frame, Scalloped Frame- both retired)
Cardstock
Matboard
Craft paper
Patterned Paper
Scotch Double-Sided Adhesive
Foam adhesive
Ek Success (Chalklets- Hot Pink)


Monday, February 23, 2015

LOVE, not just for Valentine's Day

Hello Crafty Friends...
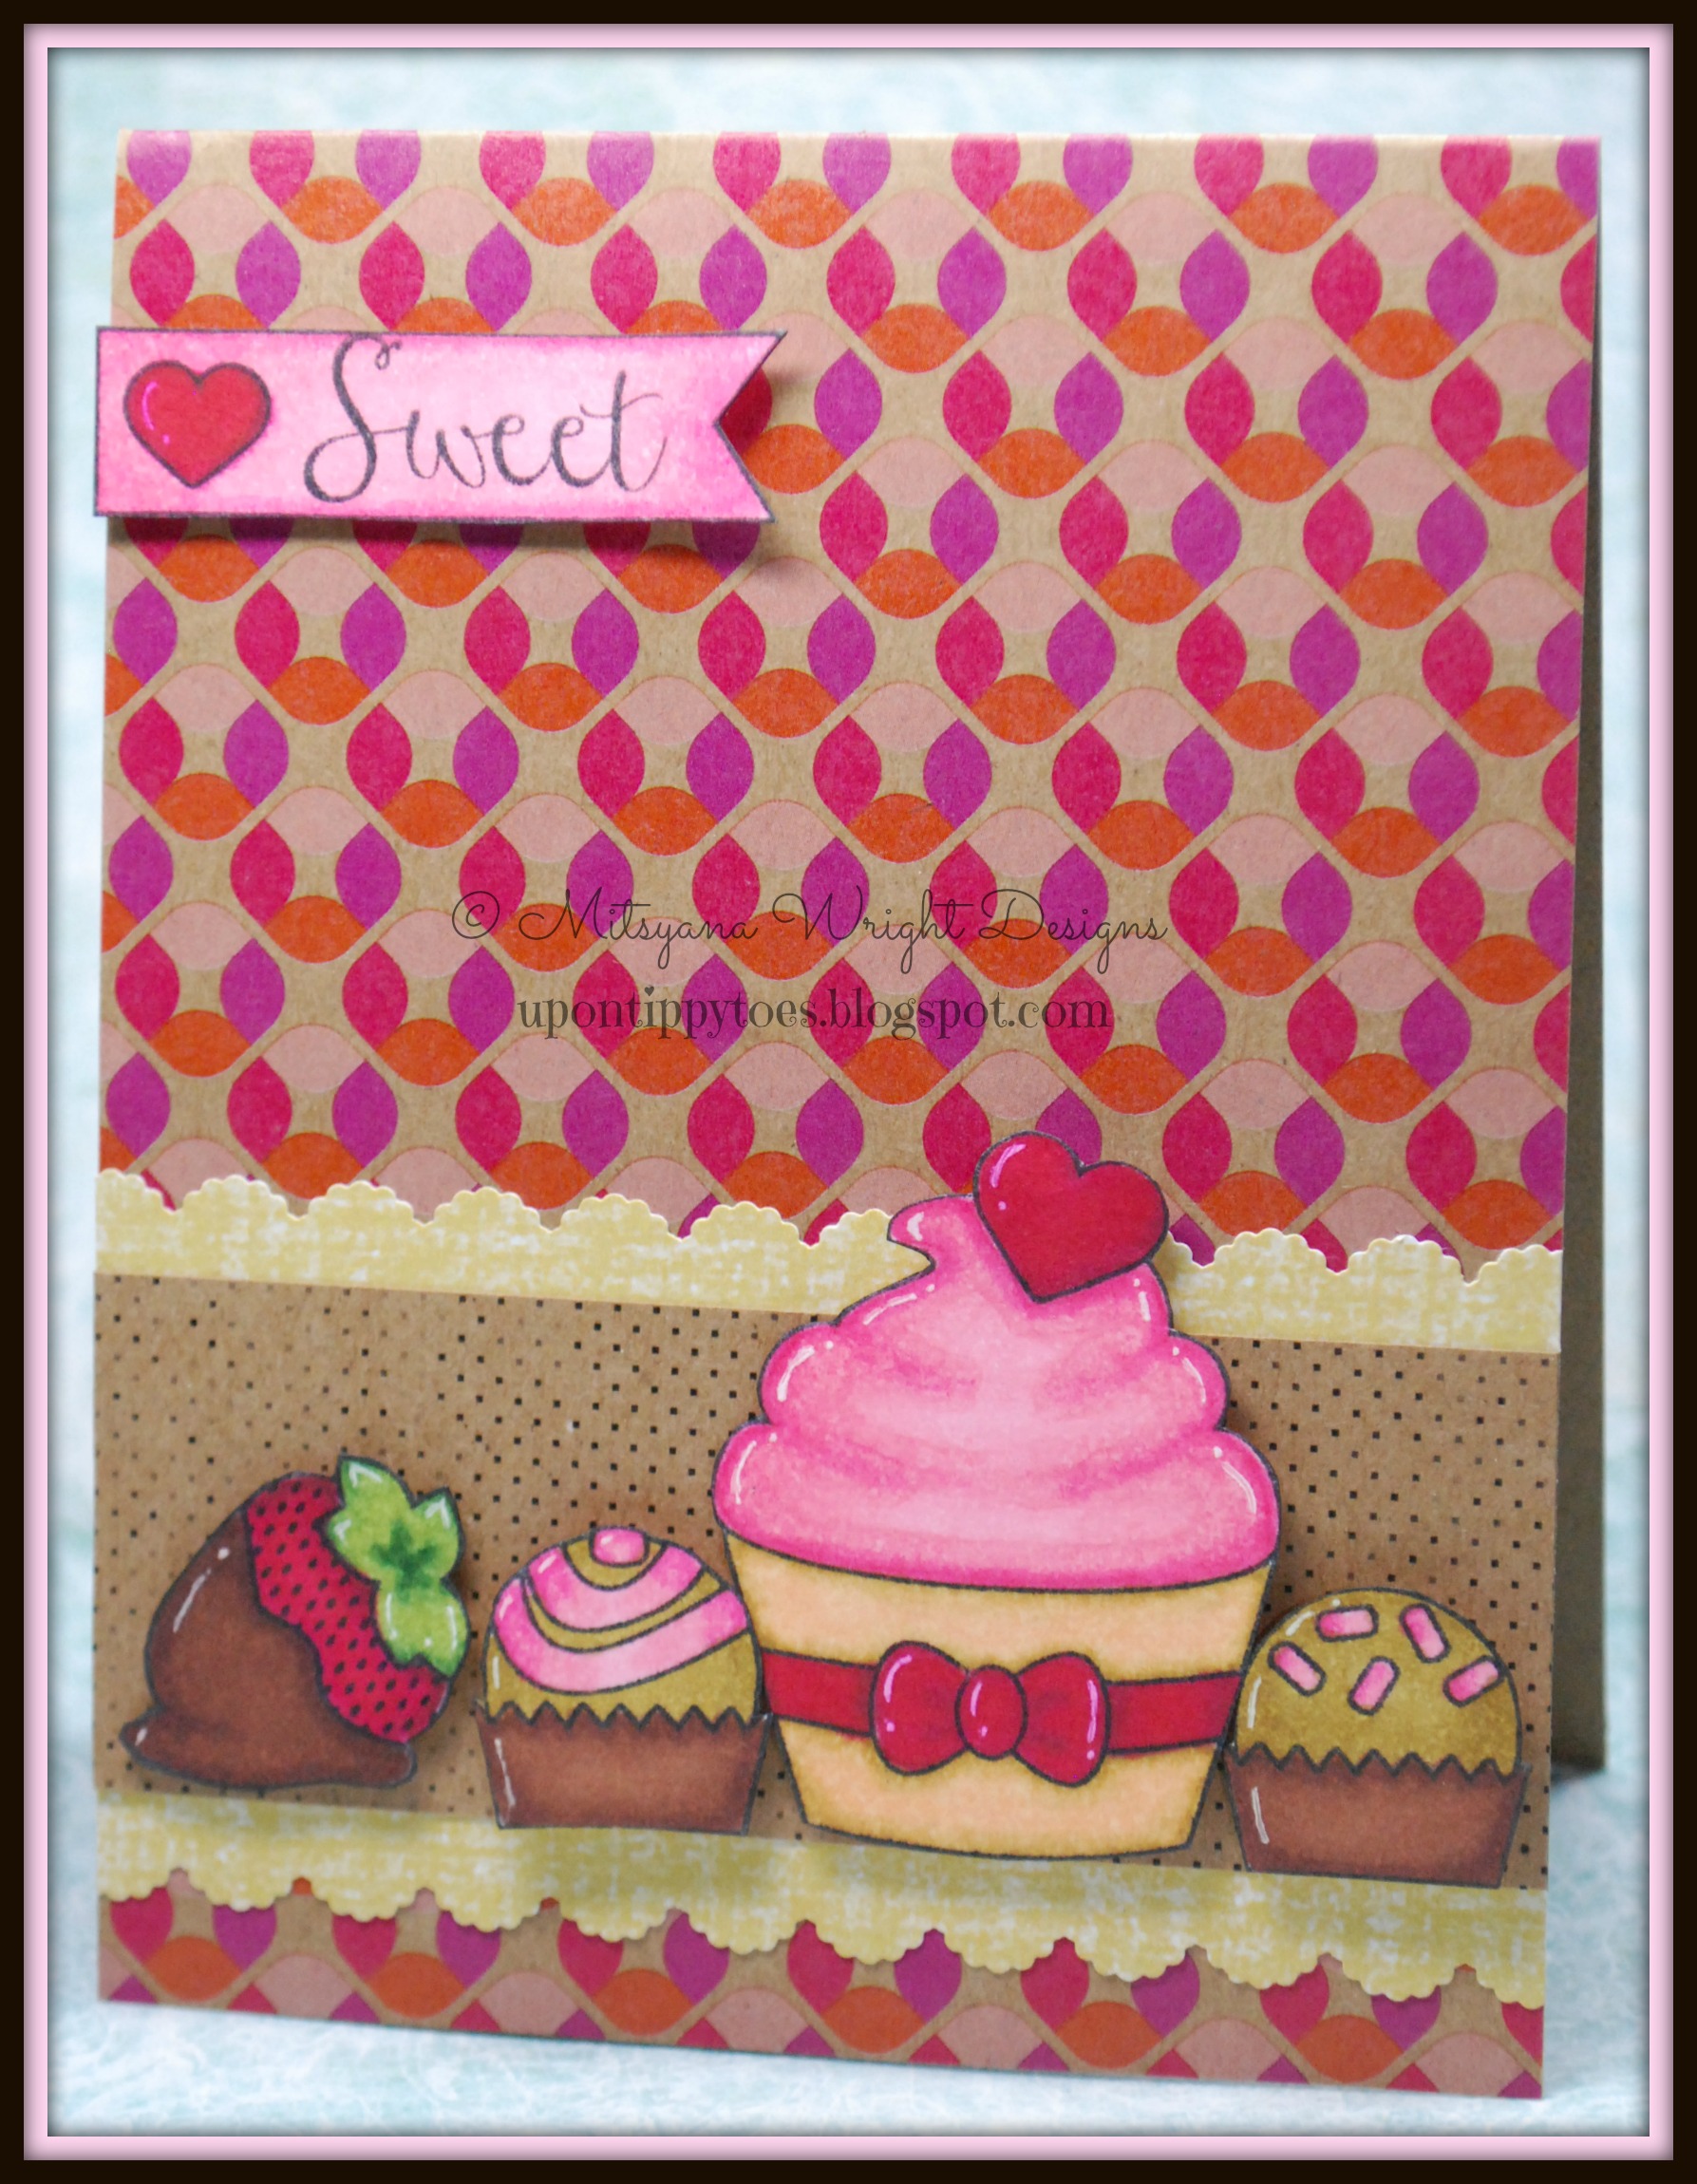
I know Valentine's day has passed but it shouldn't be the only reason to give someone some "LOVE". Sometimes sending friends and family a love themed card can tell them " hey, I'm just thinking of you" or "thanks, I really appreciate you". And, today's card does just that. I made a simple just because card... because it's nice to send some "love" to brighten someone's day!
sweet
 For this card I used Pink and Main's " Sweet on You" set for the cupcake, bon-bons, strawberry, and flag... and the "Sweet" is from the " Little One" set. These two sets work very well interchangeably as the flag and label shapes are pretty close in size.


 To color my stamped images I used Spectrum Noir Markers in colors P3, P5, DR3, DR5, DR7, GB2, GB8, TN7, and TN8.

Additional Supplies:
EK Success Scalloped Scallop Punch
Canson 150 lb. Illustration Paper
Momento Ink Pad by Tsukineko (Tuxedo Black)
Patterned Paper by 
Craft Smith (Typecraft)
and  DCWV (Sky's The Limit)

Hope you send someone some LOVE today!!
Happy Crafting!!
~ DT Mitsy

Thursday, October 30, 2014

3D Flower Birthday Card

Hello Again Crafty Friends... Today I wanted to share with you all a card I made for one of the most important women in my life. My mom. For me a store bought card just won't do. 

For someone as special as she is, I needed to pour lots of love into it... it needed to come straight from my heart.


Supplies Needed
Craftwell
eBrush and Copic(CP) adapter
Teresa Collins Cut'n'Boss
Teresa Collins Pocket Dies 
( Thankful Holidays set- Lg & Sm flower,leaf, berry twig, & scalloped oval label)
Happy stamp set
Stitched Greetings Stamped set
Copic
Sketch Markers (RV11, RV19, RV25, YR16, YG17)
Tsukineko/ Imagine Crafts
Versa Magic (Hint of Pesto)
Versafine (Onyx Black)
EK Success border punch (
Additional Supplies
Glue Gun & Glue Sticks
Scissors
Foam Adhesive
Double-sided Adhesive
Patterned Paper 
Various Cardstock
Ribbon


With my cut'n'boss. and my Teresa Collins pocket dies I cut  out my shapes in red, green, light pink, and white card stock. A great thing about using this machine is the huge platform. I can cut a lot of dies all at once. And, with the cut'n'boss' strong motor and gears cutting through several layers at once is a breeze.

For my flower I cut 4 red flowers, 2 green leaves, 1 small light pink flower, and 3 twig & berries ( I used them for stamens). I also cut the scalloped oval out 2 times (1 copper for the frame and i white for the center label). Then I adhered them onto a separate piece of cardstock to make one solid piece. 


I stamped my Happy Birthday phrase using two stamp sets from Pink and Main called "Stitched Greetings"( for the word happy, in Versa Magic - Hint of Pesto) and"Happy"( for the word Birthday, in Versafne - Onyx Black) .


For my flower, first, I ebrushed all my red flowers with a star pattern with Copic markers RV19 and YG17. 
   

I curled the end of my petals up, hot glued all flowers together alternating the pedals.


For the center of the flower I ebrushed the smaller flower in Copic Markers RV25, YR16, and YG17. I then I punched a hole in the center of the flower and set aside.The stamens I ebrushed in RV11, RV25, RV19 andYG17. 


I inserted my stamens into the center hole and secured them in place by hot gluing the stem from the bottom the flower.

I then hot glued this piece to the stack of red flowers.


For the leaves I ebrushed them with Copic Markers YG17 & YR16. Backed it by gluing to a piece of dark green cardstock and cut out by hand with my scissors.


I hot glued the leave to the under part of the flower. 

The  cardfrontwas made with a 6"x6" piece of foiled cardstock and a 1 1/4" strip of patterned  cardstock that I punched with my EK success bordderr punch and ebrushed with Copic YG17. I then wrapped with a piece of 7/8" olive green satin ribbon and attached my scalloped label with foam aadhesive for dimension. Then, I adhere this card front to a 6"x6"plain white card base I made by folding a 12"x6" piece in half.


This took a little bit of time to put together but was quite easy to do. Ebrushing all my pieces instead of shading them cut my work time down by more than half. I love this machine!

I hope this project has inspired you and thanks for stopping by!
Happy eBrushing!!

~ DT Mitsy 
https://upontippytoes.blogspot.com


Friday, January 31, 2014

Valentine's Day Card - Bee Mine

Hello Crafty Friends! I am in love with card making! Even more now than during the Christmas season. And today I would like to share with you two cards. Another Valentine's Day card (Valentine's Day is right around the corner, ya know)...and an everyday card (because our friends and  loved ones deserve to know we think about them on other days besides holidays). LOL


I am just love making VDAY cards!! I plan on making a few more before Valentine's Day gets here. This card is an A2 size. I used Designs on Cloud 9's Bee Bears file to make the flying bee bear. I got the hearts & honeycomb from the ecal shape library (for the honeycomb shape I used polygon 6 and added a shadow to get the honeycomb look). I also used a font called BubbleGum for the sentiment. 


Believe it or not this card started as a birthday card... Well, I had other elements originally incuded but as sometimes happens with my projects, things don't pan out the way I'd imagined... so presto, It became an everyday card. And, a very cute card at that.

This card is 5"x7". The Sun & Clouds I used DC9's Sunshine Title. This pattern is one of my absolute favorites and is THE must have cutting file! I use this sun in quite a lot of my projects... cards & layouts... it's awesome in both! The "sunshine" word and the sun's little hands came from DC9's My Sunshine Bear file. And, the face on the sun is actually a stamp from Treasure Box Designs. I used Cuttlebug's Divine Swirls embossing folder to add more depth & interest to the clouds. And I  two different corner punches from EK Success for the filigree & scalloped photo corners. 

Hope you enjoyed my cards... because I really enjoy making them! Stay tuned for more cards to come. I'm on a roll and I have to take advantage of it so I don't lose my crafting mojo. LOL... It's not fun to be in a craft funk!! So, I'm gonna let that baby ride as long as I can!

AND...

Don't forget today is FREEBIE FRIDAY! Every Friday Designs on Cloud 9 release a new FREEBIE for the week. This week's file is:

Cute Snail


And, you can find it here.


Hope you enjoyed your visit
HAPPY CRAFTING EVERYONE!!