Showing posts with label feathers. Show all posts

Wednesday, April 19, 2017

Be Brave

Hello Crafty Friends,
I'm here with #TeamPINK.. to show you my newest card featuring a new stamp set from Pink and Main thaat  has me feeling pretty adventurous!! If you crave a it of adventure or just like letting your wild side free, you'll love this new April Release called My Tribe! I'm having tons of fun with these little cuties... just see how I made this card down below.


I started by stamping the little tribal boy and girl out in black archival ink onto mixed media paper.
I colored my images with Tim Holtz Distress Markers in Spiced Marmalade, Vintage Photo, Scattered Straw, Wild Honey, Hickory Smoke, and crushed Olive.

Then, I used the coordinating dies to cut out my images.
I absolutely love the new Be Brave 6x6 Paper Pad!! And in all honestly, I think this pad was made specifically to coordinate with this set (but don't quote me on that! LOL), It has lots of geometric shapes, arrows, and feathers... so fun, right??!! And I love love love the color palette! I just had to pair the two together!

For the card base I cut two coordinating papers from the paper pad using the largest rectangle from the Stitched Rounded Rectangles Dies

Then took one of those rectangles and used it to cut a semi circle using the Stitched Circles Dies. this way I had a semi-circle with the stitched lines going around the curved edge as well as along the straight edge bottom.
I cut another rectangle but this time just a 1.5" wide fraction of it and attached it using my Xyron Mega Runner along the bottom of the full sized rectangle cut-out. 

Then, stamped the bottom right corner with the sentiment "be brave" in more black ink.

I centered the semi circle just right above the short strip, attaching with more adhesive tape. Then ran the entire card front through my Creative Station Lite.

I attached the card front onto a A2 sized (4.25" x 5.5"- folded ) card made from Corrugate cardstock.


Lastly, I stamped out these feathers and colored them with distress markers. Then cut them out with the coordinating die. I  bundled them together with a small piece of twine and tied it into a bow. Then I attached them to the lower left hand side of my card.

And here is my finished card...

Supplies Used


Other Supplies Used
Tim Holtz Distress Markers (Ranger)
140 lb Mixed Media Paper (Strathmore)
Mega Runner (Xyron)
VersaFine Onyx Black Ink (Tsukineko/ Imagine Crafts)
Foam Adhesive Tape
Twine

I hope you all enjoyed my card for today!
Don't forget to seek adventure in YOUR everyday crafting!!

Happy Stamping!
~ Mitsy

**Disclaimer**
My blog contains affiliate links. Clicking on and purchasing through these links help support this blog at no extra cost to you. Thank you so much for your support!

Wednesday, November 9, 2016

Hat Pin Book Tutorial & GIVEAWAY


Hello, Crafty Friends!! It's another gorgeous day in and out of my craft room!! And I want to share some of that gorgeousness with all of you!!

Speaking of GORGEOUSNESS in the craft room...

Today's project was made using GORGEOUS papers from DCWV's Royal Gypsy Stack. This entire stack is filled with beautiful patterns with a variety of rich blues. And as an awesome bonus... check out the awesome gold foil!!

Other Supplies Used
Eileen Hull Designs' Scoreboards Needle Book Die (Sizzix)
Mat Board (Sizzix)
Crinkle Ribbon
Eyelash Yarn
Le Plume II MArkers- Pale Green, Violet, Light Blue (Marvy Uchida)
Water Brush (Pentek)
Glossy Accents (Ranger)
Magnet Disks
Metal Embellishment (Momenta)
Rhinestone
Scissors
Paper Trimmer


This sheet is just an awesome sample of what is included. 
It is also what started this whole project! I was flipping through the pages and found a gold foiled feather. It was part of a panel that had a beautiful sentiment. But the sentiment was too large to what had in mind.


I decided to use it anyway. And used my Marvy Le Plume II Markers and a water brush to color and shade my gold feather. I used Pale Green for most of the feather with Lt. Blue down the center. I added more Lt. Blue up top and Violet in the center for the "eye". Then just blended out all the colors with my water brush.

Once I got the colors to the intensity I wanted, I cut the feather out by hand.

Such a pretty feather needs something just as pretty to lay on...

Image result for sizzix needle book
I had this awesome die in my collection and had been wanting to make one for a while now.

So, I used a couple coordinating sheets from the Royal Gypsy Stack and layered it onto some Mat Board. Then ran through my Big Shot stacked on my die... and cut it all at the same time!

It not only cut my patterned paper, it separated the patterned paper pieces at the crease lines (which saved me time from cutting them apart), and it made crease lines in the mat board, all in one pass!!

Next, I ran the segmented pieces through my Xyron Creative Station Lite to add adhesive to the backside of the paper.

Then attached the patterned paper to both sides of my book cover and buffed down the sharp edges with a sanding block.

I added a line of clear liquid adhesive to the inside middle of the book. ONLY down the center.

Then added a 4"x 3.25" piece of felt.

I didn't worry about glue showing through... I simply ran crinkle ribbon down the middle, flipped it over and tied it off on the outside. Finishing off with a basic bow.

Then I glued the closure to the outside of the back side of the book. wrapped around front to see where it met and added a magnet on both the book and to the closure strap. (No picture of this step sorry! By the time I realized I did take a pic I had already glue it down and was on the next step)

Once, my glue had dried. I moved onto dressing up my front. I wanted the feather to be the focal point of the cover but it got lost in the patterned paper I chose.

I found the really pretty gold foil doily on the Paper Lace pad and it was perfect... it just needed to be trimmed down a bit. I cut about 2 inches off and attached it to my front cover.

Then added foam adhesive behind the feather and mounted it onto the doily. I tied eyelash yarn around the feather for more texture, then added a metal embellishment to the bottom of the feather.

And here is my finished book...

I also added a tiny rhinestone to the top of the closure. 

And...

Remember when I said I wanted to SHARE some GORGEOUSNESS??!!

Well, I am giving away this Hat Pin Book to one lucky person!!
But what's a Hat Pin Book without HAT PINS, right??!!

So... Included in this GIVEAWAY are three handmade hat pins!!!!

Each pin was handmade (by me) with Swarovski Crystals!

***Disclaimer***
This giveaway is in no way sponsored, affiliated, or endorsed by Facebook, Twitter, Instagram, or any of their subsidiaries.

You do not have to "follow" or "like" to be entered in the giveaway but if you did, it would be greatly appreciated!!

Good Luck, Everyone!!

Hope you all have a GORGEOUS day!!


**UPDATE**
THIS GIVEAWAY IS CLOSED AND THE WINNER WAS ANNOUNCED IN A SEPARATE POST

You can follow me on the following:


Instagram


Saturday, October 3, 2015

SVG Attic - Pink &Main Spook-tacular Blog Hop

Welcome to the SVG Attic-Pink & Main Spook-tacular blog hop!  We are so excited to have you join us today!
At each stop of the hop we hope you will be inspired by the creativity of the design teams of SVG Attic and Pink & Main. You are sure to find many wonderful projects that will be at the top of your crafting lists!

You should be arriving from Angeline's blog. If you happened across this post out of order, please head to the SVG Attic blog to start at the beginning of the hop.

Here is the project I created:

For my projects I made a card using Pink and Main's Witch House stamps set and Scalloped Waves Die for the hills.

         Image 1

Closer View
I stamped my image with Versafine ink and colored with color pencils.

I airbrushed my rolling hills with my ebrush and a green sharpie marker.

and for my top hat I used the Mourner's hat from the JGW Raven Quest file

JGW Raven Quest
Assembly was super easy on this top hat. And was totally awesome I glued it together with my Xyron Mega Runner so there was no waiting for the glue to dry!! Yay!!

This file came with the hat, feathers, bow and the skull. I added the shabbies, ostrich feather, rhinestone flourish, and hat pins.


I love making both pf these projects... I am a  Halloween NUT and it is my absolute favorite holiday!! I hope you enjoyed my projects!!

Now how about some blog hop prizes??

$20 Gift Certificate to SVG Attic

Oooooh, and by the way, SVG Attic is having an AWESOME SALE  going on NOW!! You may want to stop in and check it out and buy all these wonderful files from today's hop at a bargain!!


 Winner's choice of 2 stamp sets from

What do you need to do to be eligible for these amazing prizes?
1.  Become a follower of each blog in the hop. 
2.  Leave some comment love at each stop.  You can do so until midnight on Sunday, October 4th to be eligible for the prizes.
3.  If you do both of the above, check back at the SVG Attic blog and/or the Pink & Main blog for the winners on Tuesday, October 6th.  

We would also love it if you would stop by the SVG Attic and Pink & Main Facebook pages and give us a "Like"!

Here is the complete blog hop lineup:
Angeline
Mitsyana (You Are Here)
 Lisa (Go Here Next)
Annie
Beth 

I hope you have enjoyed this stop on our hop!  Be sure to head on over to the other stops for more Halloween inspiration.  Comment and become a follower to be eligible for the prizes!

Sunday, June 28, 2015

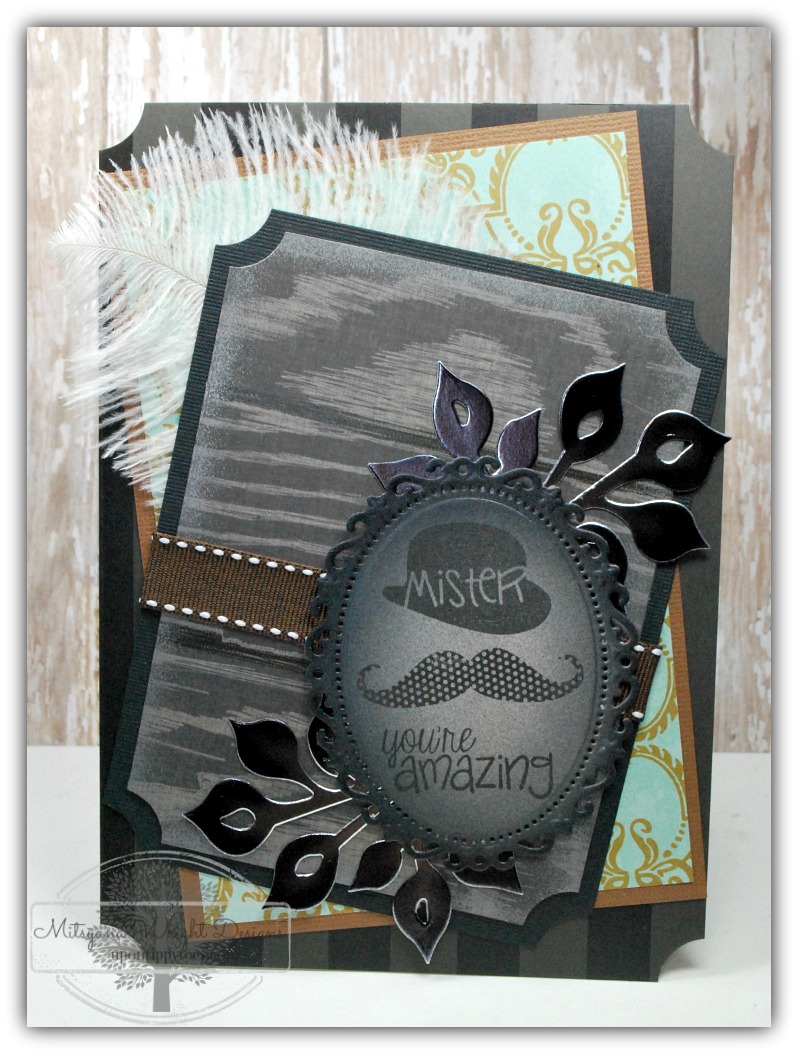
Mister... you're amazing!!


Hey Crafty Friends, Mitsy here!!!  I'm entering Die-Namites monthly Sketch Challenge and Dare!! 
This month's dare was to create something "manly".
The sketch doesn't have to be exact and can be loose interpretation... which I love. I just need to "somewhat" follow their sketch and make it "manly"... ok, I can do that... I think. LOL
Here is the sketch:

And I used the Die-Namites Small Ivy Die to incorporate into my card. I love that this isn't a flowery die. Flowers are pretty and delicate and some "men" (not all) don't like a card that is too frilly. So these ivys are a great choice.

Small Ivy


This card is for my Father-in-law. I would summarize him as very classy with a bit of old world. He likes to sit outside at night and smoke cigars and read the newspaper. Sometimes my husband and I take the kids over to visit… he’ll come inside and share a bottle of wine with me and my husband and ask about our day, our kids, or my side of the family.  Simple courtesies that in today’s society have become a rarity. He’s a classy man who’s entitled to a classy card.  

I thought the Mister set from Pink & Main would go great with this month's challenge. This is an awesome “Guy” set. I Love how it come with several different mustaches in different sizes, shapes, and even patterns!! But my favorite stamp of this has to be the houndstooth stamp! I also used it to make an awesome background for another card here.


Here is how I put my manly card together...
First, I started off by cutting a scrolled oval from my Spellbinders Floral Oval set. I airbrushed around the edges with my ebrush machine and my Spectrum Noir MArkers in BGR1, BGR2, and BGR3.

Then I used my hat, mustache, and sentiment from Pink and Main's Mister stamps set with my Momento ink pad in Tuxedo Black.
  I wanted a bit of shine on my card and since rhinestone don't appeal to too many men I opted for metallic paper instead. Graffix makes cool metallic cardstock that comes in different color bit I chose their plain silver...


I used my Die-Namics Small Ivy die and cut out 2 ivy branches.

Then I airbrushed the leaves with a black Sharpie marker. Even though I airbrushed the color over the paper it still maintains all the shine of the metallic paper.
I set that on the side.
I made a couple of mats and ran them through my Xyron Creative Station.
I also made a card base and another mat from these awesome dark , masculine paper by Craft Smith... this is from their Natural Luxury stack.
Then I ran all my pieces through my Xyron Creative Station. 

And pieced all my elements together. I decide to add an ostrich feather behind one of the mats at the last minute... I think I like it!

And here is my finished card...


I hope you liked my project!!

Come back and visit for more crafty inspiration!
~ Mitsy


Thursday, March 26, 2015

Faux Stained Glass Vase

Hi Crafty Friends!! Today I decided to step away from the paper crafts and try my hand at something I wanted to do for a while... Faux Stained Glass.

The art of stained glass is too time consuming and far too expensive to invest in yet again, another craft to spend my already tight budget. Buying all the specialized tool cutters and glass panes are a little to rich for my taste. And, on top of all that, the time it takes to cut and piece and then somehow weld the pieces together to make one solid... um, no thank you! It's not for this busy mommy!! 

And, if you are a busy bee like me... and if you already have an eBrush... then this is a great alternative that won't break the bank or take up very much space!


Supplies needed:
eBrush by  Craftwell
Glass Vase
Liquid Leading
Sharpies (bright blue, bright green, mustard/ tan, purple)
Image 
Blue Painter's Tape


I started by doodling a peacock feather about the length of my vase. I used the actual vase to trace along the top and bottom of my vase for an approximate drawing area to draw in. Make sure you take into consideration  the base of your vase may have a thick base and accommodate your drawing accordingly. 

It's ok if you have no drawing skills. There are a lot of  free images online to search for. And if you are using someone else's art work, always ask for permission before using.


Once you have your image to the desired length and size, tape to the inside of your glass vase. Always put your image in the opposite side you will be spraying on.


I then ebruhed my colors directly on the glass, using the image as a guide. Usually, you would have to put your liquid leading down first but I wasn't filling it with more liquid. And if I sprayed over it , you would see where I sprayed on the liquid leading as well.


After spraying down your colors to your liking, finally, trace the outline of your image with your liquid leading. Set aside and let dry! And, you are all done!!

Now, all I need is my darling hubby to fill my pretty vase with pretty flowers!! Anyone want to send him a hint for me?! LOL

Hope you enjoyed this eBrushed project and decide to give it a try!!

~ Mitsy