Showing posts with label guy cards. Show all posts

Tuesday, June 20, 2017

So Awesome - Pink and Main & Xyron Blog Hop


Hello, crafty Friends!
Welcome to day 2 of the Pink and Main & Xyron Blog Hop! I am so excited to get to share with you another inspirational project featuring awesomely cute Pink and Main Stamps paired with fabulous Xyron adhesive!


We hope to inspire you all week with fantastic projects from both design teams! 
Please visit each of Pink and Main's DT member's blogs for a chance to win a $25 Pink and Main gift certificate AND a Xyron Mega Runner. More details below.

Supplies Used


Too Cool (Pink and Main)

      
Take Flight (Pink and Main)
Take Flight 2 (Pink and Main)

Mega Runner (Xyron) 
Big Shot Machine (Sizzix)
Tim Holtz Cityscape, Skyline (Sizzix) 
Chalkboard paper (DCWV)  
140 lb Mixed Media Paper
Versafine Onyx Black Ink Pad (Tsukineko/ Imagine Crafts)
Tim Holtz Distress Markers (Ranger)
Waterbrush
Acrylic Block


I started by stamping my image from the Too Cool set onto mixed media paper. I like to water color my images and this type of paper holds up to moisture really well with minimal buckling. I colored my image using distress markers then blended out with a waterbrush till I got the desired look.

I die cut 2 large Stitched Rounded Rectangle Dies for my card base one from clouds paper and the other I cut a 1-1/2" strip from gray striped paper.

Then I die cut out 2 cityscape silhouettes. One from a fun deep red chevron paper and the other from chalkboard paper.


I love this little dude on his skateboard! How cool is he in his tiny shades?! And of course, he has to skateboarding somewhere equally as awesome! So why not the city, right?!

I used my Xyron Mega Runner and attached the strip of gray at the bottom of my card creating pavement. This was perfect to set my cityscape on top.

Then I propped him up with foam adhesive and mounted him at tilt to make it look his doing cool trick on his skateboard.

Then I stamped my sentiment in the lower right corner with black ink.

Here is my finished card...
How awesome is he?!
SO AWESOME!! Sorry, I couldn't help myself!
You have to admit, he is pretty awesome though. Makes me almost want to take up skateboarding... almost! With my luck and lack of coordination, I'd end up flat on my face!
I think I better stick to crafting!


I hope you enjoyed my project for today!!

Don't forget to enter for a chance to win the $25 Pink and Main Certificate and Xyron Mega Runner Prize Package!

All you have to do is visit each participating Pink and Main Design Team Member's blog and leave a comment on the blog hop posts.

Easy Peasy Mac and Cheesy!!

But wait!!
The Xyron Team is also giving away a prize package!!
Make sure you visit the Xyron Facebook Page and comment on any of the Pink and Main & Xyron Blog hop posts throughout the week.

There will be tons of inspiration from both teams! So keep coming back!!


***Disclaimer***
This blog is compensated to provide opinion on products, services, websites and various other topics. Even though the owner(s) of this blog receives compensation for our posts or advertisements, I always give my honest opinions, findings, beliefs, or experiences on those topics or products.
The views and opinions expressed on this blog are purely my own. Any product claim, statistic, quote or other representation about a product or service should be verified with each manufacturer, provider, or party in question.

This blog may contain affiliate links, making a purchase through these links helps fund this blog at no additional cost to you.

The giveaway above is in no way sponsored or affiliated with Facebook, Instagram, Twitter, or any of their subsidiaries.

Sunday, June 28, 2015

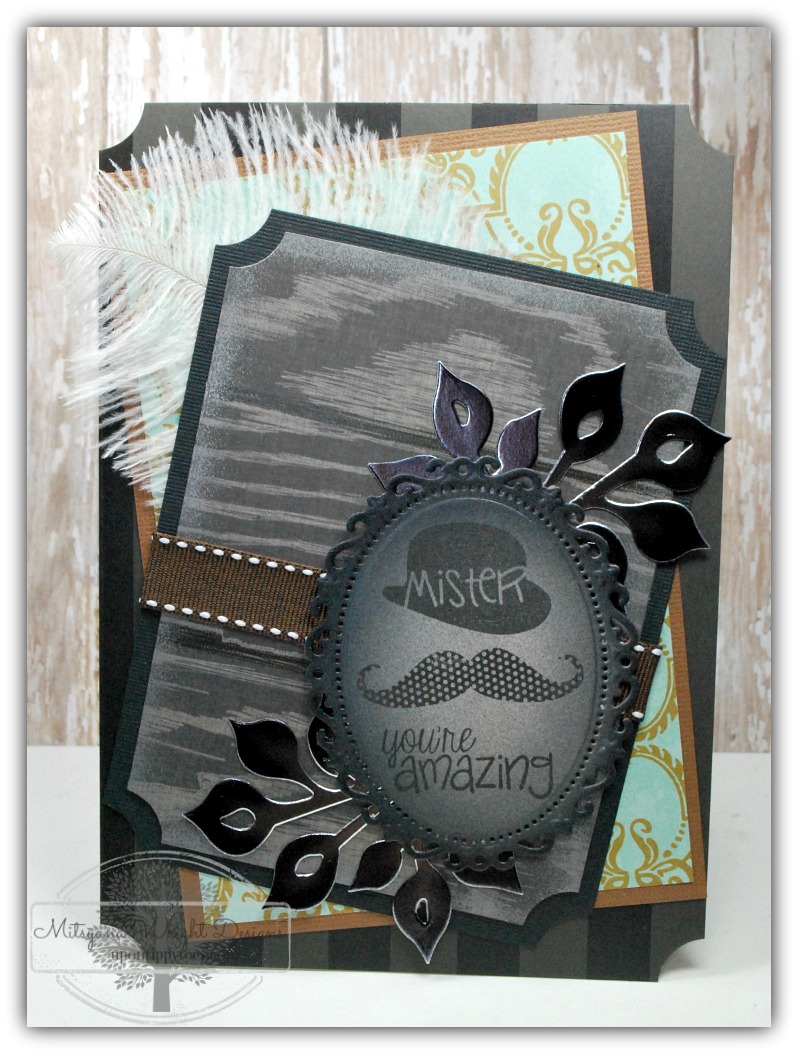
Mister... you're amazing!!


Hey Crafty Friends, Mitsy here!!!  I'm entering Die-Namites monthly Sketch Challenge and Dare!! 
This month's dare was to create something "manly".
The sketch doesn't have to be exact and can be loose interpretation... which I love. I just need to "somewhat" follow their sketch and make it "manly"... ok, I can do that... I think. LOL
Here is the sketch:

And I used the Die-Namites Small Ivy Die to incorporate into my card. I love that this isn't a flowery die. Flowers are pretty and delicate and some "men" (not all) don't like a card that is too frilly. So these ivys are a great choice.

Small Ivy


This card is for my Father-in-law. I would summarize him as very classy with a bit of old world. He likes to sit outside at night and smoke cigars and read the newspaper. Sometimes my husband and I take the kids over to visit… he’ll come inside and share a bottle of wine with me and my husband and ask about our day, our kids, or my side of the family.  Simple courtesies that in today’s society have become a rarity. He’s a classy man who’s entitled to a classy card.  

I thought the Mister set from Pink & Main would go great with this month's challenge. This is an awesome “Guy” set. I Love how it come with several different mustaches in different sizes, shapes, and even patterns!! But my favorite stamp of this has to be the houndstooth stamp! I also used it to make an awesome background for another card here.


Here is how I put my manly card together...
First, I started off by cutting a scrolled oval from my Spellbinders Floral Oval set. I airbrushed around the edges with my ebrush machine and my Spectrum Noir MArkers in BGR1, BGR2, and BGR3.

Then I used my hat, mustache, and sentiment from Pink and Main's Mister stamps set with my Momento ink pad in Tuxedo Black.
  I wanted a bit of shine on my card and since rhinestone don't appeal to too many men I opted for metallic paper instead. Graffix makes cool metallic cardstock that comes in different color bit I chose their plain silver...


I used my Die-Namics Small Ivy die and cut out 2 ivy branches.

Then I airbrushed the leaves with a black Sharpie marker. Even though I airbrushed the color over the paper it still maintains all the shine of the metallic paper.
I set that on the side.
I made a couple of mats and ran them through my Xyron Creative Station.
I also made a card base and another mat from these awesome dark , masculine paper by Craft Smith... this is from their Natural Luxury stack.
Then I ran all my pieces through my Xyron Creative Station. 

And pieced all my elements together. I decide to add an ostrich feather behind one of the mats at the last minute... I think I like it!

And here is my finished card...


I hope you liked my project!!

Come back and visit for more crafty inspiration!
~ Mitsy


Saturday, January 31, 2015

Poo Valentine

 WARNING: CRUDE HUMOR AHEAD!!
If you get easily offended please turn away right now or skip over this post!
If not, and would like a good laugh, you may proceed!

Ok, I admit I have a strange a slightly twisted sense of humor. And... I may add... I will not at all deny that I could not, for the life of me, stop laughing while I was creating this card!

I laughed while designing the sketch!
I laughed the entire time cutting it out!
I was ecstatic, elated, head over heals delighted as I was ebrushing the creases of my pile of POO!!

I was in tears of joy as I glued down my heart shaped flies and rising swirls of steam!
"Why", you ask? Because I made a card that perfectly sums up my feelings for my husband! It encompasses the very passion that sometimes is hard to express with mere words!!

Yup, nothing says it better than ... " I love the SH*T out of you"!

BAM!! THERE IT IS!


Yup nothing says it better! EXCEPT... a handmade card with an airbrushed steaming hot turd on the front!!


Cutting files used were from Designs on Cloud 9:
Warm Cocoa- for the pile-o-poop (whipped cream) and steam
&
Little Love Notes- for the scalloped and stitched rectangles


Fonts used:
KG Always A Good Time (for the word love)
&
KBbubblegum (for the rest of the wording)

Hope you enjoyed this "crap-sterpiece" !

THANKS FOR STOPPING BY TO LOOK AT MY POOP!

~Mitsy


Thursday, January 29, 2015

Valentines for the HUBBY


Hey eBrushing friends... Today I have 2 cards to show you.
As we all know Valentines Day is fast approaching. And, if you are like me it's very hard to find card that appeal to your male counterpart. Most store bought cards are frilly or cutesy, doused with glitter, and mostly attract the female eye.

So, this year, why not try making your own Valentines Day card for that special guy in your life.


Supplies Used:
Teresa Collins Pocket Dies (Lovers' Lane Die Set)
Personal Die Cut Machine
Studio Calico - Huey's Masks (V-pattern mask)
Patterned Paper (Craft Smith - Natural Luxury)
Metallic Paper (DCWV- Metallic Stack - gold, silver)
Cardstock (black, white)
Spectrum Noir Marker (IG1)
Sharpie (Metallic- Gold, and silver)
3D Lacquer 
Blue Painter's Tape


I started by ebrushing my pattern onto my white cardstock with my Studio Calico Mask and Spectrum Noir Marker in IG1. I used blue painter's tape around the edges of my paper to secure in place.


I chose very masculine colors for my card. Shades of grays, black, and metallics. I chose the lightest shade of gray I had for my background. I did this for two reasons... 1) I didn't want it to be too stark and overwhelming against the white, and 2) If it was too light I could simply layer the color on until I got to the shade I wanted... remember, you can always add but it is very hard to take away!

One I ebrushed my background and matted it onto black cardstock I notice it needed a little extra something... I simply ebrushed a few "splatters" with my metallic gold Sharpies.

Aaaahhh... much better!!

Then I cut out this phrase from my Teresa Collins Pocket Dies and personal die cut machine. I ebrushed the top half with my silver Sharpie and the bottom with gold. I then adhered it to my card front. Again, something was missing, it seemed too flat to me... so, I added 3D Lacquer directly to my die cut phrase. I also cut out a heart frame and "happy" flag and glued everything to a 6"x6" card I made from black and gray chevron paper.

And here is my finished card:


I loved this color scheme an layout so much I decided to make a second card. Same color scheme, same layout, different dies.

Here I used more Teresa Collins Dies.. from  the same set , Lovers' Lane, and made an additional card for my sweetie.

And here are my finished Valentines Day cards.


I hope the hubster loves them as much as I enjoyed making them!

Thanks for stopping by!!
&
Happy Crafting!!

~Mitsy