Showing posts with label unicorns. Show all posts

Wednesday, August 12, 2020

Be a UNICORN - Mini Journal

Hey, Friends!! Happy Hump Day! Today I have a bright and cheery project to share! 
All month long the Eileen Hull Inspiration Team will be sharing Junk Journal projects and let me tell you right off the bat I am not a Junk Journalist!!

Don't get me wrong, I love journals! I love making them. I love that I can personalize each book... but I CANNOT for the life of me fill them to the brim and decorate the innards of said books.

The thought of decorating each and every page, staining the pages, and having hidden flaps and compartments terrifies me and gives me anxiety. 

Well, my daughter's birthday is coming up and she has been begging and begging me to make her a pretty journal. She has seen the handmade journal I make and has always tried to stake a claim on them. But since lost of my projects are for different teams I'm on so sadly I have to remind her that they already belong to someone or need to be mailed off somewhere.

This time I made this one for her! She doesn't care too much for overly extravagant or any of the "foufou" stuff. Which is absolutely perfect for me because I can't compose a junk journal to save my life. Instead, her journal is more of like a journal/ scrapbook/organized hybrid. 

Don't let the Junk Journal title turn you off and intimidate you. It can be whatever it is you want to be. And you can use it and fill it as YOU want. This is YOUR JOURNAL. And you can do (or not do) with it as you want.

Let me show you what I did with this one...


Supplies Used
Eileen Hull Passport Die (Sizzix)
Eileen Hull Place Card & Flowers Die (Sizzix)
Eileen Hull Bookmark, Tag & Pocket (Sizzix)
Tim Holtz Stitched Oval Dies (Sizzix)
Mat Board(Sizzix)
Mega Runner (Xyron)
Essentials Paper Pack (Kingston Crafts)
Unicorn Mini Books (Hampton Arts)
Unicorn Envelope
Inktense Pencils - Fuschia 0700 (Derwent)
140 lb White Cardstock (Accent)
2mm Elastic Cording
Bonefolder 
Clear Drying Liquid Glue
Clothespins- OPTIONAL


I started off by cutting my mat board into smaller segments. To make the passport, you really only need to cut the cover and spine pieces with chipboard and not the entire die with chipboard. You will need two cover and one spine. Then, I cut my paper down to the same sizes as the chipboard pieces. 

I ran my paper through my Xyron Creative Station and adhered them onto my mat board pieces to cover the fronts and backs of each.


Then, I placed my pre-covered mat board over just the cover and spine piece as shown in the pictures down below.

As a rule of thumb (and to determine what side will end up where), I always put whichever side I want to end up on the front directly against the die. The side I can see is always going to be the backside.  So if it's faced up towards you, it will end up on the inside of the cover.


Once die-cut, I folded the spine along the crease lines. Then added glue along the sides and attached them to the cover pieces. I held the cover pieces in place using clothespins until the glue set.


I die-cut the page portion of the die from cardstock and folded it along the crease line and scored it with a bone folder. 

I'm not creating my own page inserts for this book. Instead, I will be using these as divider tabs.


To add tabs to my dividers, I used Eileen Hull's Place Card & Flower Die to die-cut fun patterned filled paper.

Again, folding along the crease lines.


I used my Xyron Mega Runner to attach the place cards to the sides of my die-cut insert piece.

I also die cut a few coordinating flowers (also included on the Place Card die) from white cardstock and attached them to the flower tabs- covering the front and back of each tab.


Pretty dividers weren't enough so I used Eileen Hull's Bookmark, Tags, & Pockets dies to create adorable tags and pockets to attach to each divider.


I also used the scalloped corners in the die set to mount a removable photo mat.

I aligned and attached the two bottom corners first and used the top of the photo mat as a guide for placement for the other two so that they would be perfectly spaced.


To decorate the front cover, I fussy cut this pretty unicorn I found on a paper bag! 

I die cut an oval and place the unicorn over it to gauge how I wanted to cut it. I didn't want the hoof to get cut off so I placed it over the top of the die, through the oval, and not under the cutting edge so it would die cut the unicorn without cutting off its leg.


I attached the unicorn onto the oval then attached that onto the front cover.

I threaded elastic through the spine and slid in pre-made books from Hampton art I found at my local Walmart. They were perfect and were already Unicorn themed so I didn't have to alter the covers.

Here is the finished journal...


It turned out great! It's bright, cheerful, and super fun!!
Just like my daughter!

I just know she will love it!

I hope you enjoyed this tutorial and that you are inspired to create one for yourself.

HAPPY CRAFTING!!
~Mitsyana 

Monday, March 2, 2020

May Unicorns & Rainbows guide your dreams


Hey, Crafty Friends!!
I'm back with another gorgeous card I created for the I Am Roses Design Team. This card is packed full of color and I am ecstatic!


 A rainbow color scheme that was inspired by the very flowers themselves. Well, actually, these specific flowers...


They instantly made me giddy with joy! I was just blissfully in awe. How did they get so many beautiful colors on such a small surface without turning those petals to mud?

And with the color code name "UNICORN", these babies quickly became my new obsession! I just had to create something with them and I am so glad I did too. Let me show you how I made this dreamy creation...

Supplies Used
Mini Round Roses (I Am Roses)
Small Rounded Roses (I Am Roses)
Spring Cottage Flowers (I Am Roses)
Big Shot (Sizzix)
Big Shot Glitter Cutting Pads (Sizzix)
Stitched Oval Dies (Pink & Main)
Life Changing Blending Brushes (Picket Fence Studios)
Tim Holtz Life's Possibilities Clear Stamps (Stampers Anonymous)
VersaFine Onyx Black (Tsukineko/ Imagine Crafts)
140 lb White Cardstock (Accent)
Pastels Cardstock Stack (DCWV)
Vellum (Grafix)
MISTI (My Pink Petunia)


If you've been following for a while, you know that I have a love for #10 (I create mine to be 9 1/2" x 4"- slightly smaller than the #10 envelope) cards. I love the tall sleek stature. It's different from that of the A2 (5 1/2" x 4 1/4") sized card that has become the standardized go-to for most crafters. 

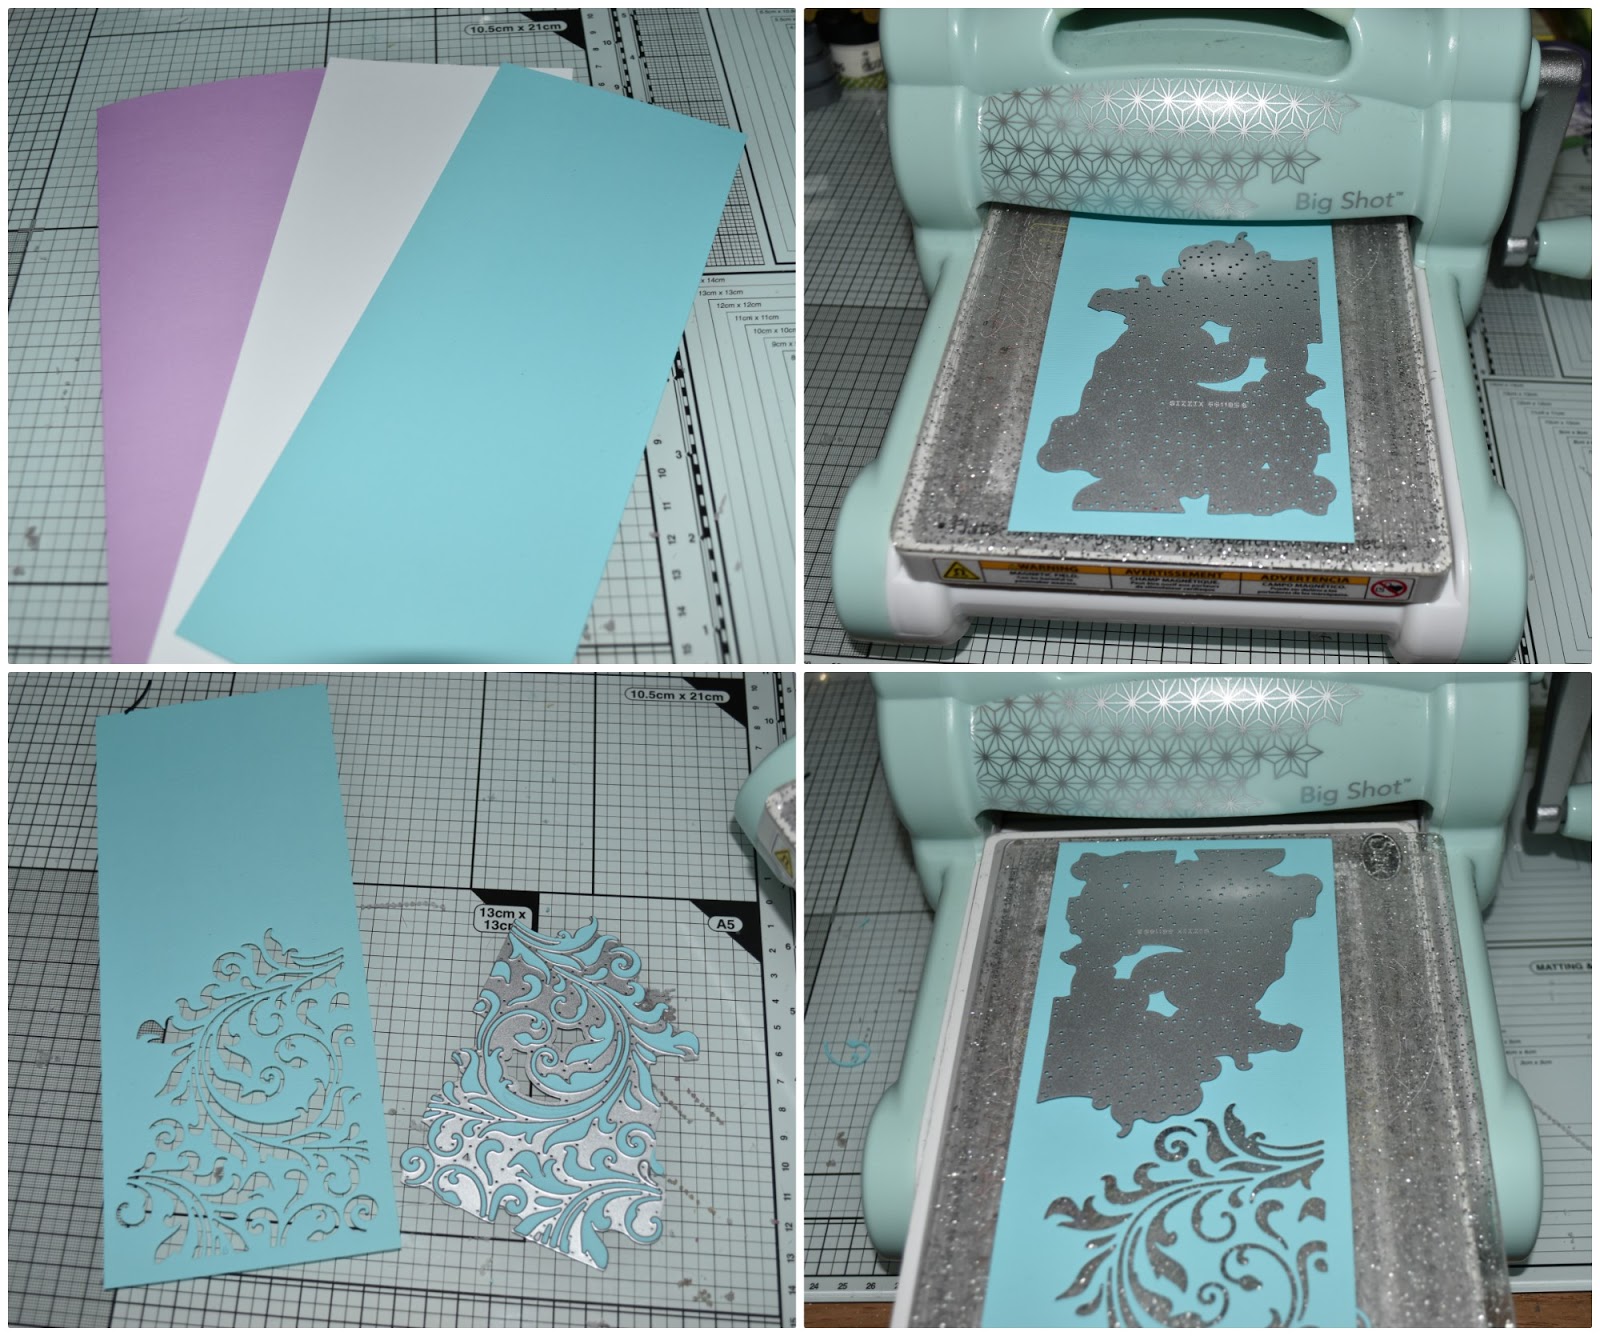
I made my card base (9 1/2"x 4"- when folded) from lavender cardstock from the DCWV Pastel Cardstock Stack. The white cardstock mat was cut to 9 1/4" x 3 7/8". And the pastel blue cardstock (also from DCWV's Pastel Stack) was cut to 9 1/8" x 3 5/8".


I used the large flourish die from the Tim Holtz Mixed Media #2  set to die an ornate window on one end of the pastel blue cardstock using my Sizzix Big Shot. Then I flipped it to the other end and repeated the process on the other side.


On the panel of white cardstock, using my Picket Fence Studio's Life Changing brushes, I blened on patches of Distress Oxide Inks in Mustard SeedCarved PumpkinPicked Raspberry

Then, I splattered drops of water using a water brush.


After I put the cut-out panel over my colorful background, I realized that the background was waaaaaay too bright. So I cut a piece of vellum the same size as the cut-out panel an ran it through my Xyron Creative Station and applied it right over top my color background. This instantly toned down the vibrancy. 

Then I layered and adhered it to the cut-out over top. and attached it to the card base.


Then I die cut a narrow oval using the Pink & Main's Stitched Oval Dies and stamped it with an inspiring quote stamp from Tim Holtz's Life's possibilities set with VersaFine Onyx Black in my MISTI. Then added foam adhesive tot he back and attached it onto my card front.


I prepped my flowers by wrapping the wired stems of my UNICORN Colored Sweet Moon Roses and UNICORN Small May Roses around a wooden dowel to create spiraled vines.
Then I attached them to my card front, anchoring them to one side but left gaps between each unicorn rose.

I twisted my Rose Leaves stems together and arched and attached them towards the top and bottom of the oval creating a swag. I filled in any tiny gaps with Mini Round RosesSmall Rounded Roses, and Spring Cottage Flowers.


Then finally scattered glittered jewels throughout the card front for a bit of sparkle and shine.

And here is my finished card...


Even with the vellum, the rainbow colors pop!! They are so eye-catching. The positively pierce through those cut-outs!! 


I thought this sentiment about DREAMS was absolutely perfect paired with my unicorn flowers and rainbows...


This card turned out more gorgeous than I anticipated. And with such an inspirational quote it is sure to lift spirits of those who wish to push and dream.

I really hope you enjoyed today's tutorial. Thanks so much for stopping by!

Until next time, HAPPY CRAFTING!!
~Mitsyana


Saturday, April 29, 2017

Be A Unicorn

Happy Saturday! I hope everyone has had a great start to their weekend! \I am so excited to be a guest designer for Lori Whitlock. I've always been a big fan of her unique and whimsical designs. And I am over the moon thrilled to be able to share with you this adorable Unicorn Card I made using her Center Box Card Unicorn.


To check out my tutorial and to see additional pictures, please visit the Lori Whitlock Blog!! 
Thank you all for stopping by!!

~Mitsy

Sunday, January 15, 2017

Unicorns, Unicorns, and more Unicorns

Hello again, Crafty Friends!! 
There is going to be lots going on within the next couple of weeks!! I have a couple major upcoming events and will be gone all next week. I'll be in Arizona for a workshop and for Creativation 2017... and won't be returning til the next week. You may or may not hear much from me till then. I'll try my hardest to at least report in on my Facebook, Instagram, and Twitter accounts. So if you don't follow me on any of those you may want to start!!

Follow me on Social Media:


But before I go, I wanted to share with you all these adorable cards I made using Pink and Main's Magical Unicorns stamp set. 


Other Supplies Used
Somebunny Stamp Set (Pink and Main)
Squeakheart Stamp Set (Pink and Main)
Colored Pencils (Faber-Castell, Prismacolor)
Momento Tuxedo Black Ink (Imagine Crafts/ Tsukineko)
Low Odor Mineral Spirits
Chalklets (EK Success)
White Gel Pen (Sakura)
Originals Dies (Sizzix)
Tag Builder Blueprints 3 (My Favorite Things)
3D Dots (EK Success)
Twine
Star Rhinestones

I used the Magical Unicorns stamp set to create all three cards!!


For this card I used The "Sending" from the Somebunny set to and added it to the "lots of love for you" from the Squeakheart set to customize my own sentiment.


Tuesday, August 16, 2016

Planner Peeker Clips

Hello, Crafty Friends! I have been on a planner clip making binge!! They are so quick and easy to make and so much fun too!!


Supplies Used
Planner Peekers (Pink and Main)
Momento Tuxedo Black Ink (Tsukineko/ Imagine Crafts)
White Cardstock (Spectrum Noir)
Alcohol Markers (Spectrum Noir)
Wink of Stella - Clear (Zig/ Kuretake)
Large Paper Clips
Hot Glue Gun and Sticks
White Felt

First, I started by stamping my unicorn images with Tuxedo Black Ink onto smooth white cardstock.

Then I colored all my images with Spectrum Noir Markers. 
All the heads were colored with FS4 and CR2. 
Purple mane was colored with HB1 and HB3.
Blue mane was colored with TB1and TB2.
Green mane was colored with LG3 and CG3.
Yellow mane was colored with LY3 and LY2.
Orange mane was colored with GB4 and OR1.
Red mane was colored with CR9 and DR2.
Pink mane was colored with PP2 and BP1.

Once all my heads were colored I cut each of them by hand. Then added sparkle to each of the unicorn horns using a clear Wink of Stella pen.

Once the horns were dried, I ran all the unicorns through my Creative Station Lite using a double laminate cartridge. Then trimmed off the excess laminate with scissors.

Next, I hot glued the laminated pieces onto paper clips.
Then, I added more hot glue and laid each unicorn face up onto a piece of felt.
Lastly, with a really sharp scissor, I trimmed off the excess felt from the unicorns.

And... there you have it!! Cute little planner clips!! 


These little cuties are going to one of my best friends, who happens to be a certifiable planner nut... I hope she like them!!

Until next time...
Happy Crafting!!
~Mitsy

Tuesday, May 31, 2016

Sweet Dreams Unicorn


Supplies Used
Stephanie Barnard's Royal Stand-Ups Card Die (Sizzix)
Magical Unicorns (Pink and Main)
Sweet Dies (Pink and Main)
Sweet Dreams Baby (Pink and Main)
Sweet Dreams Baby Dies (Pink and Main)
Cardstock- DIY Project Stack Flowers, DIY Projects Stack Stencils, Jewel Toned Textured (DCWV)
White Cardstock (Bazzill Basics)
Mega Runner (Xyron)
Momento Tuxedo Black Ink (Imagine Crafts/ Tsukineko)
VersaMagic Night Sky (Imagine Crafts/ Tsukineko)
Striped Grosgrain Ribbon (Paper Mart)
Markers- JG2, LG5 and Colored Pencils- Nature-053, 057; Primaries- 034, 068 (Spectrum Noir)
White Gel Pen , Glitter Gel Pen (Sakura)
3D Dots (EK Success)
Chalklets (EK Success)
Ordorless Mineral Spirits
Blending Stumps
3D Lacquer
Blue Matte Button

I cut my base using Stephanie Barnard's Royal Stand-Ups Card die out of green striped cardstock from DCWV's DIY Projects Stack- Flowers. Then die-cut the coordinating panels from polka-dot cardstock from the DIY Project Stack Stencils. The ornate shape in the center was also included with the card die and was cut out from bright blue cardstock from DCWV's Jewel Toned Textured Stack. I added stitch lines and stars to the background using a  white gel pen.


I used Pink and Main's Magical Unicorn set for the unicorn.


The unicorn was stamped on white cardstock using Momento Tuxedo Black ink. Then colored with Spectrum Noir alcohol marker in LG5 (body) and marker JG2 (mane). Then for extra detail and depth I shaded with colored pencils 057 (body) and 053 (mane). I also colored the inner ear with 034 color pencil. For the cheeks I shaded with hot pink dry chalk and added highlights with a white gel pen. 

For the border strip at the bottom of the card, I cut a strip of bright blue jewel toned cardstock measuring 1.25" x 5.5" and layered a strip of polka-dot cardstock measuring 1"x 5.5". I used my Mega Runner to attach the two strip together as well as attach the ribbon down the center.

I topped with a basic bow and attached both the bow and the button center with 3D lacquer. Then hand drew stitch lines with a white gel pen.


I cut the word "Sweet" twice. Once ,from a light green cardstock, and again from the same striped green cardstock I used to cut the card base. Then I used a glue pen to layer the two die-cut words, offsetting them just a bit , creating a shadow. Again, adding highlight with a white gel pen.


I die-cut several clouds from the Sweet Dreams Baby Dies for my unicorn to stand on and shaded them by outlining them first with a blue (Spectrum Noir color pencil 068) and then blending the color out using odorless mineral spirits and a blending stump. I die cut an additional cloud to stamp the word "dreams", and positioned under the word "Sweet" to read out "Sweet dreams".


And, here is my finished easel card...


This set has to be hands down my all time favorite to date!! I just can't get enough of these UNICORNS!!!

#UnicornLover #UnicornAddict # IBelieveInMagic #80sKid

Hope you all enjoyed today's project!!
Until next time...
HAPPY CRAFTING!!
~Mitsy