Showing posts with label sequins. Show all posts

Saturday, May 7, 2016

You Deserve a Treat


Hello, Crafty Friends!! I've a new toy to play with!! I've been dying to try this tool for a while. I've seen it on TV, on youtube, and every other social media outlet out there. I'm a sucker for cool new toys! And though, it not brand new it is still cool none the less! Yup, I got bit by the Fuse bug!! And I love it!!

I thought I 'd take this puppy for a spin and make one of my favorite things to make... shaker cards. When you first start using a new tool it's always good to do a test run and get familiar with it.
And, what better way to test out than to make something I am very familiar and comfortable with... shaker cards!!

I think I can make a shaker card blindfolded! So today's project I'm making a shake, shake, shaker!!


Supplies Used
Becky Higgins- Project Life Fuse Tool
Pocket Sleeve or Baseball Card Holder
Teresa Collins Cut'n'boss (Craftwell)
Die-Namics LLD Cool Cup Dies (My Favorite Things)
LLD Stay Cool Stamps (My Favorite Things)
Die-Namics Fishtail Flag Stax (My Favorite Things)
Mega Runner (Xyron)
3" Sticker Maker (Xyron)
VersaFine Onyx Black Ink (Imagine Crafts/ Tsukineko)
Classy Copper Stack(DCWV)
White Cardstock (Bazzill Basics)
Heavy Duty Vellum
 Sequins (Assorted)
3D Dots (EK Success)
Pink Raffia
Button
PITT Artist Pen (Faber-Castell) - *Optional*
Blue Painter's Tape - *Optional*

 I started by cutting out a piece 4"x5.5" piece of cardstock . I used this patterned paper from DCWV's Classy Copper Stack.

Then, using my blue painter's tape and the cup die from MFT's Cool Cup set, I cut a window from the middle of the my cardstock. It looked a little plain so I die cut it again, this time using a stitched die from my Pick and Main Stitched Rectangles set. I felt it really finished the edges.

I also cut out the whipped cream topping form plain white cardstock and the dome lid from heavy duty vellum. Then ran both pieces through my Xyron sticker maker and attached it to the top of my window cut-out.
 For the shaker part of my card, I pre-heated my Fuse tool. While that was heating up, I took a plastic pocket sleeve and cut out one of the pockets.

When my Fuse was heated, I sealed one of the open ends of my pocket. I left the top portion open so I could fill it. I added a variety of brown, gold, and star sequins.

I also die-cut two paper straws using the die included with the MFT Cool Cup set. I inserted one straw into the pocket with the sequins. I left the end hanging out of the pocket.Then I fused my opening closed, sealing the sequins and straw into place. sealing the plastic over the straw insured that the straw wouldn't shift.

With the other straw, I cut off a 1/2" piece and tucked it behind my whipped cream and dome, to give the appearance of it coming out of the top of the cup.

To keep my sequins free and loose, and to prevent them from being "squished" I added 3D foam adhesive to the back of the card front.

For my sentiment I used the matching stamp set to the Cool Cup dies, called Stay Cool. I thought this phrase was super "sweet"! LOL Pun, totally intended...  I know I'm a dork!

I stamped it in VersaFine Onyx Black ink onto plain white cardstock. Then, I used a Fishtail Flag die to cut out a little banner. I didn't have a double ended fishtail so I made my own by cutting it twice, flipping the the fishtail to the other end the second time.

The letters/ sentiments in this set have a distressed look to them... I wanted my letters to be dark and bold. So, I took my PITT Artist Pen and colored in the letters.

I remeber seeing little blocks of words and decorative panels in my paper stack... I cut out one of the tiny ones into a little flag and added it to the top of my straw.

For a final touch, I added pink raffia, tied a bow, and topped it with a button.

And here is my finished shaker!!


I think this is a great start to my "Fuse-ing" adventures!! Now, I gotta see what else I can fuse!! LOL

I will also be entering this card in My Favorite Things' Sketch Challenge #279!!
To find out how you can join in on MFT's challenge and upload your own project, click here!

Hope you all enjoyed this project!
Until next time...

HAPPY CRAFTING!!
~Mitsy

Wednesday, May 4, 2016

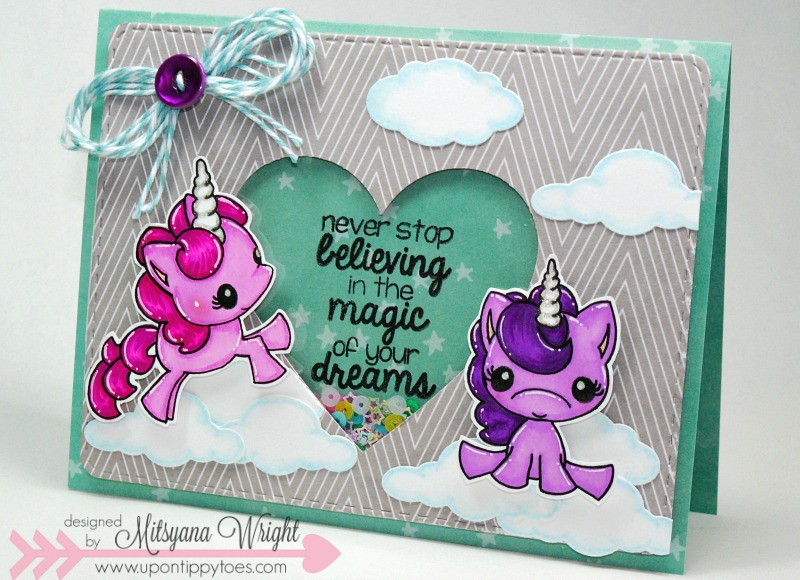
Never Stop Believing...

Hello, Crafty Friends!!
I have a uber cute sneak peek for you all using one of Pink & Main's NEW RELEASES for the month of May!! This set is called Magical Unicorns.
dream1

I can't count how many times I have said how much I am love with this set!! I know I risk sounding like a broke record... but this is, hands down, my all time favorite set and I LOVE, LOVE, LOVE IT!! I grew up in the 80's, and one of my favorite Saturday morning cartoons was My Little Pony! I absolutely loved the unicorn and pegasus ponies and adored the little baby ponies!! This set made me soooo nostalgic! And, it made me feel 9 yrs old again! LOL


Another New Release featured on this card, is P&M's new Stitched Rectangle dies... yes, stitched dies!!! These are nested rectangle dies with rounded corners... and the best part is they are PINK!!! Eeeeekk!!! And, not just any pink... a very bright, electrifying, HOT PINK!! OMG! Another SUPER LOVE!!!

Both of these will be released on May 10th and and available for purchase on the Pink and Main website.

Also used on my card are the fluffy clouds from the Sweet Dreams Baby Dies.
This set is currently available. I use the clouds from this set quite a bit to make scenery on my cards. They are absolutely perfect!


I hope you enjoyed my sneak peek... stay tuned for more to come!!
Happy Stamping!!
~Mitsy

Thursday, December 3, 2015

Flourishes & Flowers

Hello, Crafty Friends... I'm back again with another beautiful Die-Namites creation!
I love how intricate these dies are. And, I love how delicate they make my creations look. 
A lot of Die-Namites' die are filled with so much beautiful detail.

And because of that detail you may need a little extra help removing extra tidbits left in the die or poke out and cut-out still attached to your die-cut itself. 

Removal of such tiny pieces requires precision tools. And I am forever loosing my little "pokie" tool. I have lost a handful of them so far. I wish replacing them were as easy as losing them... but my closest craft store is about 45 minutes to an hour away. But my super store is just around the corner and it carries something that has a higher probability rate of it being in stock. 

So, what is my secret go to "pokie" tool replacement? Easy... dental tools! Come in a variety of sizes and run for $4 or less. The finer tipped tools tend to be a little sharp, but that is easily fixed by blunting the tip with a little bit of sandpaper.

Shading and coloring such delicate die-cuts poses a little bit of a challenge also. You need to have a soft touch or risk of damaging your beautiful pieces. I, on the other hand, am pretty heavy handed. So I need to have another tool the helps me with coloring and shading without mangling my paper. For this, I use an airbrushing machine that uses markers. It allows me to add layers of colors onto my piece without the need of rubbing.

The results are amazing!You can add so much depth from just adding a little color!!

I used the following dies:

Small Ivy

Budding Vine

Love Kite
As you can see, these are very intricate and detailed dies. They all coordinate and come together beautifully!!

And here is my finished card: 

I love these flourishes!!


Hope you enjoyed my project for today!! 

Until next time...
HAPPY CRAFTING!!
~ Mitsy


Wednesday, October 7, 2015

Die-Namites Photo Inspiration and Challenge

Hello Crafty Friends... 
Today I'm sharing my take on the Die-Namites Inspiration Challenge!

 I love fall and all the lovely colors. So I chose to mimic the inspiration photos' deep rich colors and earthy feel. I also loved the woodgrain background so I kept that in mind when designing my card.


For my project I  I chose to make a 5"x7" sized card. I really loved that woodgrain as a background so I embossed with my Teresa Collins Woodgrain Cottage embossing folder a 4 3/4"x 6 3/4" mat.


I shaded the raised embossed image and cut a 4 7/8"x 5 7/8" piece of white cardstock to layer it over.


Then, I ran both pieces through my Xyron Creative Station.


I used Die-Namites Budding Vine and Beautiful Flowers Dies as my focal point.


   Beautiful Flowers

You don't need leaf dies to replicate the the challenge photo. Unlike the inspiration photo, I currently do not have any leaf dies (which I need to remedy... there's no such thing as too many dies if you ask me). So, instead, I opted to use my floral dies and shade them in deep oranges and reds. For me, the fast and easiest way to color and shade is airbrushing... I rarely bring out sponge daubers and ink pads anymore.


I airbrushed my flowers using an eBrush machine and orange, red, green, and brown Sharpies. 


Then I ran that piece through my Xyron 3" Sticker Maker.


And layered it over another flower die-cut I cut out of chipboard that I painted white with gesso.

Speaking of gesso...


I love how painting the buds on the Budding Vines with gesso makes them look a whole lot like pussy willows... don't you think so?!

I also love the metallic element in the inspiration photo too... but instead of wrapping my flowers I chose to mount my flowers over a bit of gold cord I looped into a circle. For a little more shine a sprinkled a bit of metallic sequins throughout.

I used an EK Success Lattice Punch for the decorative strip in the center and layered over an orange strip of cardstock, and matted over white.

Then I flicked a little bit of gesso onto my card with a paintbrush.

Once that dried, I stamped my sentiment from Pink and Main's Thankful set.


Then I fishtailed it with my scissors, added a foam dot in the center to raise the middle, and tacked down the ends with my Xyron Mega Runner.


I think this card definitely screams FALL!!

I hope you enjoyed my card and that it inspires you to join in on our Halloween/ Fall Challenge!! Enter your projects and you can win a $25 voucher to the Die-Namites website!!

For more info (details, rules, and/or to link your fabulous "Challenge" projects) click HERE!

I can't wait to see all the wonderful entries!!

Until next time...
HAPPY CRAFTING EVERYONE!


Monday, September 14, 2015

Teresa Collins See-thru Card


Hi Crafty Friends!! I get to kick off this week with this awesome card made with lovely Teresa Collins Papers!! That's because Teresa Collins is this month's sponsor for Craftwell!! Woohoo... how awesome is that?? 

And when I saw these new clear sheet of Teresa Collins I knew I had to make a see-thru card... A shaker see-thru card!!

Supplies Used
Cut'n'Boss (Craftwell)
Teresa Collins Pocket Dies, Leaves (Thankful Set), Happy Frame (Lifestyle Set), Butterfly ( Memory Collection)
eBrush (Craftwell) w/ SN adapter
Spectrum Noir Markers- IB1 and GT1
Acetate (Grafix)
Black Foam Sheet
Diamond Glaze
Sequins
PITT Artist Pen B (Faber-Castell)
Gesso (Liquitex)
toothpick
Scissors
Paper Trimmer


I started my shaker card by cutting my Happy frame from my flower paper, black foam sheet, and gold from the TC Project Pink Gold paper. The gold is awesome not overly shiny but still a lot of bling!


Next, I ran my pieces all through my Xyron Creative Station to give them all instant adhesive.


I wanted a coordinating panel for the inside of my card and I also wanted it sized appropriately... so I used my die that I used to cut my frame, trace around it with the same Teresa Collins Flower Paper, and cut it out with my scissors. I adhered it to an A2 sized card base I made using Teresa Collins' Clear Paper in Gold Arrows.

I also used more TC Collector's Edition Flowers Paper to cut out my butterfly. I used a my PITT Artist Pen to draw the outlines and wing details. Then finished it off by applying gesso with a toothpick for the white spots.

For the shaker... I added the the flower paper to plain white card stock as a backer before running it through my Xyron Sticker maker... making it one solid piece. Next, I adhered the foam to the out line of the framed area of the flower paper. Then I sprinkled some sequins into my  framed area. I used diamond glaze over the foam and topped it off with my window made from my golden frame adhered to acetate.

 I chose to do it this way because the framed area is used as guide to where to glue my foam frame for proper alignment... once I put the top layer on it will all line up with the foam and I don't have to worry about my foam being crooked.

I wanted my butterfly to look like it was in a tree or resting on a branch so I cut out 5 stems of leaves out of black card stock and adhered them to the outside of my frame using my glue pen.

I didn't want the shaker to look like it was just "floating" so I  used a couple Teresa Collins border stickers to accent the front of my card and anchor my shaker frame.

Then I I curled the wings of my butterfly to give it a bit of dimension and only applied adhesive to the body of the butterfly and attached it on top the leaves and let dry.

And here is my finished card...

These Teresa Collins papers make this card look ultra chic. Pictures don't do this justice!! 

I hope you enjoyed my project for today!!

Until next time...
Happy Crafting Friends!!

~ Mitsy


Thursday, September 3, 2015

Mixed Media & Bella Blvd


Hey there Crafty Friends!! Today I got a little something different... I love mixed media!! I love the way you can take different medium and mesh it to create something simply beautiful or something over the hill extraordinary!! 

And today I'm expanding my Mixed Media Journey with Bella Blvd.!! Sponsors of Team eBrush for the month of September!!

Supplies Used
Tim Holtz Stencils- Measured, Splatters
Spellbinders Grand Nestabilities- Grand Labels One
Sharpie Markers- Blue and Navy Blue
Blue Painters Tape
Modeling Paste
Sequins (Virginia Turtle)
Diamond Glaze (Judikins)


I started off by ebrushing my Passcode paper by Bella Blvd. with a bright blue Sharpie marker.


Then I simply ebrushed a dark/navy blue ring in the center of that.


Then I added  my blue scalloped border from Bella Blvd's Treasures and Texts stickers. 

I wanted to add some texture to my layout. So I taped my layout to my work surface to help prevent warping and bowing.

Then I added modeling paste with a palette knife and my Splattered and Measured Tim Holtz stencils.


And while that was drying...

I die cut my my Bella Blvd Dotty paper with the largest die from my Spellbinders Grand Labels One set using my Cut'n'Boss.


Then I ran the die cut piece through my Xyron Creative Station for durability and adhered it to the base of my layout. Next I took my 4"x6" photo and matted it onto a 4.25"x 6.24" piece of Bella Blvd. Newsflash paper. Then ran my matted photo once again through my Creative Station.


Once my photo was adhered to my layout I embellished it using more stickers from the Bella Blvd. Treasure and Texts sheet. With my parvy circle punches I cut various circle in different sizes to add to my layout.  I tied everything in by scattering and adhering Guacamole Doodads across the page. I also added words from the Orange Little Bits stickers to my biggest circle.

I thought using the words "goofy boy moments" went perfectly with this picture of my son with his tongue hanging out.

Lastly I used my dimensional glue to adhere sprinkles of sequins onto my layout.

And here is my finished layout...