Friday, June 29, 2018

What's Cookin' with Newton's Nook & Xyron

Hi, Crafty Friends!!
I'm so happy to be back with Team Xyron today!! And this week we partnered up with the awesome people at Newton's Nook to bring you some amazing projects from BOTH teams for twice the FUN!!
**WOOT WOOT**

Boy, do we have lots of great things in store for you!! On top of all the inspiration created by both our talented teams, we also are doing an AMAZING GIVEAWAY!! 
Both Xyron & Newton's Nook will be giving away prize packages. 

PRIZE PACKAGE
Each company will be giving away a Mega Runner (like the one used in this post- winning color may vary) and a $25 Newton's Nook Gift Certificate!!

TO ENTER:

-Visit the Newton Nook Blog and COMMENT on their Xyron/ Newton's Nook posts all week long.
&
- Visit Xyron's Facebook Page and LIKE & COMMENT on all the Xyron/ Newton's Nook posts all week long. 

Winners will be chosen at random from the comments left on the posts.

I am so glad to be winding down and closing out this week-long promotion with ... not 1, not 2... not even 3... but 4... yes, 4... super simple, yet super cute cards!!


Let me show you how I created these adorable cards all from 1 stamp set.

Supplies Used
Newton's Kitchen (Newton's Nook)
Floral Lace Stencil (Newton's Nook)
Serene Strips Stencil (Newton's Nook)
Mega Runner (Xyron)
ColorBox Petal Point Chalk Ink- Primary Pastels (Clearsnap)
Lori Whitlock Snow Day Embossing Folder (Echo Park)
Mixed Media Paper (Strathmore)
Chalkboard Cardstock (DCWV)
Shimmers Stack (DCWV)
VersaFine Onyx Black Ink (Tsukineko/ Imagine Crafts)
Tim Holtz Distress Markers (Ranger)
MISTI Stamping Tool (My Sweet Petunia)
Stitched Square Dies, Scalloped Square Dies, & Stitched Circle Dies (Pink and Main)
Glitter Enamel Dots
Large Round Makeup Brush
Paper Trimmer
Scoreboard
Scissors

I'm a little weird when it comes to coloring. Most people who color with markers tend to use smooth cardstock to stamp and color on. Not me! A major thing I've noticed when coloring is that I am very heavy handed. They say you're supposed to use light strokes and flicking motions... and that's good and all but I just can't. I try and I try but just can't. I must have a really lazy hand but it just doesn't seem to cooperate with what my mind is telling it to do.

So, instead of constantly ruining perfectly good cardstock with my heavy hand and excessive bleeding... because I know my colors will bleed... I just switch out my paper and use something that can handle my coloring style. I almost always use a mixed media paper to do all my coloring on. It's thick, durable, and can hold up to all the moisture that I know I'm gonna pile onto it. And you know what it works for me! I'm in no way a professional colorist but I just find that this works best for me.

I stamp my images from the NEW Newton's Kitchen stamp set from Newton's Nook with an archival black ink onto mixed media paper. Then colored the images using Tim Holtz Distress Markers.

Then cut out each image out by hand. Newton's Nook does carry the matching dies but I don't mind a little fussy cutting.

I set my colored images to the side and worked on the card bases. I knew I wanted a colorful stenciled background. So I used plain White Cardstock cut down to 4 1/4" x 4 1/4".

I dabbed/ smooshed ink onto my craft mat and with a makeup brush, I blended color over my stencil. I started with Blue Lagoon, then applied Blue Iris, then Lime Pastel from the Primary Pastel Petal Point.

**TIP**
Make sure to use a quality brush. Tried using one from the dollar store and didn't like the results. It was very splotchy and didn't blend evenly. Blot off excess ink till you get a cloud effect on your craft mat before applying. These extra steps help make very soft results.

Look at that pretty pattern the stencil left... It's absolutely gorgeous!!

I also used the Serene Strips Stencil to create backgrounds... and again came out with gorgeous results by brushing on that chalk ink.
I gave each of the four backgrounds their own spin bu the techniques used were the same.

Then, I used a stitched die to die cut each background down to 4"x4" and give it stitching... I albsolutly adore stitching even if it is faux stitching.

Then I die cut scalloped square out of black chalkboard cardstock to mat behind the inked backgrounds.

I adhered the backgrounds to their scalloped mats using my Mega Runner... look at how beautifully these card fronts are coming together!


I inserted my card fronts into my MISTI Tool to help me align my sentiments in just the right spot... but first, I placed my colored image in the areas I wanted them to be in (I did not glue them down yet). Then removed the image before stamping, just in case something slipped and I had an accident, I didn't want to mess up my coloring with a big smudge of ink.

Once the inked sentiment was dried, I added craft foam to the back to give it a litlle dimension and adhered them onto the card fronts.

Then cut out 4- 4 3/4"" x 4 3/4" pieces of Shimmers cardstock, inserted them into the Lori Whitlock Snow Day embossing folder, which by the way makes for an awesome random polka dot background for everyday use... Not just for winter/ Christmas themed projects.


I created 5"x 5" card bases by cutting chalkboard paper down to 5" x 10" then creasing and folding in half to get a 5" squared card.

Then used my Xyron Mega Runner to attach the card fronts to their black card bases.


As a final touch, I added glitter enamel dots onto each as a simple accent.


And here are my finishd cards...


You can check out this amazingly adorable quartet a little closer down below...


How stink cute did these turn out??!

I hope you enjoyed today's project! I'm so glad you were able to join us today!

Don't forget to visit Xyron's Facebook Page to see what amazing projects my Design Team Sisters created!! Leave a comment on each of the week's project and you could win amazing prize package!!

Wanna double your chances of winning? Then swing by the Newton's Nook Blog for more amazing projects and leave some love on their Xyron posts!! * ** ***


DISCLAIMERS
*This giveaway is not sponsored, endorsed, or affiliated with Facebook, their partners, or subsidiaries.*

**This blog is compensated to provide opinion on products, services, websites and various other topics. Even though the owner(s) of this blog receives compensation for our posts or advertisements, I always give my honest opinions, findings, beliefs, or experiences on those topics or products.
The views and opinions expressed on this blog are purely my own. Any product claim, statistic, quote or other representation about a product or service should be verified with each manufacturer, provider, or party in question.

***This blog contains affiliate links, clicking and shopping through these links helps to support and run the Up On Tippy Toes blog at no additional cost to you..***


Thursday, June 28, 2018

DIY Paper Floral Wreath

Hey there, Crafty Friends!! I  know Spring has been done and gone for a while now but flowers never really go out of style With all this summer heat, pretty much all the flowers have disappeared where I am. Sadly, real blooms don't last very long. Once fully bloomed most flowers go to seed then wither up and die.  

I figured, why not make my own??!! So, I made this Floral Wreath. It's made with all paper flowers and leaves and is sure to last the test of time.


Clearsnap Supplies:
ColorBox Premium Dye Ink- Rose, Coral, Dandelion, Olive, Leather

Other Supplies:
Big Shot (Sizzix)
Eileen Hull Designs Stitchy Flowers & Leaf Dies (Sizzix)
Eileen Hull Designs Spring Leaves Die (Sizzix)
Home and World Die Set (Diamond Press)
Grapevine Wreath
Brown Double Stitched Grosgrain Ribbon
Kraft Paper
White Cardstock
1.5” Sticker Maker (Xyron)
Hot Glue Gun
Hot Glue Sticks
Glitter Gem Stickers (Michael’s)

First, I gathered my materials. I found this awesome grapevine wreath at the dollar store. It's not a huge wreath... I wanted to be able to send it in the mail and those huge wreaths make it almost impossible to find a box to send it in. This was was perfect, it's about 8". Perfect size for gift giving or for indoor use... And for $1, you can't go wrong.

Next, I die cut flowers and stamens from kraft cardstock using Eileen Hull's Stitchy Flowers & Leaf dies by Sizzix. Using my Sizzix Big Shot I was able to cut a couple layers at a time. I also die cut leaves from more kraft cardstock using Eileen's Spring Leaves steel rule die. The heavy duty blades allowed me to cut twice as many layers as the thin metal dies. I was able to cut 4 layers at a time with this die.


I inked the edges of all my flowers petals with Rose Premium Dye ink and a Colorbox Stylus & Tip.

Then, inked on Dandelion Dy Ink into the centers of the stamens. 

I used an Art Dauber to ink on Coral Dye Ink to all the stamen tips.

Then, used Olive Dye Ink to shade all my leaves and stems.

To make my flowers, I made a snip about 1/4" long in between every two hills to make separate petals. I took a ball stylus a rolled it in the center to form a curved pit. I flipped over the flower and used the smaller ball to create veins and creases in each petal.

I also used the stylus to curve the stamens.

Then, layered 2 or 3 large flowers with 3stamens to create 1 large flower. I used a hot glue gun to attach all the layers together. Then added a jewel to the center (not shown).


For the smaller rose-like blooms, I again used my ball stylus to curve and shape the smaller flower petals. I rolled the smallest one till they almost looked like tiny bowls. I curved the tiny petals together from 2 flowers to form one bud and hot glued in place. 

I glued the bud into 2 more bowled flowers of the same size. Then glue those flowers onto 4 open slightly larger flowers. 

For the larger leaves, I creased and folded them to create veins. And for the stems, I rolled a ball stylus over the back to curve the leaves. 

With all of my flowers and leaves done, I moved on to creating a greeting to place on my wreath. I die cut the word "welcome" from thick (110 lb) white cardstock. I die cut the word 3 times, ran them through my Xyron Sticker Maker, then adhered them to each other creating a thick chipboard-like piece. 
I hot glue the word onto double-stitched grosgrain ribbon to lay across my wreath like a banner.

Then hot glued all my leaves and flowers to the grapevine wreath.

Then draped my banner across the wrath and glued in place.

I created a loop from more grosgrain ribbon and attached it to the back of the wreath as a hanger.

And here is my finished wreath...


I hope you enjoyed this tutorial and are inspired to create your own floral wreath too!!

Until next time...
HAPPY CRAFTING EVERYONE!!
~Mitsyana

Disclaimers
**This blog is compensated to provide opinion on products, services, websites and various other topics. Even though the owner(s) of this blog receives compensation for our posts or advertisements, I always give my honest opinions, findings, beliefs, or experiences on those topics or products.
The views and opinions expressed on this blog are purely my own. Any product claim, statistic, quote or other representation about a product or service should be verified with each manufacturer, provider, or party in question.

***This blog contains affiliate links, clicking and shopping through these links helps to support and run the Up On Tippy Toes blog at no additional cost to you..***

Wednesday, June 27, 2018

No Prob Llama Wrapped Journal

HAPPY HUMP DAY, FRIENDS!!

I am excited to finally share with you a project created with some of the newest dies from Eileen Hull for Sizzix. These dies are a continuation from her previous and ever-popular 
BOOK CLUB Collection.

If you like journals and journal making you will be head over heels for these!!

For today's project, I made this adorable Llama Journal using Eileen Hull's new 
Wrapped Journal die & Journaling Cards, Flowers & Leaves dies. See how I made it below.


Supplies Used
Big Shot (Sizzix)
Eileen Hull Wrapped Journal (Sizzix)
Eileen Hull Journaling Cards, Flowers & Leaves (Sizzix)
Eileen Hull Animal Print Set #2  Embossing Folders- Retired (Sizzix)
Little Sizzles Mat Board (Sizzix)
Creative Station (Xyron)
Eileen Hull Blends-  Hydrangea, Beach, Ebony (Clearsnap)
Pebeo Gilding Wax
Chipboard
FabriTac
Glossy Accents
Rhinestones
Wood Veneer Frame (Michaels)


I started by die-cutting my wrapped journal from Sizzix's white mat board. These reach from end to end and cut out the entirety of the die.

Usually, I would cover my journals with pretty patterned paper but this time, I opted to emboss and ink up my cover instead.

I wanted only certain parts of my journal to be embossed and did not want to emboss on the spines, so I cut out pieces of chipboard to the size of each panel.

Front flap/ Smallest Panel: 2 1/2" x 5 1/8"
Middle Panel: 3 3/4" x 5 1/8"
Back Panel: 3 1/3" x 5 1/8"

Depending on how thick your chipboard is you may want to cut out two sets of each and adhere together. By embossing with these, you will emboss only where the chipboard covers.
*test on cardstock before embossing mat board*
If embossing appears on areas that you don't want it to, you either have to trim your chipboard down or use thicker chipboard to avoid areas of direct contact.

After my mat board was completely embossed, Inked the entire cover using Eileen Hull's Blends inks by Clearsnap. They have a built on applicator so I can apply my ink directly onto my surface without the need of an extra blending tool.

I used Hydrangea, then added areas of Beach. Blended, then added Ebony around the edges and over top and spines.

I randomly rubbed some silver gilding wax over the embossed surface. Then Inked the entire back surface/ inside of the wrapped journal with Ebony ink.

I also inked a wood veneer frame I purchased at Michael's completely (back and front) with Ebony ink as well.

Once the frame was dried I glued it to the front flap of my journal.

I ran into a dilemma halfway through my project. I ran out of black elastic and the only elastic I had left was stark WHITE!! I didn't want to leave to go to the store just for a strand of elastic so...

Instead, I inked my white cord with more of Eileen Hull's Blends inks... I used Beach to coordinate with the color on the cover. This is a pigment ink so it's going to take longer to dry but sooooo worth it when I have a matching cord to my cover!


Let the cord dry completely before stringing!! 
Seriously, that is the hardest part... just stop and walk away and leave it alone!

If you don't you may ruin and smear ink over EVERYTHING!

So, while that was drying, I worked on my inserts.

I usually hand make my inserts but Eileen introduced me to these mini composition books that you can find out the dollar store. They came 3 to a pack... 3 books/ inserts for a buck!! SCORE!! They fit wonderfully into the wrapped journal and saved me time from having to make them myself!! 
WIN-WIN if you ask me!!

The covers of these books look a little bright and aren't the prettiest so I decided to cover them up to match my cover. 

I used papers from DCWV's No Prob Llama Stack to make mini covers and fronts for each of he the little books. Ran the pieces through my Xyron Creative Station and adhered them. Thentrimmed off any excess.


Then when all my books were covered, I checked on my elastic. Once they were dried, I strung my journal. No fancy weaving pattern. Just one strand per sets of holes tied into a knot on the inside.

Then, I used a piercing tool to make a hole created a small loop, inserted it through the hole, and tied a knot on the inside.

I glued a rhinestone to the black frame. Once dried I looped the cord around the rhinestone to act as a closure.

To decorate the front cover, I used Eileen's new Journaling Cards, Flowers & Leaves dies to cut out an assortment of leaves from green cardstock and flowers from patterned paper from the No prob Llama stack.

I "squished" the flower petals upwards to give them some dimension. Then layered and adhered them together to create full blooms.

I found these cacti in the same No Prob Llama stack they were cute but the details got lost because the lines were kind of fading into the background. I shaded the cacti in with a light blue color pencil to help add definition and make them pronounced.

Then laid my pieces out over the cover to see where they'd look best. I almost never glue my pieces down right away just in case I don't like the placement.

Once I was satisfied, I glued my pieces down and added craft foam behind certain pieces to give them dimension.


And here is my finished Wrapped Journal...


I absolutely love how it turned out!


I added small details like mini rhinestones and Glossy Accents throughout and creased and folded my leaves.


This embossing folder may look like cobblestone but it's actually a giraffe print form a retired Animal Print set of Folders that Eileen Hull designed.


Here, I used 3 "inserts" and a mini steno notebook to fill my journal.

And there you have it, CUTENESS all "WRAPPED" up!!


I hope you all enjoyed my project for today!!

Thanks for stopping by!

Until next time...

HAPPY CRAFTING!!
~Mitsyana


**This blog is compensated to provide opinion on products, services, websites and various other topics. Even though the owner(s) of this blog receives compensation for our posts or advertisements, I always give my honest opinions, findings, beliefs, or experiences on those topics or products.
The views and opinions expressed on this blog are purely my own. Any product claim, statistic, quote or other representation about a product or service should be verified with each manufacturer, provider, or party in question.

***This blog contains affiliate links, clicking and shopping through these links helps to support and run the Up On Tippy Toes blog at no additional cost to you..***

Wednesday, June 6, 2018

Quick & Easy Mermaid Decor


Hi, Crafty Peeps!!
And HELLLLLO, SUMMER!!

Yup, the summer heat is here and it's time to hit the water! You could say I take to it like a fish in water... but I'd say, you're WRONG!! I'm not a fish in water... I'm a MERMAID!

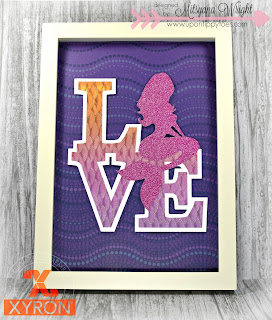
And if you're a mermaid or LOVE everything mermaid, you'll love this quick and easy "Mer"-decor! Yes, Mer-decor is a thing!! Which is why it's a good thing that I am here today with Team Xyron and this week's amazing partner, my good friends from DCWV!! Because I'll be playing with their new Ocean Wonder Stack and it's gonna help take my home decor from awesome to "MERMAZING"!!


Supplies Used
Ocean Wonder (DCWV/ American Crafts)
Glitzy (DCWV/ American Crafts)
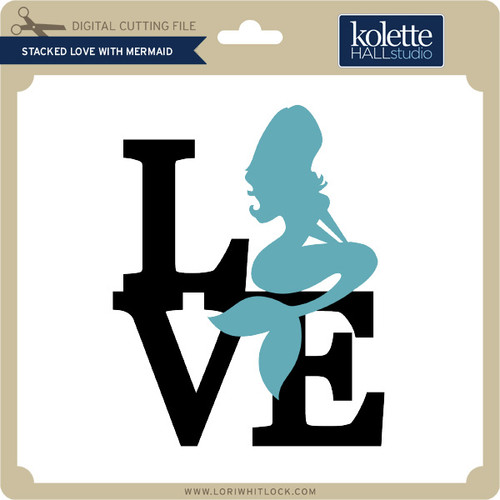
Stacked Love with Mermaid SVG File (Kolette Hall Studio)
Creative Station w/ 9" Permanent Cartridge (Xyron)
White Cardstock
Craft Foam
Picture Frame


When I saw this paper I immediately thought of Mermaids! And I found the super cool SVG file by Kolette Hall that was absolutely perfect!

Image 1

I downloaded it onto my computer and loaded it into my ecal software.

When loaded into my software, the default size was too big for what I had in mind. So I resized it.


I simply adjust the sizing in the panel to the right of the screen. I used the drop-down arrow in the width section (which is simply labeled with a "w") and clicked it from it's 8.563" default sizing till it got to, what I thought was just right, at 7.060".


These pieces are also attached together (by default) and I want to cut multiples to stack them for a thicker three-dimensional look so I right-clicked, then clicked on "Ungroup" to separate them.


I knew I was going to be working with lots of colors and patterns and didn't want them to get lost or distracting. So, I broke it up by adding a .015" border around my "LOVE" word.

Simply, right click on the word, go to "Appearance", then "Add Shadow Layer...".


Then, set the sizing box to 0.15".

You can set what color you want your border to be, and in this case, I wanted it white. But that color blends into my virtual cutting mat. So I simply adjusted the outline to black. Go to the paint palette icon on the right of the screen, Go to "Stroke" box, then click in the color box and choose black.

Now, I can see that awesome border around my words!

I did those same steps to fill in color to my shapes too. but in those cases, I entered my selections in the "fill" box.

Both of these steps are optional, they just help me see what I'm doing better and help me get a better visual of what I am creating.

I separated my shadow onto another cutting mat. Remember, I wanted to create a stacked/ thick chipboard type of look. I only need to stack the shadow to achieve that look. So I duplicated 3 more and spread them over an entire mat.


Cutting multiple images is easier when you group like colors together and cut them all at once.

For the shadow, I cut in plain white cardstock. But for the main LOVE stacked word, I used this AMAZING or should I say MERMAZING fish scaled paper with a beautiful gradient and gold foil outlines and for my mermaid silhouette, I used this gorgeous pink glitter paper (also from DCWV).


I ran all my die cut pieces through the Xyron Creative Station, then layered all the LOVE stacks together.


I wanted the mermaid to have dimension but it seemed pointless to cover a bunch of glitter paper. So instead, I ran a piece of craft foam through the creative station and made my own foam adhesive to prop up my mermaid.

I attached the foam to the back of her head and torso only since her fins will be attached to the LOVE stack.

For my background, I used this deep purple paper with dotted waves. I think it looks a lot like deep sea currents. But it could just be me... HA!

I cut it down to fit inside my 7"x 10" frame... I know... what an awkward size! But use whatever size frame you can find and adjust accordingly.


 I took my stacked LOVE... look how nice and thick this piece is... and attached it to the center of my background paper, then inserted it into my frame and closed it up.

And there ya have it, EASY-PEASY!!


These papers are absolutely GORGEOUS and when the light hits it... Oh my gosh... STUNNING!!


This is clean and simple!
Aaaaaand...
 makes for perfect decor or gift for all those mermaid lovers out there!

Hope you enjoyed this tutorial!
Thanks for stopping by!!

Until next time...
HAPPY CRAFTING!!
~Mitsyana


**Disclaimer**
This blog is compensated to provide opinion on products, services, websites and various other topics. Even though the owner(s) of this blog receives compensation for our posts or advertisements, I always give my honest opinions, findings, beliefs, or experiences on those topics or products.
The views and opinions expressed on this blog are purely my own. Any product claim, statistic, quote or other representation about a product or service should be verified with each manufacturer, provider, or party in question.