Thursday, December 23, 2021

Christmas Sweater Slimline Card

Hello Crafty Friends!

Today, I'm sharing a festive card that  LOOKS & FEELS like a warm knit Christmas sweater! These are so quick and easy to make so if you are a last-minute kind of guy or gal (like me), you could easily crank these babies out in no time flat.

**Disclaimer**

This website uses affiliate links. A small percentage of sales made through these links goes toward supporting this blog at no additional cost to you.


Supplies Used

Creative Station (Xyron)

Big Shot Foldaway (Sizzix)

Eileen Hull 3D Textured Impressions Embossing Folder- Sweater (Sizzix)

Eileen Hull Wreath & Snowflake Dies (Sizzix)

Black Craft Foam (Creatology)

White Cardstock (Accent)

Silver Glitter Cardstock (Recollections)

Red Velvet Paper

Chitchat Stickers 

Paper Trimmer

Stitched Grosgrain Ribbon


I started a 3-1/2"x 8-1/2" card base made from 110 lb white cardstock. Next, I ran a sheet of Red Velvet Paper through my Xyron Creative Station. Then cut it down to 3-3/8" x 8-3/8".

Before continue I made sure to run all my materials for this card through my Xyron Creative Station. This enables me to create quicker by adding adhesive directly behind all the materials so that once everything is cut all I need to do is peel and stick it all together.

Then I inserted the Red Velvet Paper strip into my  Sizzix Big Shot Foldaway using the Eileen Hull 3D Sweater Embossing Folder. This folder is a standard A2 size. So after embossing one end I embossed it a second time on the other end, carefully lining the embossing up to look like a continuous pattern. 

Keep in mind that this is also a 3D embossing folder so the sandwich for your machine will differ. 


Then I die-cut The bird and stars from glitter cardstock. I also die-cut an additional bird from black craft foam. Then I die-cut the wreath from white cardstock and more black craft foam.

This is where having that adhesive on the backs of my surfaces plays an integral part in my card making...


All I need to do is PEEL & STICK!! Layering those die-cuts is super easy and I don't have to worry about waiting for the liquid adhesive to dry or worry about it spilling over the edges and potentially making a sticky mess!! 


I just added the words Peace, Joy, & Love onto the wreath and then added a line of ribbon and a simple bow, and called it good!!

And here is my finished card...


So simple and elegant! 


I love the detail of this sweater embossing folder, it very much LOOKS like it was made from a real knit sweater... and making it from the red velvet paper makes it FEEL like it was too!!

Wednesday, December 15, 2021

Gnome For The Holidays Blog Hop


WELCOME to the I Am Roses "Gnome for the Holidays" Blog Hop!

Season's Greetings from all of us at I AM ROSES! There will be no IAR Challenge this month but we have a festive blog hop for you. We'd like to THANK YOU from the bottom of our hearts for all your support this year. There will be TWO Prizes up for grabs!
 
(2) $50 Voucher


Sit down and relax with a warm hot cocoa or the holiday drink of your choice.


Here’s how to play:


Hop along to each of the Designers’ blogs and be sure to comment on their individual IAR Blog Hop Post


  • There are 2 HIDDEN BLOG CANDY PRIZES up for grabs spread throughout our  Designers’ blogs!

  • Be sure to Subscribe/Follow the I Am Roses Challenge Blog

  • Commenting along the way highly increases your chance of winning a Prize Voucher.

  • Comments will be CLOSED on 11:59pm PST on December 21st (This blog hop has a duration of one week)

  • We will be randomly selecting 2 winners from the comments made on our Designers' blogs and will announce the winners here on the I Am Roses Challenge Blog on January 1st!

Let's get this hop started!
 
(*November Challenge Winners will be posted tomorrow on the 16th)


And now it's time for some holiday inspiration... Here is the card I created for this month's Blog Hop!


Here are all the different I Am Roses Flowers I used...


And here are close-up views of my card...


I am Roses Products Used

Other Products Used
Santa Claus Paper- (Authentique)
Red Polka-Dot Paper
White Cardstock
Scalloped Background Die (Diamond Press)
Mega Runner (Xyron)

Don't forget to visit my crafty design team sisters!!

 
Enjoy the hop! Please come back here and comment that you finished!

 GOOD LUCK!!


Wednesday, October 27, 2021

Eileen Hull & TCW Collab


Hey, Crafty Friends! I'm back with the Eileen Hull Inspiration Team and we are thrilled to be working with The Crafter's Workshop for this entire month of October. 

In today's post I'll be working with Eileen Hull's line of stamps along with TCW's stencils and luscious "Stencil Butters" to create this card...


Supplies Used
Eileen Hull- Wonderful World of Flowers Stamp Set (Marker Forte)
Eileen Hull- Button Cards & More Stamp Set (Marker Forte)
6x6 Stencil- Skeletal Leaf (TCW)
Stencil Butter- Marigold, Gamboge (TCW)
Versafine- Onyx Black (Imagine Crafts)
Alcohol Markers (Diamond Press)
Distress Oxide Inks- Mowed Lawn, Wild Honey, Tea Dye, Vintage Photo (Ranger)
MISTI (My Pretty Petunia)
Mint Tape (Scrapbook. com)
White Cardstock 
Palette knife
Heat Gun
Blending Brushes

I started by taping down paper I planned to Stencil on. I found some in my stash that looked like aged newsprint and taped it down with strip of Mint Tape. This tape is low tack and will not rip or damage the paper when removed. You can reuse several times (as you can tell in my pictures) so save those strips for later 😉. You can keep reusing them till they run out of tack- less waste.

Once my paper was secured down,  I took the TCW Skeletal Leaf Stencil and spread Gamboge then Marigold Stencil Butter over the design using a palette knife.


I used my heat tool to speed up drying time and to my surprise and delight it did not bubble whatsoever! It held up to heat very well!

Then, I shaded in the Leaf with Mowed Lawn and Wild Honey Distress Oxide ink using a Blending brush. With the raised surface area created by the Stencil and Butters it was just more easier using a brush versus a sponge. The bristles of the brush move through the raised areas easier and can get in between all the little nooks- whereas a blending sponge or dauber could have issues of being torn from the ridges.

Next. I cut my paper down to 5.5

5"x 5" and then inked around the edges with Tea Dye and Vintage Photo Distress Oxide inks.

I matted and layered fall shades of patterned paper together using my Xyron Mega Runner and attached them onto a 6" x 6" cardbase. 


I used the library card stamp, from the Eileen Hull Button Cards and More Stamp Set, in my MISTI and stamped it using Versafine Onyx Black ink.


I then did the same with the Flowers from the Wonderful World of Flowers set onto white cardstock and the quoted label from the Button Cards and More Set.

Then colored the in using my Diamond Press alcohol ink markers.


I fussy cut (handcut) all my stamped images and added a huge Rhinestone to the. Enter of the larger flower.

Then I attached these embellishments to the front of my card surrounding the Leaf. I also added a bit of foam adhesive  behind the large flower and quoted label cutouts for more added dimension. 

And here is my finished card...


I really love how this turned out, especially this color combo! Teal is Eileen's favorite color and it really pops off those fall colors!

This would be a great Fall/ Thanksgiving card or great Anyday/ Everyday card!

I hope you enjoyed today's tutorial! Thanks for stopping by!

And until next time...
HAPPY CRAFTING!!
~Mitsyana 


Friday, October 22, 2021

Eileen Hull 2021 Halloween Screaming Skull Journal


Hey, Crafty Friends!! It's that time of the year again! My favorite season, SPOOKY SEASON... Halloween!! And you know I just had to continue with my tradition of making a creepy-cool Halloween journal. So here is my new 2021 "Screaming Skull"!!

This year I kick it up a notch because this one lights up!!

Let me show you how I created this horrifically haunting masterpiece...


Supplies Used
Black Gesso (Golden)
Mint Tape (Scrapbook.com)
Plastic Skulls
Black Netting 
Plastic Halloween Toy Bugs
Spider LED String Lights
Chipboard Frame
Quick Dry Glue
Bone Folder
Scissors
Paper Trimmer


I started by making the base, the journal cover. For this, I used the Eileen Hull Full Size Journal Die. I trimmed a piece of 12" x 12" black chipboard down to 8-1/2 " x 12". Then laid it over the die and ran it through my Big Shot Plus Machine. This die has to use the Big Shot Plus or Pro Machines. It is a very large die and will NOT fit in the other smaller machines. 

To make a single journal you must cut the die out twice.


Once you have all your pieces cut, take the two cover pieces and attach them together.
 Add glue to the spine portion and overlap the spines. I like to use clothespins while the glue is drying to keep them in place.

When the glue is completely dry, I ran the entire cover (FACED DOWN) through my Xyron Creative Station. Then I burnished the protective film thoroughly to get maximum adhesion before peeling.


Then I peeled the protective film completely off and immediately covered it with the black netting.
I trimmed off any overhanging excess with kitchen sheers... this stuff is pretty thick.

I found a chipboard frame and painted it with black gesso then attached it to the front of my journal cover using quick-drying glue.


I bought these cool "spider" string lights from the dollar store and really wanted to incorporate them into my journal but it has a big battery pack so there was no way to hide it IN the journal itself... so I hid it in plain sight by adding it directly to the cover.

Keep reading to see how I disguised it!!

And it is important to note that I placed this pack with the switch facing down toward the bottom of the cover. You'll see why.


Here's how I did it... I used the skull head!

These plastic skulls are hallowed. I cut off the entire backside of the skull and sliced it in between the lower and upper teeth to create a separated jaw.

Then attached the upper part of the skull over the battery pack with more quick-drying glue, concealing it. Once I liked the position I attached the bottom portion of the jaw to the cover as well.

Then draped more netting around the skull to cover the rough edges and any gaps.


I strung the light around the skull around the back cover. Then glued on an assortment of plastic bugs. I used more black netting to conceal the wires and glued those over them. It's ok if they faintly show because the next step will completely hide anything else showing...


First I used mint tape to cover the lights. And added some black netting into the skull's mouth.

Then I painted over EVERYTHING with black gesso. And when I say EVERYTHING, I mean EVERYTHING!


The skull, hands, bugs, and yes, even the netting itself!

Once the gesso was completely dry, I rubbed a bit of Rose Gold Luster wax over everything. It really highlights all the raised areas and really brings out all the gorgeous textures.


Once it was completely covered here is what it looked like!


Remember, I placed the battery pack inside the skull...
So to turn it on and off you actually have to reach inside its mouth!! Ewww!! LOL!

This was why it was important for me to place the switch in the direction I did... So you could access it through the mouth!


It was worth it because here it is all lit up...


I am obsessed with it! I think this is my favorite creepy journal I have made so far!

I hope you enjoyed my process!!

Thanks for stopping by!

And until next time...

HAPPY CRAFTING!!
~Mitsyana


Wednesday, September 15, 2021

Beautiful Winter Wishes Card

Hey, Crafty Friends! I'm back with Team Eileen and today I'll show you how to create this simple and elegant slimline card.

The summer heat is barely dying down but I'm looking forward to cooler weather already. It's still getting into the late 90s here and I would really love it if mother nature blew a few flurries my way! There's just something about snow that is so beautiful and serene. I think that there is something lulling about the way it blankets everything after heavy snowfall. 

So, today, I'll be using Eileen Hull's Wreath & Snowflake die to create this flurry-laced card.


Supplies Used
Eileen Hull Wreath & Snowflake (Sizzix)
Mega Runner (Xyron)
White Cardstock
Red Cardstock
Gold  Glitter Cardstock
Vellum
Gold Foil Stickers (Scrapbook.com)

I started by running a sheet of white cardstock through my Xyron Creative Station. 

Then, I used the Snowflake die from the Wreath & Snowflake die set to die cut about 7 or 8 snowflakes.


I cut a piece of red cardstock down to measure 
3-1/2" × 8.-1/2" and adhered my snowflakes onto the front. 


I spread the snowflakes out along the card front until I was happy with the way it looked. Then, I trimmed off any overhanging pieces.


I used the star included in the Wreath & Snowflake set to die cut 6 stars from gold cardstock. Then adhere them in between the snowflakes.


Using my Xyron Mega Runner, I mounted my card front onto a 3-5/8"x 8-5/8" piece of gold cardstock. Then attached it to a white 9" x 4" slimline card base.

I cut a 1-1/2" strip of vellum and laid it across my card at a diagonal and attached the sides around the back so the adhesive was not visible. Then I used gold foil stickers to spell out the word WINTER across the vellum. Lastly, I word from Tim Holtz's Big Chat sticker stack to complete my card sentiment.

And here is my finished card...


I love how this card turned out!

Even though there were a few steps, it came together pretty quickly.


I hope you enjoyed my card for today! 
Thanks so much for stopping by!

Until next time...
Happy Crafting, Friends!!

For more creative inspiration head on over to my Instagram account where I post even more crafty projects...
www.instagram.com/mitsyana/


Friday, August 27, 2021

Eileen Hull - Marker Forte August Stamp Release

 Hey, Crafty Friends!!

I'm so excited to finally share some awesome news... 

Eileen Hull partnered up with Marker Forte to produce premium quality clear stamps!! How exciting, right??!!

 Today, marks the launch of the first 3 stamp sets. In celebration of this occasion, the Inspiration and Education teams have collaborated to bring EH fans an assortment of creative ideas using these stamps!!

Here are a few projects I made with the NEW stamp sets...


DISCLAIMERS
This blog is compensated to provide opinions on products, services, websites, and various other topics. Even though the owner(s) of this blog receives compensation for our posts or advertisements, I always give my honest opinions, findings, beliefs, or experiences on those topics or products.
The views and opinions expressed on this blog are purely my own. Any product claim, statistic, quote, or other representation about a product or service should be verified with each manufacturer, provider, or party in question.

This blog contains affiliate links, clicking and shopping through these links helps to support and run the Up On Tippy Toes blog at no additional cost to you.


The first card in my lineup uses 


the stamp set...


I inked the library card stamp with Versafine black ink and stamped it onto white cardstock. 

Then cut out it out and inked the cards with Tea Dye and Vintage Photo Distress Oxide Inks. 


Then I labeled one of the library cards "OVERDUE" (included in the set) stamping it in Candied Apple Distress Oxide ink.


Then stamped a couple of tickets onto coral Colored cardstock, cut them out, and inked the edges with more Vintage Photo Distress Oxide ink.

I layered these Ephemera over Eileen Hull's beautiful Mandala die, surrounded them with flowers and leaves, and attached them to front of a 5"x7" card.

For this next card I used the 
stamp set...
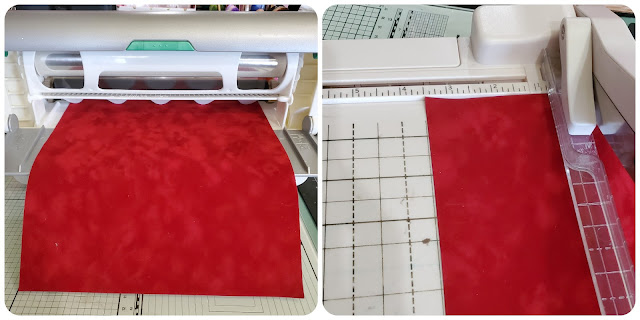
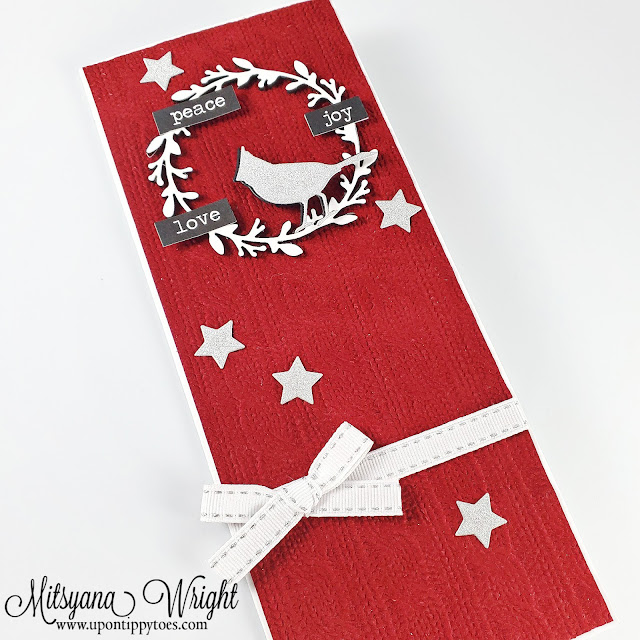
This patter measure 4"x 6" but as you can see I used it to create a slimline card.


I simply stamped the image twice. Getting the inked impressions as close as I can together without overlapping them.


The image doesn't make a continuous pattern...
But since I used Eileen's Mandala, no one will even see or notice it. I die-cut 2 Mandalas, 1 in a coral cardstock and 1 in white, and offset it a bit so the white peeks through on the side. Then laid it over the area where the pattern doesn't perfectly match. This creates an illusion that it is a continuous pattern.


I also incorporated the dainty wreath from Eileen's  Wreath and Snowflake die set, I die-cut 2 and stacked them directlyon each other for more dimension...

And I also added the William Wordsworth quote from the previously shown "Buttons, Cards, and More" set.

I stamped the background as well as the quote using Worn Lipstick Distress Oxide ink.


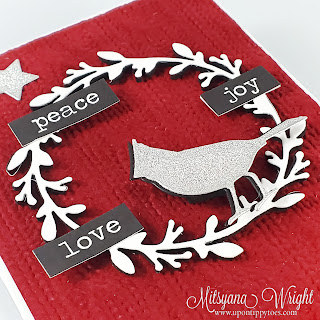
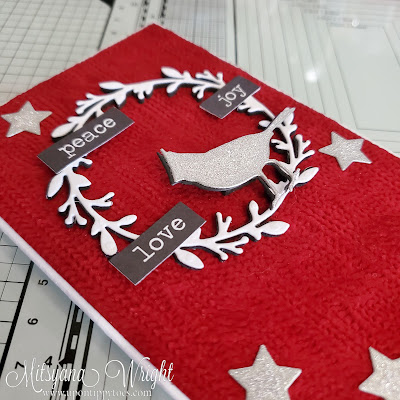
And last, but certainly not least, I created a bright and cheerful card using the
stamp set...

I loved the blocked grid frame. You can use it to put any of the included stamped images into the coordinating sized blocks. Or you can also as a interesting background stamp, like I've done below.


I've used the little flowers and leaves as accents, stamped multiples of each, then fussy cut them all out, and added a single flatback adhesived pearl to each flower center.

I grouped my flowers and leaves catty corner from each other.


And use a heart-shaped tag in the center. I inked the edges of my tag with Mustard Seed & Carved Pumpkin Distress Oxide Inks.  Then tied a button topped bow on top.


In the center of the heart tag. I used the little solid heart stamp from the set stamped in more Carved Pumpkin ink.

I also stamped the word " Congratulations" in more Carved Pumkin ink and cut it into a thin strip.

And I attached both to the center of my heart.


I love how each of these card turned out. Each are so individually different and yet components from each set work so beautifully together!

If you're like me and can't decide on which one set to get, think about getting all three!! Eileen has a great deal on a bundle below...


Other Supplies Used (*Affiliate Links)
Eileen Hull *Mandala Die (Sizzix)
Eileen Hull Wreath and Snowflake Dies (Sizzix)
*Mega Runner (Xyron)
Glue Gun (Xyron)
*Distress Oxide Inks- Tea Dye, Vintage PhotoCandied AppleWorn Lipstick,
Yellow Gardenia (I Am Roses)
Small Green Leaves (I Am Roses)
White Cardstock (Accent)
Colored, Craft Cardstock (Recollections)
Green Twine
Fashion Button (Buttons Galore)

I really hope you enjoyed my projects for today!! 

For more inspiration using these sets, check out the rest of the Eileen's Inspiration and Education teams. They are packed full of creative ideas!!

Thanks for stopping by!

Until next time...

HAPPY CRAFTING!!
~Mitsyana