Tuesday, May 31, 2016

Sweet Dreams Unicorn


Supplies Used
Stephanie Barnard's Royal Stand-Ups Card Die (Sizzix)
Magical Unicorns (Pink and Main)
Sweet Dies (Pink and Main)
Sweet Dreams Baby (Pink and Main)
Sweet Dreams Baby Dies (Pink and Main)
Cardstock- DIY Project Stack Flowers, DIY Projects Stack Stencils, Jewel Toned Textured (DCWV)
White Cardstock (Bazzill Basics)
Mega Runner (Xyron)
Momento Tuxedo Black Ink (Imagine Crafts/ Tsukineko)
VersaMagic Night Sky (Imagine Crafts/ Tsukineko)
Striped Grosgrain Ribbon (Paper Mart)
Markers- JG2, LG5 and Colored Pencils- Nature-053, 057; Primaries- 034, 068 (Spectrum Noir)
White Gel Pen , Glitter Gel Pen (Sakura)
3D Dots (EK Success)
Chalklets (EK Success)
Ordorless Mineral Spirits
Blending Stumps
3D Lacquer
Blue Matte Button

I cut my base using Stephanie Barnard's Royal Stand-Ups Card die out of green striped cardstock from DCWV's DIY Projects Stack- Flowers. Then die-cut the coordinating panels from polka-dot cardstock from the DIY Project Stack Stencils. The ornate shape in the center was also included with the card die and was cut out from bright blue cardstock from DCWV's Jewel Toned Textured Stack. I added stitch lines and stars to the background using a  white gel pen.


I used Pink and Main's Magical Unicorn set for the unicorn.


The unicorn was stamped on white cardstock using Momento Tuxedo Black ink. Then colored with Spectrum Noir alcohol marker in LG5 (body) and marker JG2 (mane). Then for extra detail and depth I shaded with colored pencils 057 (body) and 053 (mane). I also colored the inner ear with 034 color pencil. For the cheeks I shaded with hot pink dry chalk and added highlights with a white gel pen. 

For the border strip at the bottom of the card, I cut a strip of bright blue jewel toned cardstock measuring 1.25" x 5.5" and layered a strip of polka-dot cardstock measuring 1"x 5.5". I used my Mega Runner to attach the two strip together as well as attach the ribbon down the center.

I topped with a basic bow and attached both the bow and the button center with 3D lacquer. Then hand drew stitch lines with a white gel pen.


I cut the word "Sweet" twice. Once ,from a light green cardstock, and again from the same striped green cardstock I used to cut the card base. Then I used a glue pen to layer the two die-cut words, offsetting them just a bit , creating a shadow. Again, adding highlight with a white gel pen.


I die-cut several clouds from the Sweet Dreams Baby Dies for my unicorn to stand on and shaded them by outlining them first with a blue (Spectrum Noir color pencil 068) and then blending the color out using odorless mineral spirits and a blending stump. I die cut an additional cloud to stamp the word "dreams", and positioned under the word "Sweet" to read out "Sweet dreams".


And, here is my finished easel card...


This set has to be hands down my all time favorite to date!! I just can't get enough of these UNICORNS!!!

#UnicornLover #UnicornAddict # IBelieveInMagic #80sKid

Hope you all enjoyed today's project!!
Until next time...
HAPPY CRAFTING!!
~Mitsy


Monday, May 30, 2016

Masculine Journal & pen

Hello, Crafty Friends!!
 I am so excited to start the new week with Craftwell's new sponsor... Latina Crafter!! I really love the assortment of Stamps and stencils! And today, I'll be using their fabulous stamps with Craftwell's awesome dies, to make this masculine journal and matching pen set for my husband. Awhile back he asked me for one but I never got around to making him one till now... I think I'll surprise him with a just because gift! Because who doesn't like surprises, right?!!


Supplies Used
Cut'n'boss (Craftwell)
Teresa Collins Pocket Dies- Noteworthy, Memory Collection, Thankful Holiday,  (Craftwell)
Anchor Stamp Set (Latina Crafter)
Hey Sailor Stack (DCWV)
Gold Metallic Foil Board (Grafix)
Mega Runner (Xyron)
VersaFine Onyx Black (Imagine Crafts/ Tsukineko)
Composition Book 
Ballpoint Pen
Paper Crimper (Fiskars)


 First, I started by cutting two sheets of patterned paper from the Hey Sailor stack, to measure 9.75"x 7.25". I want this to be really sturdy and stick in place so I ran both sheets through my Xyron Creative Station using a permanent adhesive cartridge. This way I had edge to edge adhesive coverage.

Then, I peeled off the protective backer and applied to my composition book. I used the corner and the edge of the book as a guide so the paper would adhere straight. Then, I rounded off the corners with a scissors.

To cover the spine of the composition book, I cut a 2.5"x 9.75" strip from coordinating paper on the same stack.


To decorate the front of my book, I used my Cut'n'boss machine and Teresa Collins pocket dies, from the Lover's Lane set, out of more patterned paper from the Hey Sailor stack. 

I also die cut these Teresa Collins pocket dies, from the Memory Collection & Noteworthy sets, to die cut gold metallic foil board.


To get more from my dies I like to cut them apart. I cut the doily die in half and tuck the cut edge under other elements. I also cut the numbers apart. Sometimes dies are too long to fit onto a surface and in these cases I'll either trim off the excess or cut them down and rearrange the cuts so that they do fit.


I love using paper stack that not just come with gorgeous sheets of patterned paper but also include sheets with decorative panels you can cut out. these make for awesome pocket page inserts or lovely coordinating embellishments!

I cut out this sailboat form one of these panels. Next, I ran that panel and my die-cuts through m Xyron Creative Station. Then I applied them onto my book front.


That sail boat went perfectly with one of the passages from the Anchor stamp set from Latina Crafter!


I cut out more gold foil paper and used it to frame my passage that I stamped with VersaFine Onyx Black ink. I cut out strip of more coordinating paper and snipped a fishtail to each, just one one side. I ran all my pieces through my Xyron Sticker Maker and mounted my elements onto my book cover.

Now, I just had to make a matching pen to go with my journal... and you know what?? They  are super easy to make!!

Take a ball point pen, you need the kind that easily unscrew on one end, and take your pen out of the barrel.

Then, cut a strip of paper measuring .5"x 3.75" from any of the paper scraps I used from my book cover. Then I ran it through my paper crimper, lengthwise. This help curl over and insert into the barrel. Trim off any overhanging paper that doesn't fit the length of the barrel. 
Insert pen through paper and back into the barrel and screw pen back together.

Tah-dah... Matching Pen!!!


And, here is the finished Journal and matching pen set...


I hope you all enjoyed this project!!

See you all next time!
&
HAPPY CRAFTING!!
~Mitsy


Thursday, May 26, 2016

Blog Hop Winner Announcement


WE GOT A WINNER!!!


Congratulations, Karen @ Misplaced Mojo!!!

You are the winner of the Deep Red Stamps $25 Gift Certificate!
**Please check your email for instructions on how to claim your prize**


I wanted to send a special THANK YOU to all that joined us for our Blog Hop! We hope you enjoyed yourselves and were inspired by all the projects!!

If you didn't win, don't fret! I will have more GIVEAWAY opportunities coming soon!! 

For the most updated info on my latest news, projects, events, or giveaways... please be sure to click on the follow button on the upper right of this page!!

You can also follow me on:


Tuesday, May 24, 2016

Missing your hugs

Hello, Crafty Friends!!
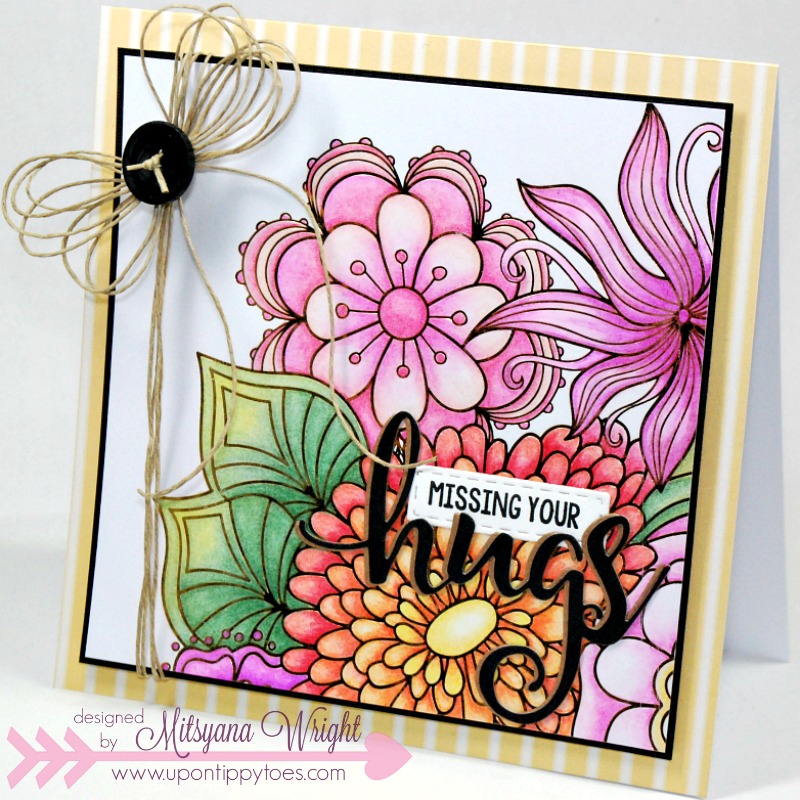
Today, I am turning a coloring book page into a beautiful card. Ok, so, I've been bit by the "adult coloring book trend" bug... bad!! But What does one do with all the finished pages once done?? Do you just discard the book? Do I put it back on the book shelf and let it collect dust?? Nope, not this gal! I turn them into gorgeous cards!


I trimmed my image a tiny bit down and mat my little work of art.  Then attached it to a card base. But what transforms my coloring into an exquisite card are these gorgeous script dies from Pink and Main!! 

And, today, I used the Hugs Dies...

with coordinating Hugs Needed stamp set...

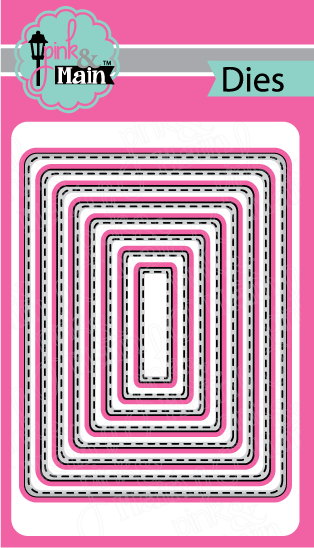
and the smallest rectangle die from the Stitched Rounded Rectangle Dies to create my card.

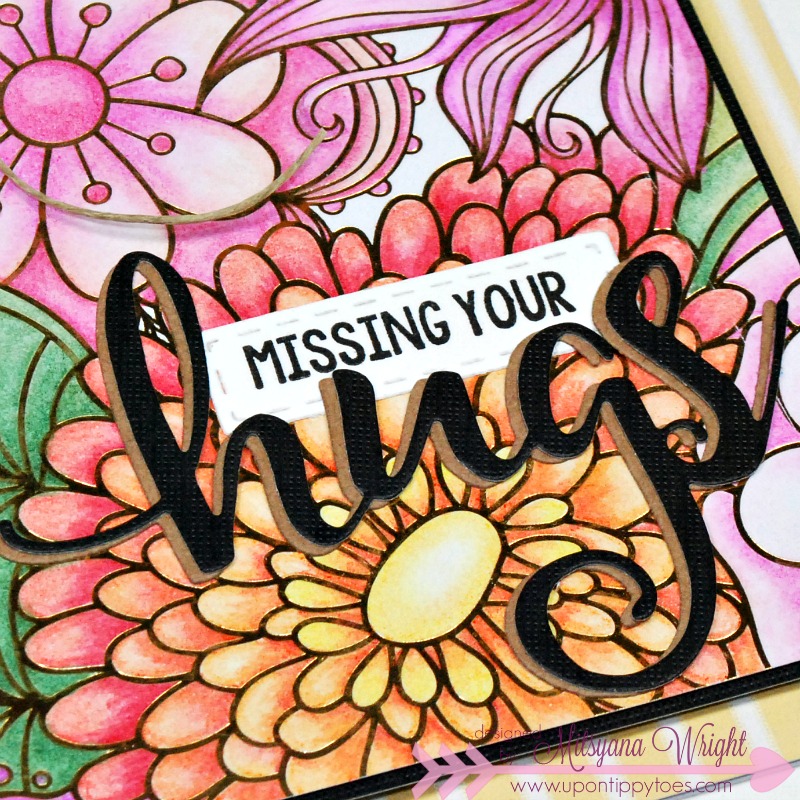
The smallest die, in the Stitched Rounded Rectangles Dies, fit most of the "add-ons" to the coordinating word stamps. In the Hugs Needed set, it fits all of the add-ons.
missingyourhugs2
I love the look of shadows behind words, but the shadow for the Hugs Dies was a little too big for my card... So, instead, I cut my word twice and slightly offset it creating the illusion of a shadow.

And most shadows are darker than the actual word on top, but I found that putting the darker color on top and the lighter color on bottom, really makes the word pop especially when you have many bright colors under it. Another awesome tip... if you have a bold or busy pattern background use a solid color on top to break apart the patterns and colors. 

 Sometimes too much of a good thing can be distracting!
So, if you are like me and love to color... try turning your coloring pages into beautiful cards!! They are a so much fun to make and you (and other) get to enjoy you colored masterpieces that much longer!

Here is my finished card...

missingyourhugs

Supplies Used
Hugs Dies (Pink and Main)
Hugs Needed (Pink and Main)
Stitched Rounded Rectangles Dies (Pink and Main)
Gold Garden Coloring Book (Craft Smith)
Tea Party Paper Pad (Craft Smith)
Colored  Pencils (Spectrum Noir)
Odorless Mineral Spirits
VersaFine Onyx Black Ink Pad (Imagine Crafts/ Tsukineko)
Black, White, & Kraft Cardstock
Mega Runner (Xyron)
Hemp Twine
Black Button

Hope you enjoyed my project for today!!
~Mitsy

Wednesday, May 18, 2016

Deep Red Stamps and Xyron Designer Blog Hop


Hello, Crafty Friends!! Welcome to the 3rd day of the Deep Red + Xyron Designer Blog Hop!!
I am so excite that you dropped by because I have an amazing project for you today repurposing old/ used Frappuccino bottles!


And if you are not already excited... here is a little motivation for ya... the awesome people from Deep Red and letting me give away a $25 in stamps to one lucky person!! WOOHOO!!! How AMAZING is that??!!

And...

I'm not the only gal giving away a gift certificate...
13 other talented crafters will be joining the fun!!! Each participating blog in our hop will EACH be giving away $25 !!

You can find the complete line-up and addition details HERE!

Aaaaaaaaannnnnd....
As a special treat, Deep Red is also giving away another bonus prize at the end of the week!!

WOOT WOOT !!


All you have to do is:
1. Follow my blog (I will use this as a means to contact you)
2. Leave a comment below (So I know you were here, each comment will count as an entry)

And, don't forget to visit 
&
on Facebook and like their pages!! It's not mandatory to "Like" their page but it sure is appreciated!! Make sure to tell them I sent ya!!

***Disclaimer***
This giveaway is in no way sponsored, endorsed, or associated with Facebook, Any and all information collected is for the sole purpose of contacting the winner.

And now to even more FUN STUFF...

How to make your very own recycle/upcycled 
Milk Bottle Vases

Supplies Used
Glass Frappuccino Bottles (Washed and Cleaned)
Gray striped Paper- Seaside Yacht Stack (DCWV)
VersaFine Onyx Black Ink (Tsukineko/ Imagine Crafts)
Stamp-a-majig (EK Success)
Wooden Plank Whitewash (Mix The Media)
    1-1/2" Split Ring Hangers x 3
3/8"x 1" Hex Bolts x 3
Metal Washers x 6 (optional)
Drill with 3/8" Drill Bit
Phillips Screwdriver


I really like the look of antique Parisian and French country chic...  and these gorgeous stamps from Deep Red are just perfect for both!! And today, I am going to show you how to make wall vases that will work for either!

I started by stamping my image using The French Perfume Label, from Deep Red Stamp,  onto this soft gray striped patterned paper from DCWV's Seaside Yacht Stack. I used Versafine Onyx Black ink... the images come out crisp and clear and the ink when dried is permanent. Which means no smudging if it gets wet... YAY!!

 I want the stripes on my paper to run evenly with the words... but there are no images on the backside of the stamp... No problem. I have an easy fix.I used a Stamp position tool. 

First, I stamped my image on the plastic sheet included, lining the sheet flush against the side and corner of the tool. Then I too my plastic sheet and positioned it over my patterned paper, lining it up to where I felt it was "straight".

Keeping the plastic sheet in position, I placed the tool back flushed against the side of the sheet. 

Then slide my stamp down the wall of my tool using it as a guide to stamp.
 This tool is awesome... I can also fix some of my stamping faux pas... like the sunflower from the image on the left. All I have to do is line place the plastic sheet back down and line up the two images until they become one. place my tool back down and re-stamp again!! 

 Tah-dah!!! No mistake!!


I hand cut each label, leaving a small border around the image.


Then I gave all of my labels a quick run through my Xyron Creative Station Lite. I want these labels to stay put so I used a permanent adhesive refill cartridge inside my machine.

 Now that my labels are done it's time to stick them onto my would be vases.
I love the shape and size of the Frappuccino coffee drinks. They kind of remind me of old fashioned milk bottles. And I always have a ton of them laying around my house.

Just soak them in hot water and wash them up. The hot water make the labels easier to get off. I use Goo-gone to remove any leftover adhesive residue then give them another wash to get off that "industrial/petroleum" smell. 

Once dried, I add my labels. To make them line up evenly with each other I lay them next to one another and apply the labels to the next glass using the previous glass as a guide.

 For my backboard... I found this wooden plank and drilled 3 holes. Well, I should have stated this at the beginning of the project... Make sure your drill is fully charged!!! Mine wasn't... but luckily I have an awesome neighbor is really handy and he hooked me up!

 I tried to space them out as evenly as possible. These holes are meant to screw in my split ring hangers. One bolt screws in from behind and two screws are up front to hold the neck of the glass bottle in place.

I used a 1-1/2 " Split Ring Hanger for my bottles and it fits these bottles perfectly. The threading that screws the hanger in place takes a 3/8" hex bolt. So I used (3) 3/8" x 1" hex bolts. This was just right right length to get through my planks and screw securely in. The bolts DO NOT come with the hangers so you'll have to purchase them in addition to the hangers.

To get the bottles into each hanger, just undo the screws up front insert bottle, and rescrew. These screws in the front of the hanger ARE included... so , there is no need to buy any or play the guessing game on what size fits those tiny holes.

Mount as desired.

And now you can add your flowers!!

Here is my finished project...


And a closer peek...


I hope you loved my project!!

I really love how this recycled /upcycled project turned out!!

And I really enjoyed you joining us along our Designer Hop!!

Hope you all have a fabulously crafty day!!

~ Mitsy

Don't forget

FOLLOW MY BLOG 
and 
LEAVE A COMMENT

To enter to WIN $25 in Deep Red Stamps

Good Luck Crafty Friends!!!


Sunday, May 15, 2016

Woof!


Hello, Crafty Friends! I have an adorable card for you today using 3 different stamp sets as well as the NEW Stitched Rounded Rectangles Dies!
Other Supplies Used
DCWV Seaside Yacht Stack
DCWV Double Sided Cardstock Stack
White Cardstock (Bazzill Basics)
Xyron Mega Runner
Momento Tuxedo Black Ink (Imagine Crafts/ Tsukineko)
3D Dots (EK Success)
Spectrum Noir Color Pencils
Odorless Mineral Spirits
Blending Stumps
Bakers Twine
Red Buttons
Glossy Accents (Ranger)

For my main image, I used the puppy dog in the Fur Friends set and stamped him with Momento Tuxedo Black ink and colored him in with Spectrum Noir colored Pencils and blended out the color with Odorless Mineral Spirits and Blending stumps. Then I fussy cut him out and added foam adhesive behind him to give him some dimension.

For my sentiment I used this phrase from the Animal Faces set. I love how I can mix and match the different pet and animal sets together to maximize my possibilities!

I thought my banner looked plain and flat so I decided to stamp this houndstooth pattern using this stamp from the Mister set. It also makes a great background stamp when aligned and stamped multiple times.
And then for my card front mats of patterned paper I used the new Stitched Rounded Rectangles for that awesome stitched line detail. And something new has recently happened to all Pink & Main dies… They are now ALL PINK!! How awesome is that??!!
I added more foam adhesive behind my banner and tied bakers twine at both end.
And here is my finished card…

If the puppy dog face isn’t cuddle worthy, I don’t know what is!!
I hope you like today’s card!!
~Mitsy