Showing posts with label christmas ornaments. Show all posts

Thursday, December 22, 2016

Candy Cane Caddy

Happy Holidays Crafty Friends!
I am super excited to be guest designing for Eileen Hull Designs today!!
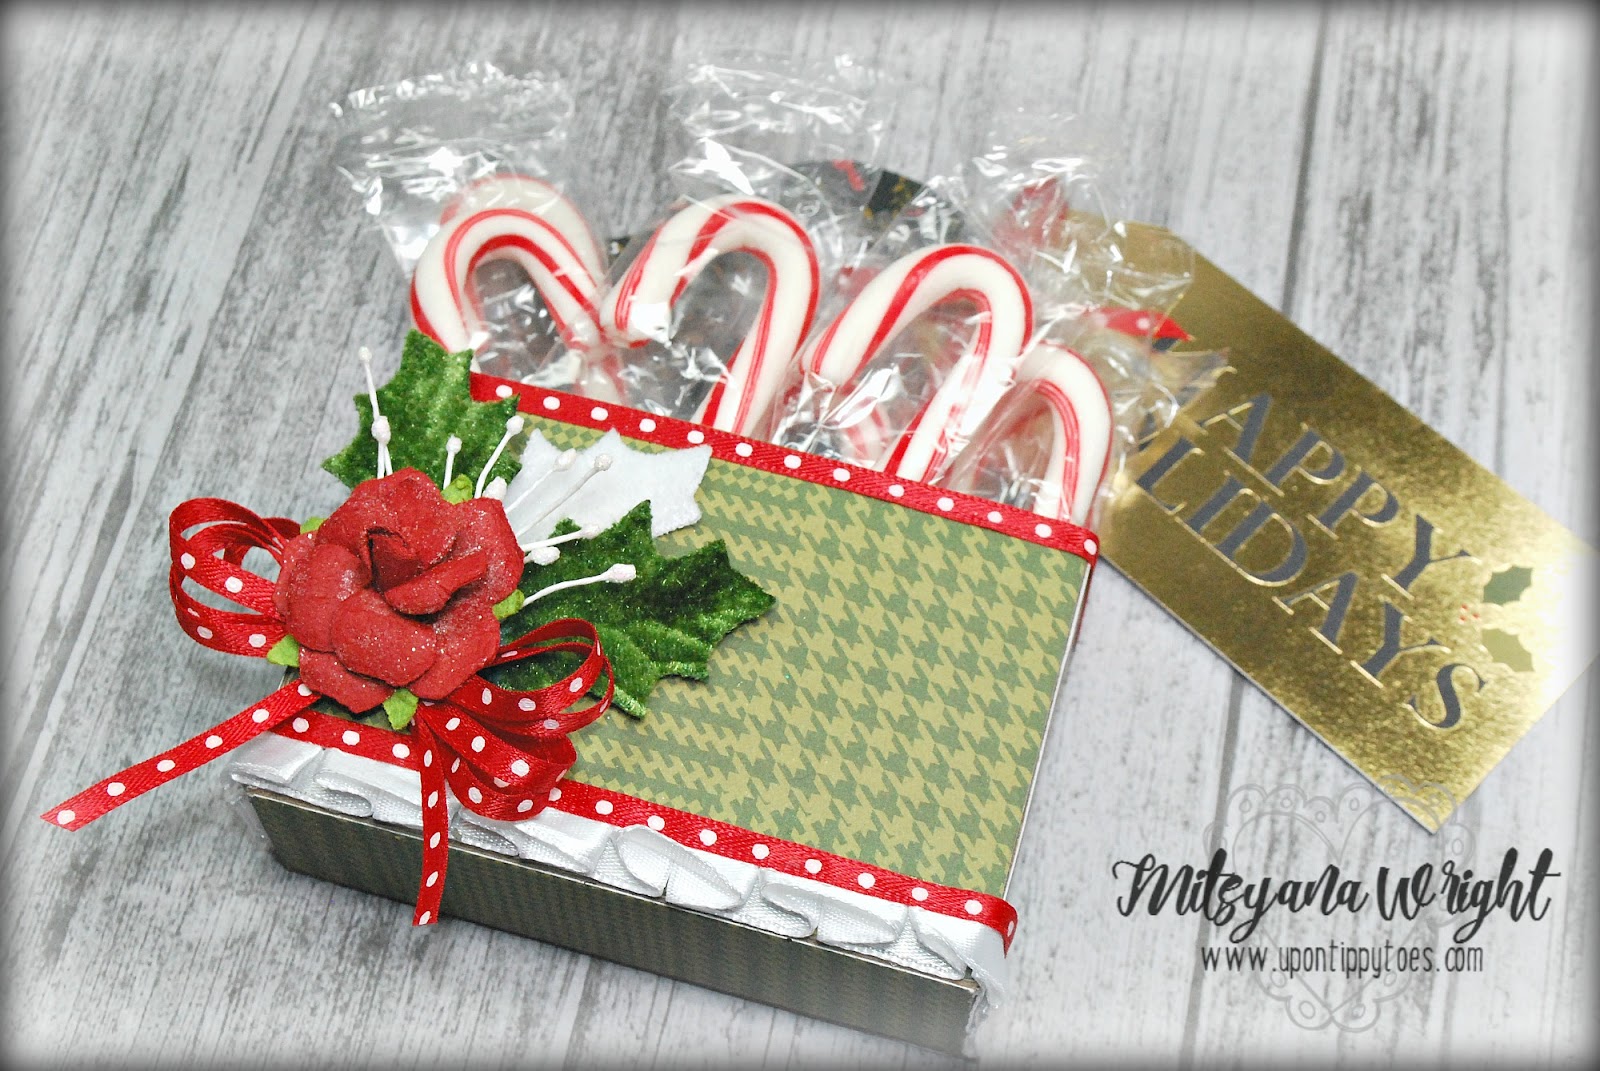
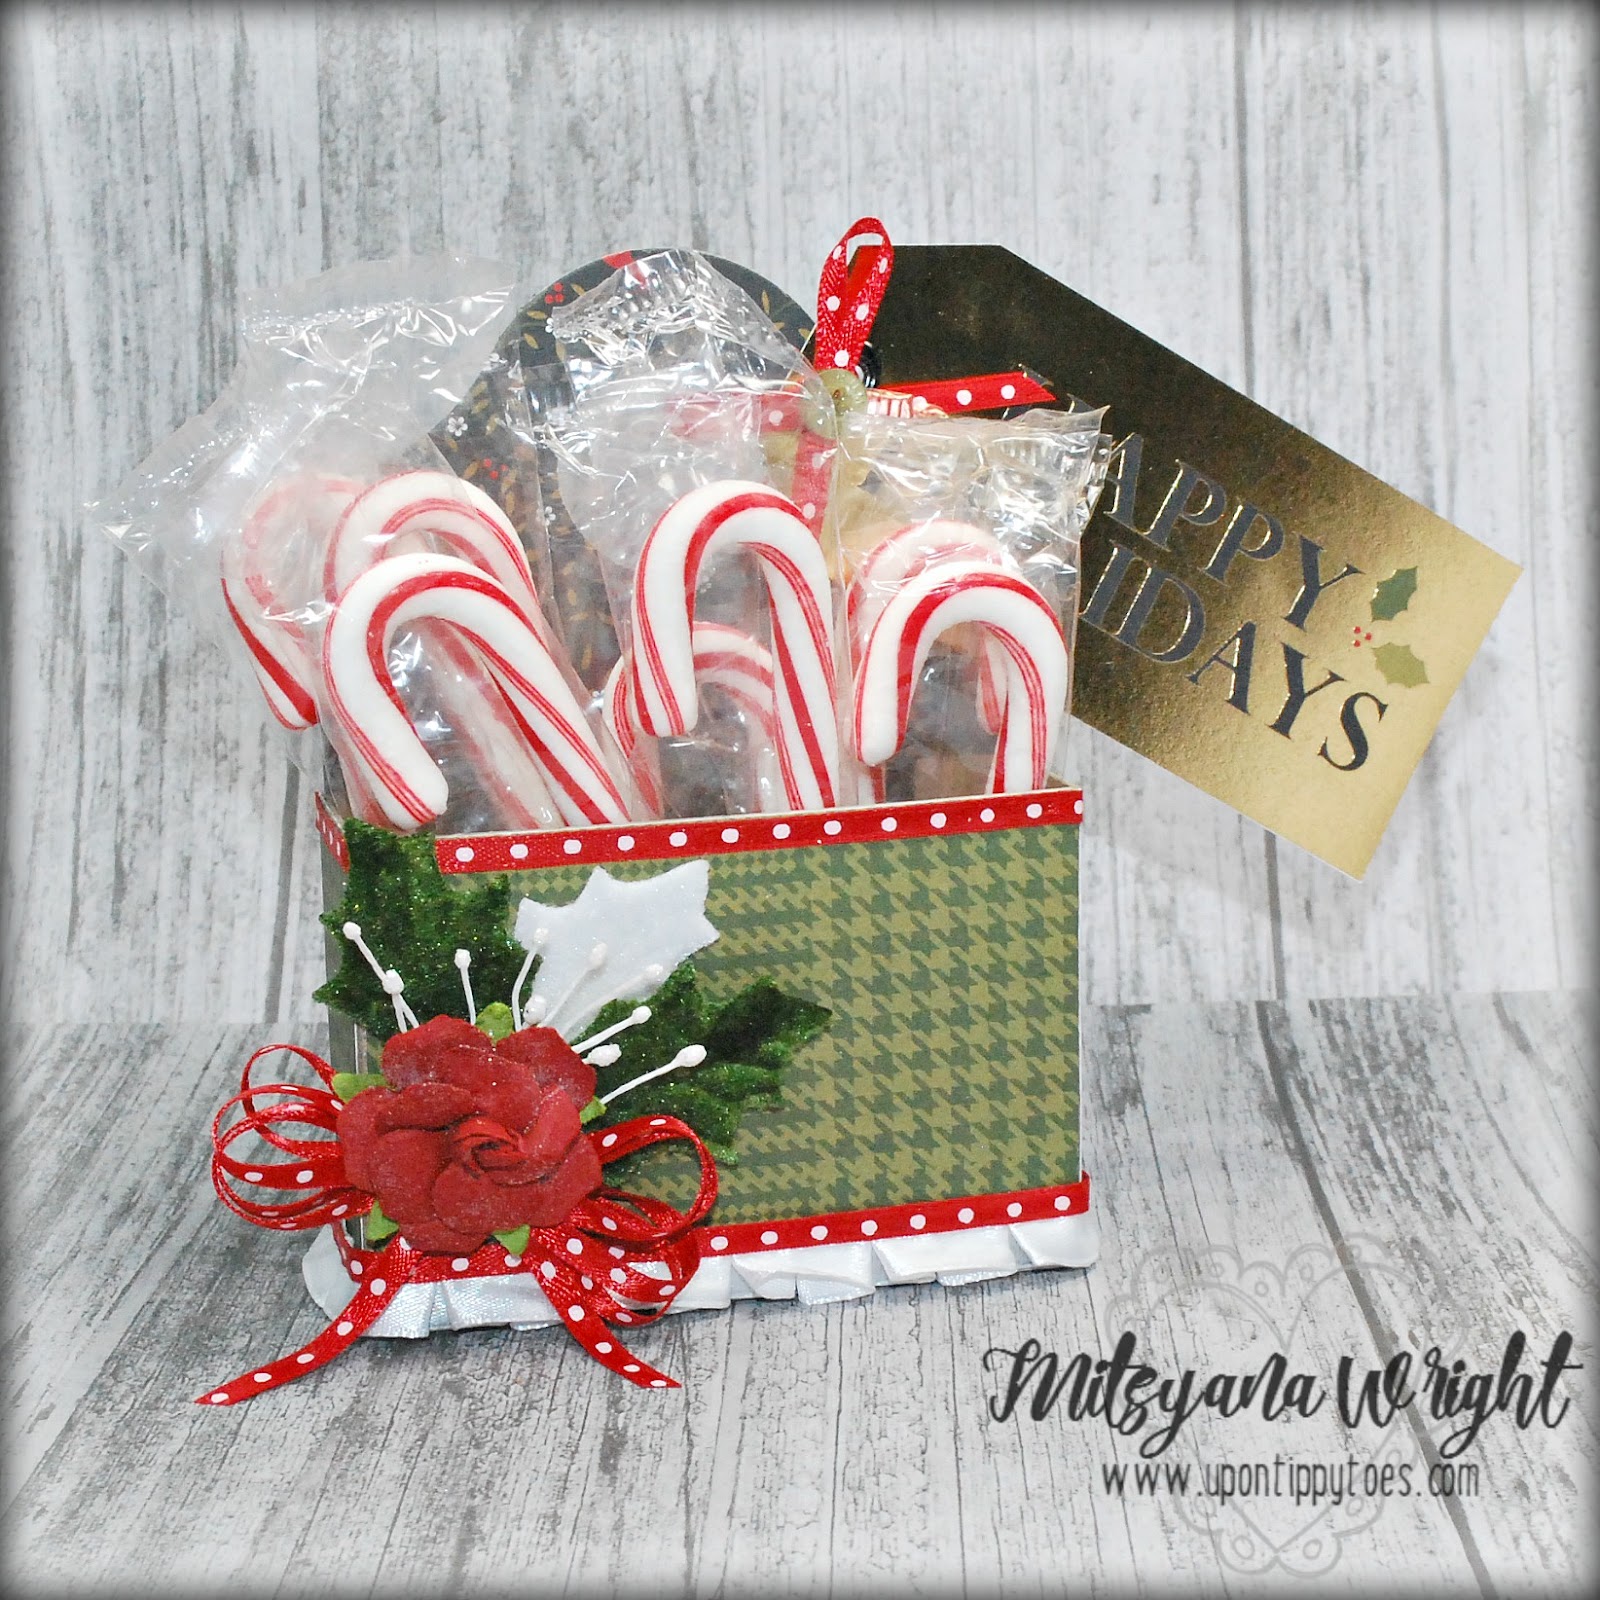
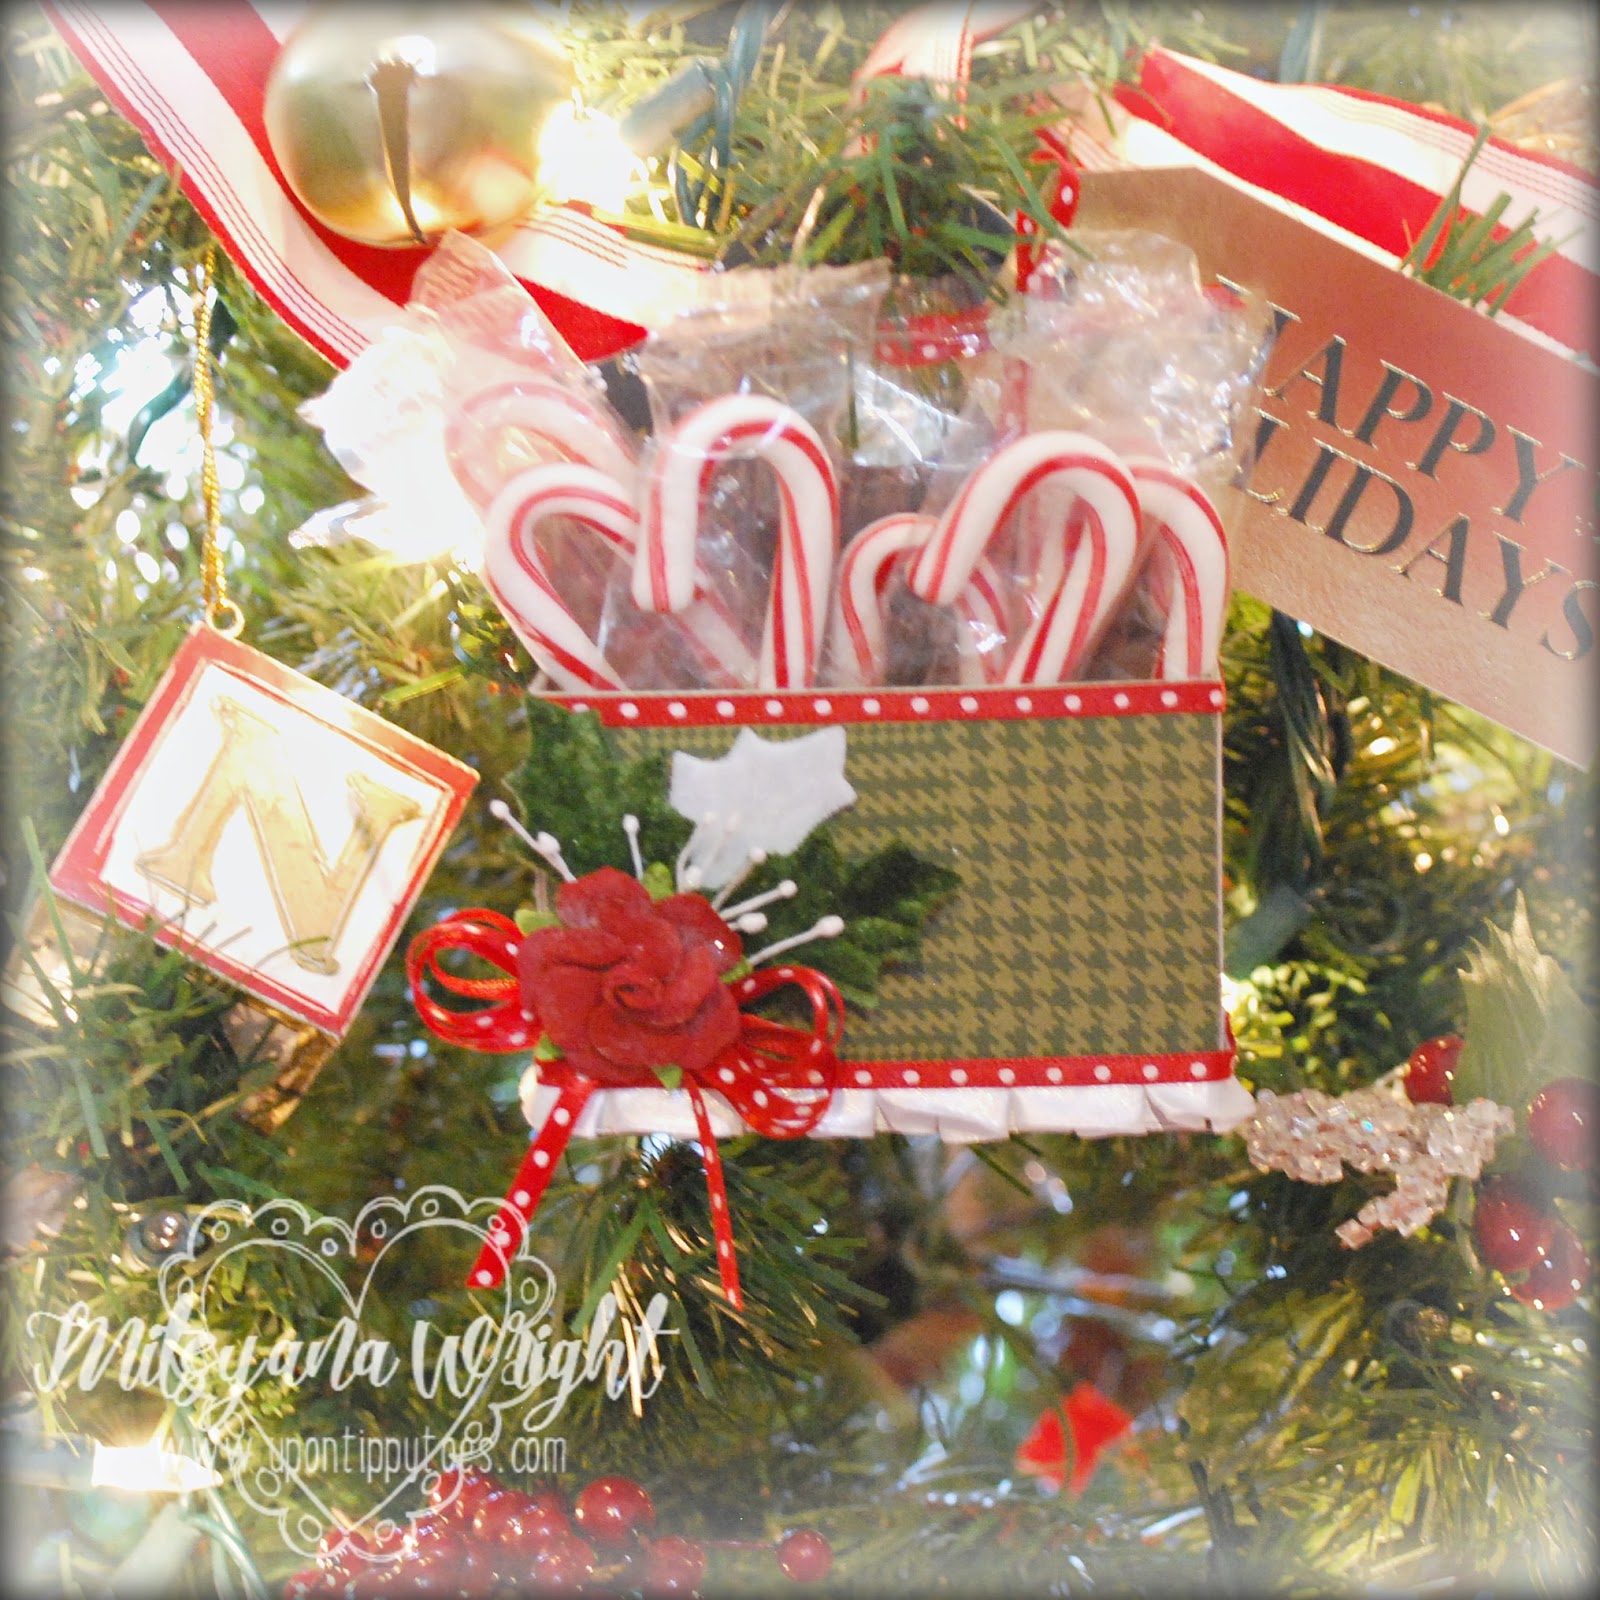
I love the versatility of her dies and how many of her designs are multifunctional. Here, I’ve made a candy cane caddy that also doubles as a Christmas ornament!

candy cane caddy2.jpg

For today’s project, I used Eileen Hull’s Caddy Die by Sizzix.

caddydie.jpg

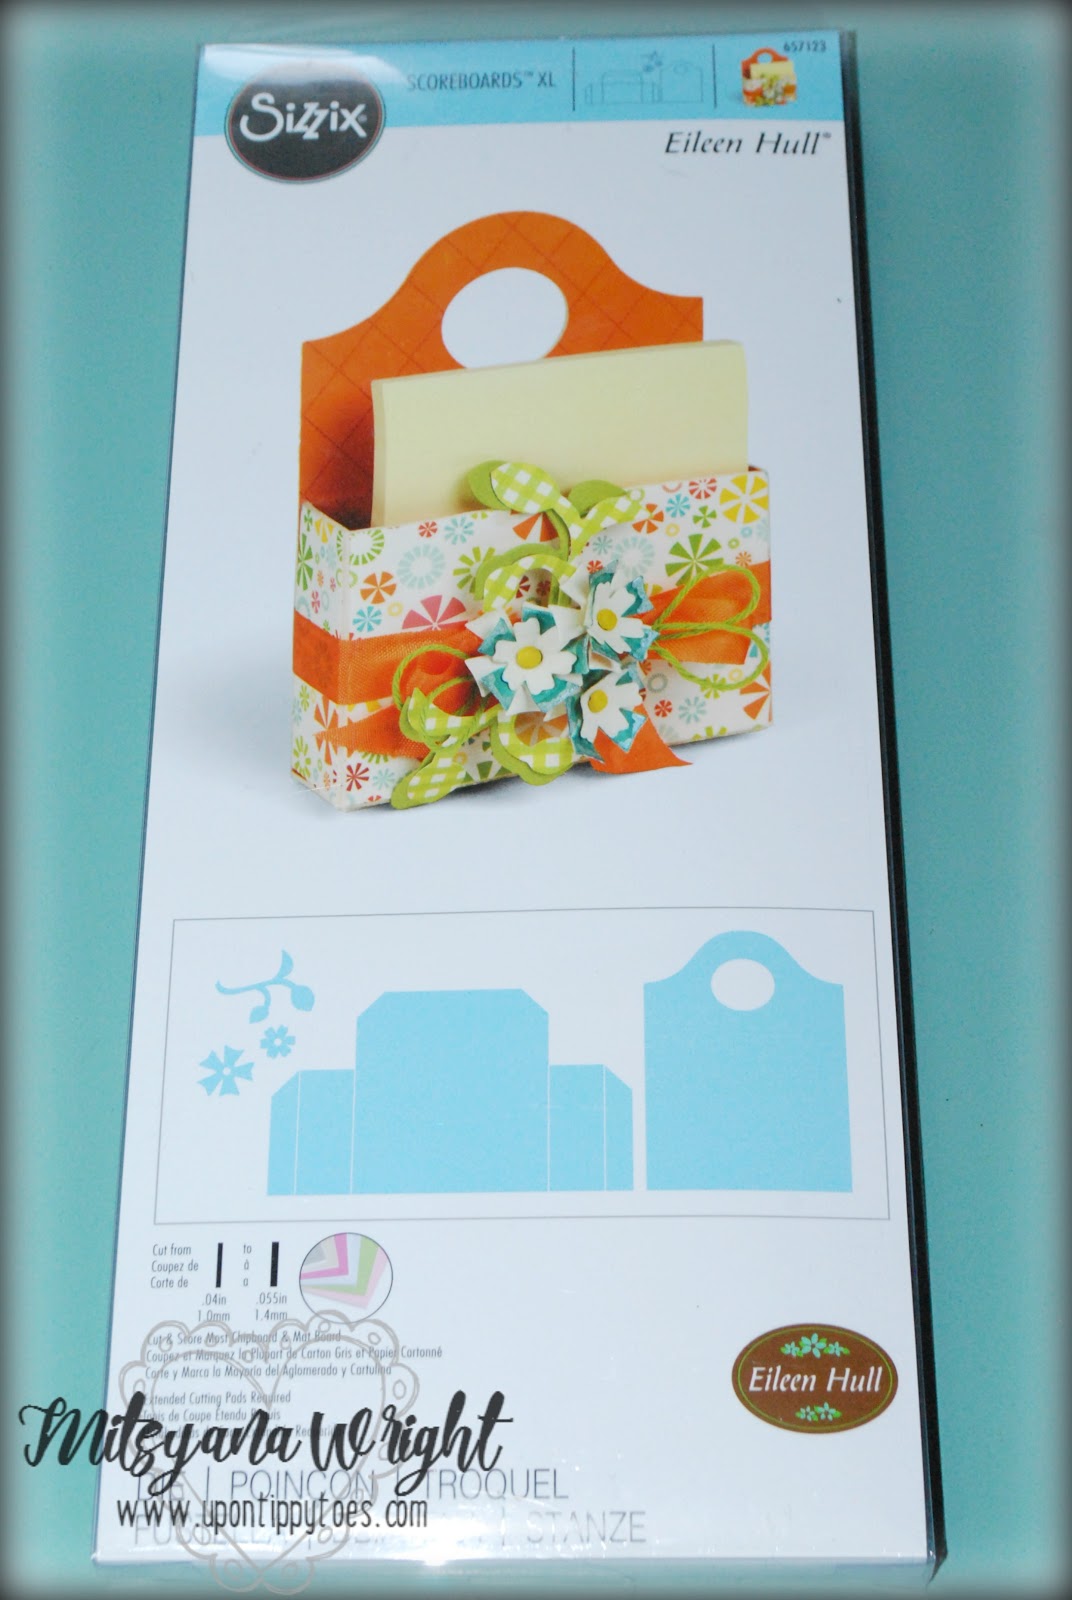
This is a steel rule XL Scoreboard die. You will need to use the Sizzix Big Shot Extended Cutting Pads in order to use these dies.

Other Supplies Used
Big Shot (Sizzix)
Christmas Plaid Stack (DCWV)
Chipboard
Creative Station Lite (Xyron)
1/8" Red w/ White Polka-dot Ribbon (Offray)
White Pleated Ribbon (Offray)
Velvet Holly Leaves (Petaloo)
Flower Stamens (Wilton)
Paper Rose (Michael's)
Glossy Accents (Ranger)
Green Button


candy cane caddy3.jpg

I started my project by first cutting down my 12” x 12” materials (chipboard and patterned paper), down to a workable 6” x 12” size so I can die cut them.

I didn’t want the entire caddy to be just one patterned paper. So, I trimmed down my 6” X 12” sheet into smaller pieces (4”x 6” and 6”x 8”) to cover just one of the panel pieces each.

Then, layered my chipboard piece over the patterned papers and ran all the material through my die-cut machine at the same time.

It cut through all the layers with ease!!

candy cane caddy4.jpg

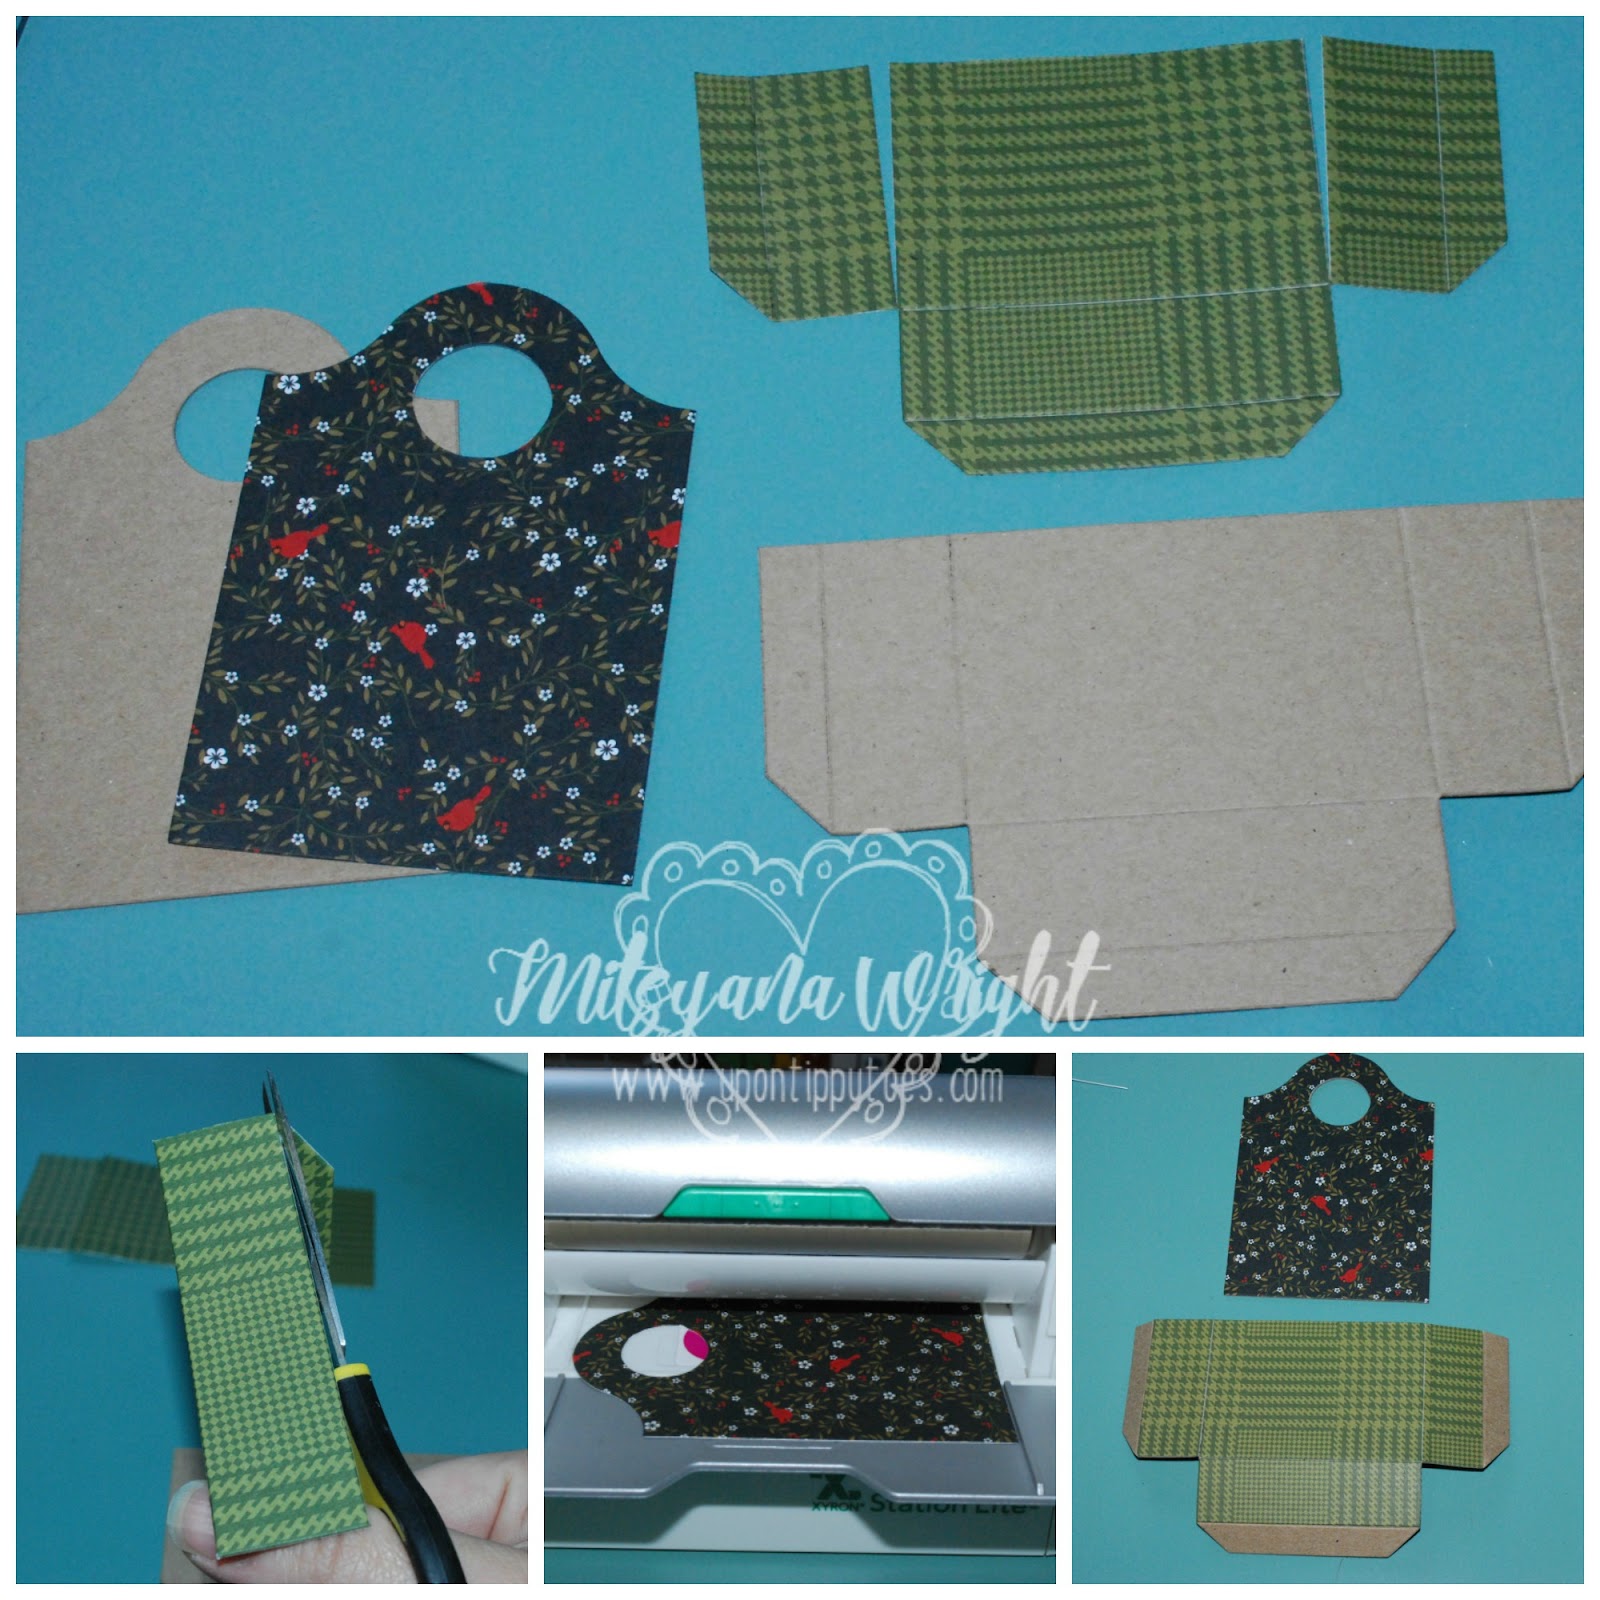
I trimmed off the “tucking” flap pieces of the bottom box portion (for the patterned paper only)... you will not see these pieces so there’s no need to add them.

Then, I cut apart this cut out on the crease lines.

Next, I ran my papers through my Xyron Creative Station Lite and attached them to their coordinating chipboard pieces.

I also cut an extra back piece out of the same black patterned paper to cover the back of the caddy, ran it through my adhesive machine, and attached it to the backside of the caddy’s back wall.

candy cane caddy5.jpg

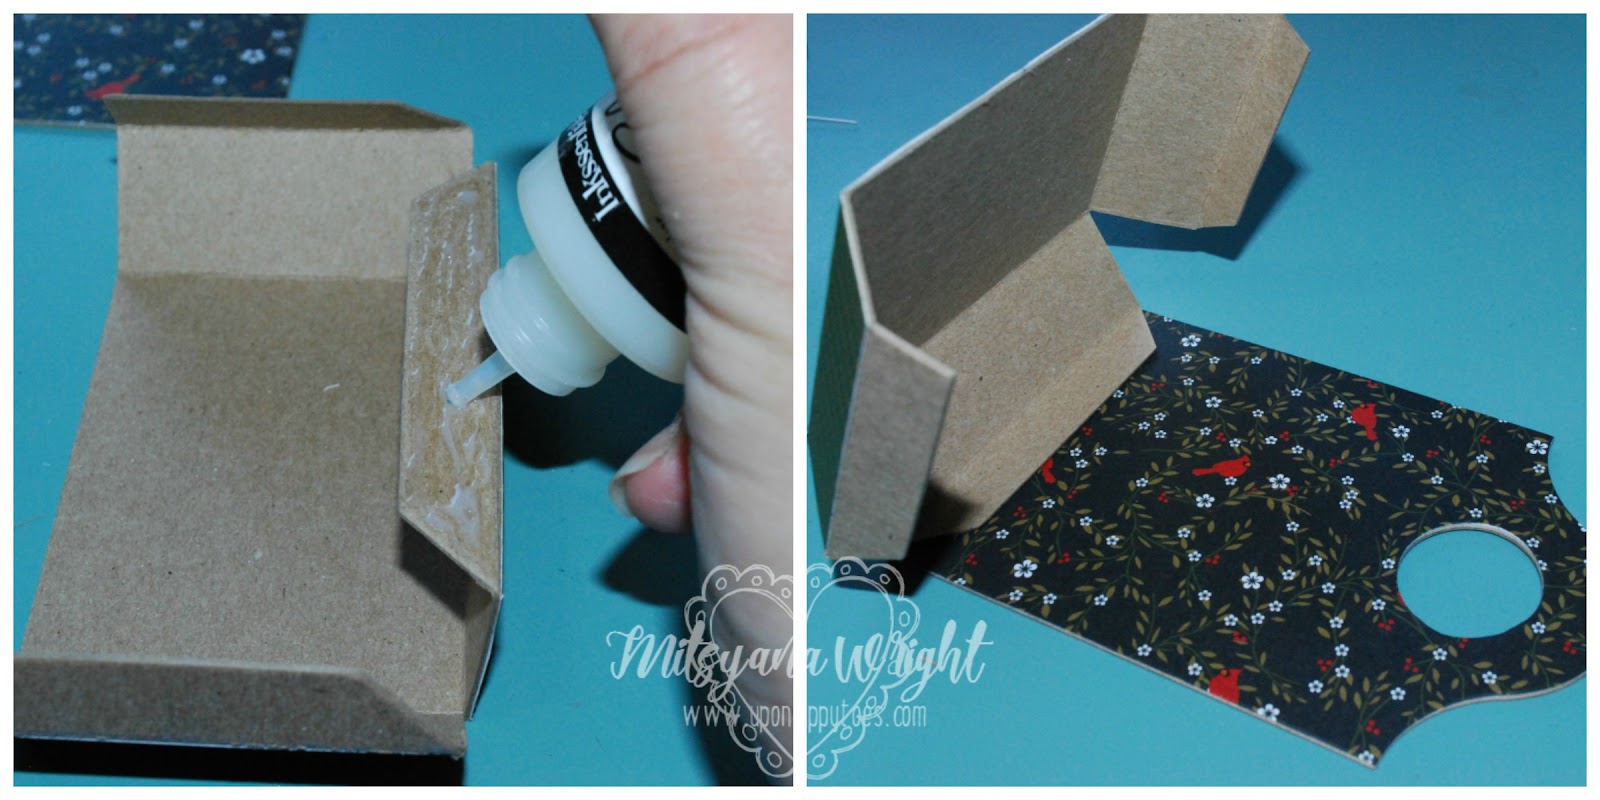
I added clear adhesive to the bare flaps and adhered them to the back panel.
candy cane caddy6.jpg

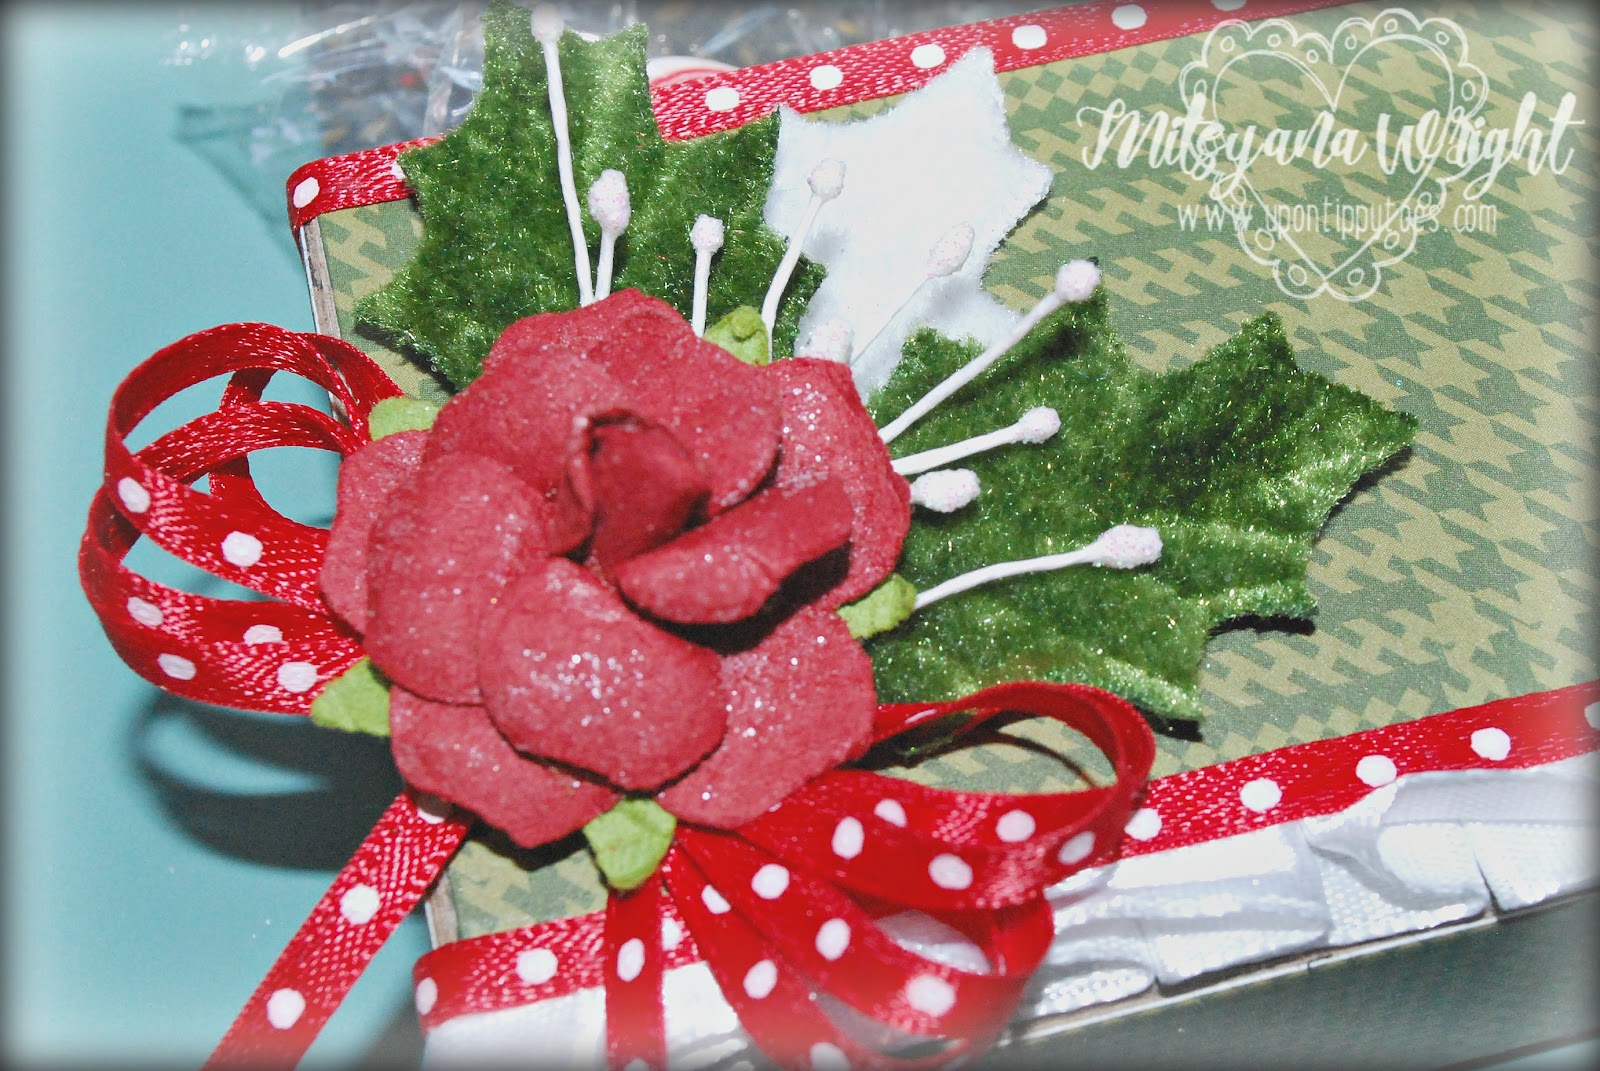
Then, I used more clear adhesive to attach a few embellishments and to trim with ribbons.

candy cane caddy0.jpg

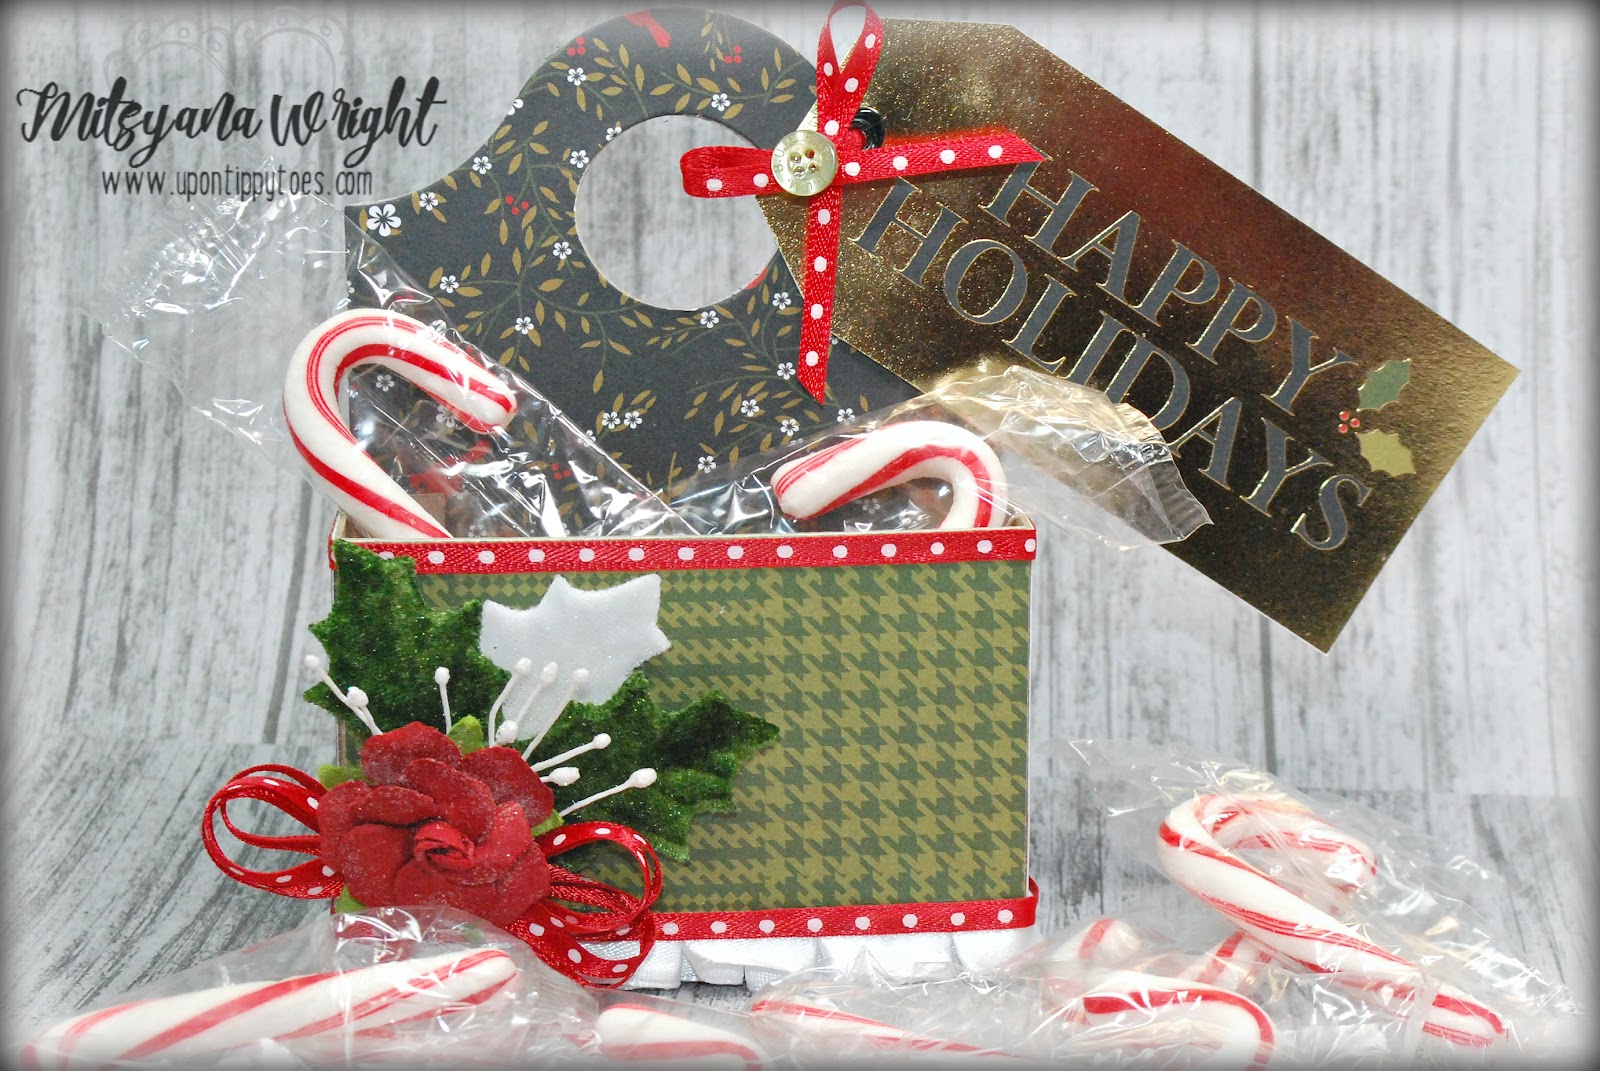
You can fill with your favorite holiday treats…

candy cane caddy1.jpg

Ready to gift as favors...
candy cane caddy.jpg

OR

Because it has the wonderful handle built in…
Hang it on the tree as festive decor!!
candy cane caddy2.jpg

I hope you enjoyed my project for today!! I am very honored to be able to guest design for the Eileen Hull Design Team.

HAPPY HOLIDAYS, EVERYONE!!
~ Mitsy

Wednesday, December 14, 2016

Winter Cottage Christmas Ornament

Hello Crafty Friends!
It's beginning to look a lot like Christmas!! And I'm back again with Team Xyron to bring everyone a little bit of holiday cheer with today's project!

Today I will show you how I made this adorable Winter Cottage Christmas Ornament.


Supplies Used
Big Shot (Sizzix)
Tim Holtz-Village Dwelling (Sizzix)
Tim Holtz- Village Winter (Sizzix)
Chipboard
White Cardstock
Vintage Velvet Holly Leaves (Petaloo)
Tim Holtz- Paper String- Stripes (Advantus)
Tim Holtz Distress Ink- Vintage Photo (Ranger)
VersaMagic- Hint of Pesto (Imagine Crafts/ Tsukineko)
Glossy Accents (Ranger)
Sweeper (Imagine Crafts/ Tsukineko)
Piercing Tool
Scissors
Paper Trimmer
Red Button
White Felt

I started by cutting a 12"x12" woodgrain patterned paper ,from the Happy Day Stack, in half to measure 6"x 12". Then, I cut my chipboard down to the same measurements.

Using the Tim Holtz Village Dwelling Die, I layered the patterned paper (face down) and the chipboard onto the die. I sandwiched them between two clear cutting plates and used ran my it through my Big Shot machine.

I folded the creases on just the Chipboard pieces. I bent the walls into place and used clear adhesive on the small flaps to connect the pieces together to form a house's walls. 

Next, I trimmed off the flaps/ tabs of the patterned pieces and cut along the crease lines to separate the segmented pieces.

I used a sweeper tool and Tim Holtz' Vintage Photo Distress ink to shade the edges.

Once ink was dry, I ran the pieces through my 3" XYron Sticker Maker. Then peeled and applied to the chipboard house.

I also Die cut the roof and porch pieces out of chipboard but opted to use this gorgeous green plaid from the Christmas Plaid stack for the rooftop and door. I die-cut the windows from just plain white cardstock.

Using the Tim Holtz Village Winter die I die-cut all the snow and ice  from white felt. Then ran those through my Xyron Sticker Maker as well.

Helpful tip: Before peeling the protective film off the felt... give it a heavy handed press/ rubdown.

Then, I attached the snow onto the rooftop.


Before attaching the roof top to the cottage, I used my piercing tool to create a small hole atop the roofline. Then, I threaded some brown and white Paper String through the hole and double knotted it. 

Then with more clear liquid adhesive, I attached the roof as well as the porch.

I added a few green velvet holly leaves and a button topped bow and glued them to the top of my cottage.

I diecut the windows and and porch pillars from white cardstock then used more clear liquid adhesive to attach them to little dwelling.

And, here is my finished ornament...


This is just too adorable!!

Below are different angles of the Winter Cottage.


And here is a close up of it hanging in my tree!!


These are not overly big and not teeny tiny either. But because we used light weighted materials it is quite a substantial ornament.

This turned out so CUUUUTTEE!! I LOVE IT!!

Hope you all loved today's project as much as I did!!

Until next time...
HAPPY CHRAFTING!!
~ Mitsy


Tuesday, October 11, 2016

No-Sew Sock Penguin Christmas Ornaments


Hello, Crafty Friends and DIYers!! I will be hosting day #11 of the 31 Days of Handmade Christmas Ornaments!!

And today, I will be doing a remake of a popular holiday favorite... but with a twist. Today, I will be showing you how to make No-Sew Sock Penguins. It is a remake and miniature version of the popular No-Sew Sock Snowmen! You can revisit my original tutorial post here.

Supplies Used
Low Cut Socks 
Super Soft/ Fuzzy Toe Socks
Hot Glue gun & Sticks
Roll of Tulle
White Felt
Rice
Polyester Fiberfill
Decorative Cord
Flat back Pearls
Black Sharpie
Stickles
Twine
Scissors
Mulberry Leaves, Bells (Optional)


I started by cutting a the heel and ankle off of each sock. making sure to cut across evenly. These will be the penguin bodies.


For the inside stuffing I cut tulle into 4" squares. I added about 2 Tbls of rice to the center and tied it closed with twine creating a sachet. 


Using a plastic cup to hold my sock up right, I inserted my sachet. I filled the remainder of the sock with about a handful and a half of polyester fiberfill.  Then used more twine to tie close and snipped the excess twine off.


For the simple beanie hat I love to use "toe socks"! I cut the sock in half (4" from the toes seems to be the midway point). 

I gather all the "toes" and tie them together in a bunch... yes, with (you guessed it) more twine and trim the ends. This part will be out hat. 

Cut a 2" strip from the remain sock piece. Snip one end to create a strip. This will be the scarf.


I cut a 1" heart and a 2" oval for the head and belly. Then adhered the pieces onto the body with hot glue.

I used my glue gun again, this time attaching the hat onto the top of the head. Then, I used decorative cord to tie a knot and make a loop. I hot glued the loop to the top of the hat.

For eyes, I used flat back pearls and colored them with a black Sharpie. Then glued them onto the felt heart to make the beginnings of the penguin's face. 

For his little beak, I simply drew a triangle use orange 

I didn't have green leaves so I just shaded some brown I had. then hot glued the leaves along with a bell onto the the beanies.


And here are my adorable sock penguins!!!


These little cuties were made with regular (no separated toe) socks,

Can't find black socks... well, nix the heart faces and oval bellies and opt for white socks instead! Then you have SNOWMEN! And these cuties have button instead of flat-back pearls for eyes! 

I hope you enjoyed my project for today!!
Thank you so much for hopping along with us!!


Make sure to visit our entire line up of awesome Christmas Ornament projects all month!!

Remodelando la Casa will be hosting Day 12... Please drop in and show some love!!


Here are all 31 Bloggers in order of their appearance:
Day 1 - The Silly Pearl :: Day 2 -Yesterday on Tuesday Day 3 - Cupcakes and Crinoline :: Day 4 - An Extraordinary Day Day 5 - Knick of Time :: Day 6 - Pet Scribbles :: Day 7 - Simply Kelly Designs Day 8 - Town and Country Living :: Day 9 - Petticoat JUNKtion Day 10 - The Everyday Home :: Day 11 - Up on Tippy Toes Day 12 - Remodelando la Casa :: Day 13 - DIY 180 :: Day 14 - 504 Main Day 15 - Sum of their Stories :: Day 16 - At Home with Jemma Day 17 - The Kim Six Fix :: Day 18 - Shabby Art Boutique Day 19 - Morena's Corner :: Day 20 - My Uncommon Slice of Suburbia Day 21 - Our Southern Home :: Day 22 - Domestically Speaking Day 23 - The Crafting Nook :: Day 24 - Sweet Pea Day 25 - Dukes and Duchesses :: Day 26 - Heathered Nest Day 27 - Lovely Etc. Day 28 - Stone Gable Blog :: Day 29 - Mod Podge Rocks Day 30 - Running with a Glue Gun :: Day 31 - All Things Heart and Home

Monday, November 23, 2015

Butterfly Ornament


Hello, Crafty Friends!! It the holiday season and it's time to get those crafty gifts going. Today I have a beautiful butterfly ornament to share. It doesn't only serve as tree decor but as a gorgeous keepsake too.

Supplies Used
Cut'.n'boss (Craftwell)
Teresa Collins Pocket Dies- Today, Thankful (Craftwell)
eBrush (Craftwell)
Sharpie Markers- Green & Lime Greem
Spectrum Noir Markers- CG3, GB1, GB2, TN3
Acrylic Ornament
Hemp Twine
Cardstock- White & Green
PITT Artist Pen B (Faber-Castell)
Gesso (Liquitex)
3D Lacquer 
Iridescent Shreds (Optional)

I started off by using my stem and small leaf die from the Teresa Collins Thankful Pocket Die set to cut out white and green cardstock. I usually try to cut out more die cuts than I need... just in case I have an accident or two (or three). LOL

To cut wafer dies I used the following sandwich combination in my Cut'n'boss machine:

From Bottom to Top
D PLATE
A PLATE
B PLATE
DIE
PAPER
A PLATE


Then I added some shading with the help of my ebrush machine and markers. With tiny pieces like these shading and coloring can be difficult. sponging and inking can run the risk of damaging your die cuts. With the ebrush the color sprays on and virtually eliminates the need for vigorous rubbing.

I ebrushed my green leaves with a lime green and regular green sharpie. And my stems in a lime green sharpie then Spectrum Noir markers in CG3 and TN3.

Then I ran my leaves and stem through my 3" Xyron Sticker Maker... turning my pieces into stickers.

Then arranged them onto my ornament... concentrating on the bottom and top of the ornament. I used 6 leaves for the entire top and 8 leaves for the entire bottom. And used 4 stems on the top and 4 stems on the bottom.

I cut out two butterflies for the Teresa Collins Today Pocket Dies set. ebrushed them in Spectrum Noir GB1 and GB2 and hand drew the details with a PITT Artist Pen (B) and used gesso and a toothpick to add the small white dots.

After they were done drying, I ran them through my 3" Xyron Sticker Maker and applied the onto each other. These butterflies are symmetrical and if flipped mirror itself perfectly. Now my butterfly is double-sided. 

I gently curl my butterfly's wing in and pass it through the hole of the ornament. Once the butterfly is inside you can open/ widen the wings by gently pushing on them with a chopstick or paintbrush. Add shreds if desired.

I wrapped twine around neck of the ornament and glued on a bow I made with even more hemp twine.

And here is my finished ornament...

I hope you enjoyed today's project.

And Happy Holiday Crafting!!

~Mitsy

For more inspirational projects please visit my personal blog at:
www.upontippytoes.com

Friday, November 22, 2013

Winter Fun Penguin Card

OH MY GOODNESS!! It is coooooold outside!! Well, the thermostat says 45 but it feels a lot like 30. It didn't help that it rained all night and it's breezy so it feels colder than it actually is. A definite sign that winter is coming... and fast!

I love the winter time! I'd rather freeze than sweat any day! And my kiddies don't fall far from their maternal tree... During meal time, while saying grace, they always make sure to ask God for snow. It's the cutest thing! And, I wouldn't mind the snow either! I mean if it's going to be cold anyway... at least be cold for a reason! I say "bring on the snow"... I'm ready for it!

Speaking of snow, here's my newest card!!


All cut files for this card are from Designs on Cloud 9. I used Fun on the Ice for the penguin wearing ice skates. Scallops for the scalloped circle. And, Snowflakes Galore for the snowflakes. 

Let's not forget today is Friday!! And, you know what that means... Freebie Friday!!
And today's freebie is:


This would look awesome on a layout or on quick & easy holiday cards!!
But remember, it's only free for a week. so, you have until the 28th to download it for free before it's replaced with a new one.

Get crafting friends! I know I'm going to!
 I gotta start my Christmas cards... hmmm, what to make??!!