Showing posts with label doilies. Show all posts

Tuesday, July 25, 2017

Journal w/ Kraft Cardstock Flowers

Hello, Crafty Friends!
I'm back with Eileen Hull Designs with another journal project! Now, it's no secret that I've been bitten by the journal making bug. And today I wanted to share with you all this gorgeous flower covered journal using Eileen's Stitchy Flowers & Leaf Dies, Spring Leaves, & of course... Eileen's Heartfelt Journal die!


Supplies Used
Big Shot (Sizzix)
Patterned Paper- Happy Day Stack  (DCWV)
Kraft Cardstock (DCWV)
Believe Script (Pink and Main)
VersFine Onyx Black (Imagine Crafts/ Tsukineko)
White Cardstock
 Chipboard
Tim Holtz Distress Ink- Worn Lipstick, Vintage Photo, Mowed Lawn (Ranger)
Mixed Media Glue (Beacon)

One of the reasons I love making these journals so much is that they are so easy to put together!

Just cut your 12"x 12" cardstock and Chipboard in half to make 6" x 12" pieces. I used 1- 12" sheet of chipboard and 2 -  12" sheets of patterned paper. 

Once sheets are cut in half, I ran the pieces of patterned paper through the Xyron Creative Station (pattern side up).  

Then, I attached them to the chipboard pieces. Each piece of chipboard had patterned paper of both side (back and front) with a different pattern on each side.

Then, I used the journal die to die cut both pieces of covered chipboard. I made sure that the pattern I wanted on the outside was face down on the die.

 I used mixed media glue to attach the spines together, making sure to line up the pre-cut holes. Then set it aside to dry.

 While the glue was drying, I die cut several flowers from the Stitchy Flowers & Leaf dies from Kraft cardstock. 

To make the large flower, I used 3 large flower die-cuts & 2 stamen/ starburst die-cuts.

For the medium sized roses, I used 2 medium in each.

and for the rosebuds, I used 1 small flower and a leafy stem for each.

I die cut a total of 6 large leaves and 7 leafy stems.

I also die cut a doily and a couple of wildflowers from more Kraft cardstock and more wildflowers from White cardstock. Then lightly inked the edges using Vintage Photo Distress ink.

For color, I shaded all the flowers with Worn Lipstick Distress ink and all the leaves with Mowed Lawn Distress then with Vintage Photo.

I added micro beads to the center of my large flower.


I die-cut label from the Tim Holtz Labels die, inked the edges with Vintage Photo Distress ink, then stamped a sentiment from the Pink and Main Beliee Script stamp set.

I  attached all my die cuts onto the cover using more mixed media glue.

And here is the finished project...

And a couple of  close-ups...


I really love this sentiment! I think it's very empowering and great state of mind to keep one's self in!

I hope you enjoyed this journal idea and that inspires you to make one of your own!

Until next time...
HAPPY CRAFTING!
~ Mitsy

***Disclaimer***
This blog is compensated to provide opinion on products, services, websites and various other topics. Even though the owner(s) of this blog receives compensation for our posts or advertisements, I always give my honest opinions, findings, beliefs, or experiences on those topics or products.
The views and opinions expressed on this blog are purely my own. Any product claim, statistic, quote or other representation about a product or service should be verified with each manufacturer, provider, or party in question.

This blog may contain affiliate links, making a purchase through these links helps fund this blog at no additional cost to you.

Tuesday, December 22, 2015

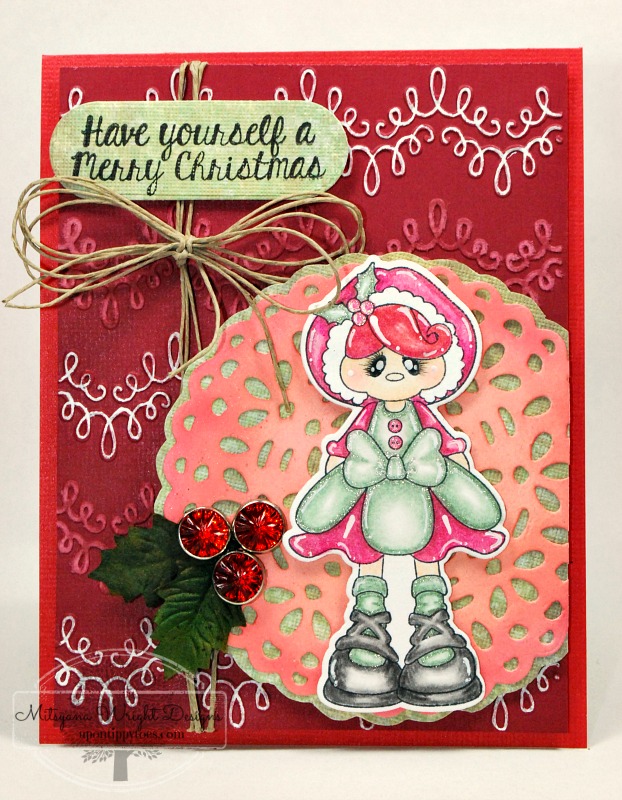
Have yourself a Merry Christmas

Hello, Crafty Friends!
Can you believe that Christmas is just 3 days away??!! It's crazy how fast approaching Christmas is. The year has gone by so fast and it doesn't look like it will be slowing down anytime soon.  And can you believe I'm still cranking out Christmas cards?? I know I'm pushing it to the very last minute! EEEKKK!!

It's a good thing I love crafting or this might feel like work! LOL
merryliittlechristmas
Here's the latest card I made with Pink and Main's Holly Stamp Set.


I also used the matching Holly Dies to eliminate the need to fussy cut. I love how Pink and Main's dies cut really close to the image but till leave a tiny border.


I just noticed something... the doily I have her on looks like an iced cookie. LOL
Which perfectly suits her because she is so sweet!!

Sorry, friends... no tutorial today but I do have a complete list of supplies below.

 Supplies used:
Holly Stamp Set (Pink and Main)
Holly Dies (Pink and Main)
Color Pencils and Markers (Spectrum Noir)
eBrush (Craftwell)
Embossing Folder- Happy Birthday (Lifestyle Crafts)
Dainty Doily Die (Lifestyle Crafts)
Gamsol
Red Cardstock (Core'dinations)
White Cardstock (Bazzill)
Momento Tuxedo Black Ink Pad (Tsukineko)
Rhinestone Brads (Hobbly Lobby)
Paper Holly Leaves (Prima Marketing Inc.)
White Gelly Roll Pen (Sakura)
Glitter Gelly Rolly Pen (Sakura)
Artist PITT Pen (Faber-Castell)
3D Dots (EK Success)
2Way Glue (EK Success)
Hemp Twine

Hope you all have a Very Merry Christmas!!

Monday, September 21, 2015

Wedding Bliss Gift Tag


Hey there crafty friends!! I'm back again this week with more Teresa Collins papers!!
Today I have a gift tag to share with you. A friend of mine is getting married and her wedding is just around the corner. I don't know about you but I don't buy my greeting cards or gift tags. I prefer to make them. It makes the gift that much more special.

Supplies Used
Cut'n'boss (Craftwell)
Teresa Collins Pocket Dies by Craftwell- Doily & Heart Card (Lover's Lane), Numbers (Memory Collection), Scalloped Oval Frame (Thankful), Ring & Flower (Girl's Best Friend)
Teresa Collins Papers- Collectors Edition (Geometric), Project Pink (Cards) & (Gold)
Xyron Mega Runner 
Crop-a-dile
Chipboard
Tulle
Button
Embroidery Thread & Needle
Hot Glue & Glue Stick
Paper Flowers
Scissors


I started with 4 3/4" x 6 3/4" piece of chipboard. I cut one of the corners at a diagonal and used the triangular cut out as a template to cut the other side. This ensures that both side are cut at the same angle and are even. 

Then with a crafter's knife, I cut my "Geometric" paper to the exact shape and size of my chipboard tag. 

Next, I cut a couple card panels from Teresa Collins' Project Pink Cards paper. Then I used my heart card TC die to cut out the wood grain card to give a cute little heart window.

I love the gold on Teresa Collins' papers... it's not overwhelming like how some metallic or foiled papers can be. I cut my doily, numbers, and rings from the gold corner of the "Gold" paper. And for my scalloped frame I used more of that grayish-green color of the "Geometric" paper, cutting the center in just plain white cardstock.

Then I ran all my papers through my Xyron Creative Station. Love this extra large 9" platform... means everything goes through at the same time!


And... I love this part... now, just peel and stick!!


Did you know Craftwell's dies can cut through multiple layers of tulle... I cut this whole stack all together!! Talk about impressive!!

With a needle, embroidery thread, and a button, I secured my flowers together. Then I fluffed my layers to make my flower fuller. Next, I hot glued stems of paper flowers and my tulle flower to the front of my tag.

Finally, I punched a hole at the top of my tag and tied a jumbo bow on top using more white tulle.

And here is my finished tag...

From this picture you can really see a big difference that fluffing the tulle makes. 


I hope the happy couple loves the decoration on the gift as much as the actual gift itself!!
I know I do!! LOL

And I hope you enjoyed today's project! 
Until next time...

HAPPY CRAFTING!!
~ Mitsy


Thursday, September 10, 2015

eBrushing w/ Bella Blvd - Week 2

Hey there crafty friends...
We're back again with Bella Blvd. this week! 
And for all you Ebrush enthusiasts that love adding bursts of color to your work Bella Blvd.'s Just Add Color line is made especially for you!!


Supplies Used
Bella Blvd. Enamel Dots Punch
Bella Blvd. Just Add Color Trinkets Full Color 3x12 Stickers
Sharpies- light pink, magenta, lavender, purple, lime green, green, and gray
Spellbinders Beaded Circles
Paper Doily (Wilton)
Cutterbee scissors (EK Success)
Gesso (Liquitex)
3D Dots (Ek Success)


I can't tell you how much I love love love these papers from Bella Blvd.! The Just add color line is mostly composed of awesome patterns in black and white and gray scales so that all you have to do is add your own colors to coordinate with your themes or color schemes.

I started by ebrushing my Bella Blvd. Star Struck paper with my Sharpie markers. The front side of this paper is covered in stars but the backside is covered in these flower doodles! I just filled in each flower doodle by either ebrushing a light pink then a dark pink for the centers or a lavender then a purple for the center. I also ebrushed the entire background in gray.

After I was done ebrushing my paper I cut my piece down to 5.25"x 4" panel. I used my Xyron Mega Runner to adhere my panel onto a standard A2 (5.5" x 4.25") card base. I made my card base using Bella Blvd.'s Peep Strandz paper... Love that pink on pink stripes!!

 I used my scissors and cut about 1/2" off of one side my doily. To get a nice straight line I just used the edge of my card as a guide.

I also used my scissor to cut out this flower from the Daily Details sheet... this flower coordinates perfectly with the flowers on the Star Struck sheet. I also used m embossing stylus to round out my flower petals to add a bit of dimension. I added an enamel dot from the Bella Blvd.'s Dot Punch to complete my flower.

I cut a mat for my doily using the second largest beaded circle die and pink cardstock. I then stamped it with this wonderful sentiment from Pink and Main's Believe Script set. This stamp set is just one of several stamps released today for the month of September!!

With a paintbrush I splattered some gesso onto my card base.

While the gesso was drying I hand cut a couple leaves out of Bell Blvd.'s Newsflash paper. Then I ebrushed my leaves with a light green and green Sharpie.

Once my gesso was dry I used my Xyron Mega Runner to adhere my doily and circle to my card base. I used 3Dots for the leaves and flower. And, the little banner that says "YOU are ENOUGH" is from Bella Blvd.'s Trinkets sticker sheet... I just peeled and stuck it onto my card... Super AWESOME!!

And here is my finished card...

Again... I  can't say how much I love these Just Add Color papers from Bella Blvd.!! I can make each project different using the same sheet of paper jut by custom coloring it!! It makes each project unique!


I want to send a very special THANK YOU to Bella Blvd. for being our wonderful sponsor!! I totally love your fun and refreshing [products!

Until next time...

Happy Crafting Friends!!
~ Mitsy


Friday, August 21, 2015

Hello- Monarch Butterfly Card


Hello Crafty Friends!! It has been such an amazing week!! Today is the last day of the Xyron & Craftwell Inspiration Hop. I hope you had a great time viewing all the fabulous projects from Both the Xyron and Craftwell Design Teams!! 

Supplies Used
Cut'n'boss (Craftwell)

Teresa Collins Pocket Dies (Craftwell): 
Butterfly, Hello- Memory Collection, Doily- Lover's Lane, Stem, Leaves- Thankful 

eBrush w/ Sharpie Adapter


Cardtsock:
Bazzill Basics - Black, Green Monochromatic, Yellow Monochromatic
Core'dinations- Harvest Yellows
Craft cardstock (Colorbok)
Patterned Paper-  Craft Smith Natural Luxury

Sharpie Markers:
Moss Green, Brown, Mustard, Gray, Yellow, Orange

PITT Artist Pen B (Faber-Castell)
Gesso (Liquitex)
Diamond Glaze
Toothpick
Cutterbee Scissors

First I started of by cutting out my die shapes out of cardstock. Because of the Cut'n'boss' huge platform I cut cut several dies at once and that means I don't have to make as many passes as I would if I were using a smaller machine.  

For my sandwich combo (especially when cutting multiple layers) I use the following combination:

From Bottom to Top
D Plate
A Plate
Magnetic Plate
Die
Paper
Metal Plate
A Plate

In one pass I was able to cut 1 doily, 2 layers of butterflies, 2 hellos, and (because my craft cardstock was on the thin side) I was also able to cut 3 layers of sprigs and 3 layers of leaves all at the same time.

Next airbrushing my die cut pieces...

I airbrushed my yellow butterfly using my ebrush machine and a yellow and orange Sharpie.Concentrating the orange to the tips and center of my butterfly.


After ebrushing I hand drew the black details using a  Brush PITT Artist Pen. Coloring in the body of the butterfly and outlining the wings. I did a web search for Monarch Butterfly images as a reference to my outlines.

Monarch Butterfly don't have a little "tail" (that's what I;m calling them) at the bottom of their wings, so I snipped them off with a pair of scissors.

With some gesso and a toothpick I added the small white details to my butterfly's wings and body. Set aside to dry.

While my butterfly was drying... I snipped off the tails from the second butterfly and ran it through.
 I bent my butterfly wings back and just applied diamond glaze to the body and adhered it to the top of my second butterfly that I just ran through my Xyron Sticker Maker. Once it was dried I had a three dimensional butterfly sticker.

I then ebrushed my sprigs and leaves. I ebrused the springs with mustard and gray. And my leaves in moss green and brown. I also ebrushed 1 layer of my "hello" word. This be my top layer. I adhered the rest of my helloes together using 2way glue and stack them onto each other with the ebrushed layer on top.

I ran my all my freshly ebrushed pieces through my Xyron Creative Station all at the same time and included a mat for a 5"x7" card. 


At the very last minute I decided I wanted an additional mat for my mat... LOL... so I just attached it, with my Xyron Mega Runner, directly to my 5"x7" card base I made out of black cardstock..


Then I peeled and adhered all my elements to my card front.

And finally peeled my butterfly and adhered it to my cardfront.

And here is my finished card... 

 I absolutely love how this card, especially the butterfly, turned out!! I am just so happy with all the little details on just this piece alone!

 Here are a couple more shots of the butterfly...


I hope I was able to inspire you with today's tutorial!!
Until next time...

HAPPY CRAFTING!!
~ Mitsy

Don't forget to visit Xyron & Craftwell on Facebook for more amazing projects!!