Hello, Crafty Friends!!
I don't know about you but I'm ready for Spring already!! I wouldn't mind winter so much if the weather decided on one particular kind of weather and stuck with it. If it's gonna snow, snow! If it''s gonna be hot and sunshiny, then stay that way! But I live in Texas... where the weather doesn't just change day by day but sometimes hour by hour as well. We can walk out the house in a snow coat in the morning just to be in sweating by mid day and tank top and shorts by the afternoon. I am so over it!! I want Spring! I want flowers! I want blue skies! And, most of all ,I don't be so darn cold! Until then, I guess I' just dream of Spring!!
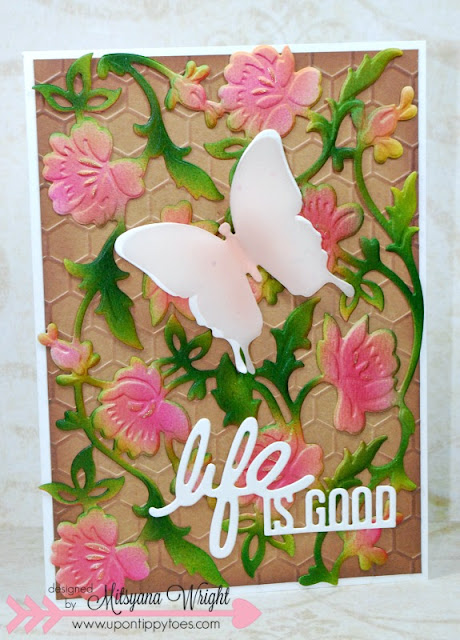
Today, I have a card that resembles all the good thing I love about Spring.
Supplies Used
Cut'n'boss (Craftwell)
Ebrush (Craftwell)
Teresa Collins Honeycomb Embossing Folder (Craftwell)
Xyron Creative Station with 9" Permanent Adhesive Refill
Spectrum Noir Markers- CR3, CR6, DG3, CG4, GB11, TN3
Anna Griffin Flower Bramble Die (Cuttlebug)
White Cardstock
Craft Cardstock
Glitter Vellum
VersaMagic Jumbo Java Ink Pad (Tsukineko)
Ink Sweeper (Tsukineko)
Fun Foam
Diamond Glaze (Judikins)
I started by cutting my Flower Bramble die out of white cardstock by running it through my Cut'n'boss machine.
I used the following plate configuration...
From Bottom to Top
D Plate
B Plate
A Plate
Paper
Die
A Plate
To get the detailed embossing remove the B Plate and then use the following configuration...
From Bottom to Top
D Plate
A Plate
Fun Foam or Silicone Rubber Sheet
Paper still in Die
A Plate
Now to make all the details come to life and really show off the embossing I airbrushed my die-cut with Spectrum Noir Markers in my ebrush machine.
I started by putting down a layer of GB11 over only the vines and leaves. Then layered a bit of CG4 over some areas to deepen the green tones.
For the flowers I layed down a base of CR6 but it was a tad bit too bright so I layered on TN3 to tone down the brightness.
Then lastly, I deepened the Green vines a bit more with DG3 and highlighted my flower stamens wth a gold glitter gel pen.
For a background to my lovely flowers I ran a 4-3/4"x 6-3/4" piece of craft cardstock with my Teresa Collins Honeycomb embossing folder through my Cut'n'boss machine.
For embossing I used the following plate configuration...
From Bottom to Top
D Plate
A Plate
Embossing Folder with Paper
A Plate
To make those honeycombs really stand out, I sponged on brown ink over the raised areas.
To add to my card front I die-cut my butterfly and sentiment out of thick white cardstock. I also cut an addition butterfly out of glittered vellum.
I ebrushed my vellum butterfly with Spectrum Noir CR3 to coordinate with my flowers. I folded the wings slightly back to give more dimension and used diamond glaze on the thorax (torso) of the butterfly to attach the two butterflies together.
Then I ran my honeycomb background, completed butterfly and sentiment through my Xyron Creative Station with 9" refill cartridge to add adhesive to all my pieces at one time. The I simply peeled and stuck all my pieces on a 5"x7" white cardbase.
And my here is my final results...
My Spring Daydream Card
Here's a closer view of the details...
I hope you enjoyed today's card!
I hope you were inspired!
And, as always...
HAPPY CRAFTING EVERYONE!!
~Mitsy


Totally love!!! So awesome!!
ReplyDeleteThank you, Twila! You're so sweet!!
DeleteStunning. Your work is exquisite.
ReplyDeleteThank you so much for such a wonderful compliment!!
DeleteExtraordinary!! It could only be made by you!!!
ReplyDeleteAwwww, thank you my sweet friend!!!
DeleteVery pretty...love how you used the floral die cuts in such a gorgeous manner
ReplyDeleteCheers
Dr Sonia
Thank you so much, Dr Sonia!! It makes my heart rejoice to hear such a wonderful compliment!!
Delete