Wednesday, December 30, 2015

Mixed Media Clock


Hello, Crafty Friends!! 
Oh my goodness... I am so glad that the Christmas is over!! Now I can craft for me!! Don't get me wrong, I love making handmade items for my friends and family but this year it just seemed like it was non-stop! Between crafting gifts, school parties, and design team projects I was beside myself!! During this holiday season it was eat, drink, breathe, CRAFT!!!

So, now that everything is generally getting back to normal, I can make pretty things for me!!
And I made myself a mixed media clock. Because mixed media on canvas is pretty and all but I have a piece of art that is also functional!! YAY!!


Supplies Used
7"x14" Stretched Canvas- Pre-primed (Daler Rowney)
Gelatos- , Watermelon, Red Cherry, Iced Rose, Iced Chai, Iced Coffee, Iced Currant, Gold Champagne, Silver Ice (Faber-Castell)
eBrush (Craftwell)
Spectrum Noir Markers- DR6, DR7, True Black
Tim Holtz Stencil- Measured
Big Shot (Sizzix)
Tim Holtz Alterations Dies- Picture Wheel, Garden Greens (Sizzix)
 Gears Dies (Darice)
Hot Glue Gun & Sticks (Ad Tech)
Velvet Flowers- Pink Posy (7 Gypsies)
Paper Roses (Michael's)
Drill Punch
Clock Movement Kit (Plaid)
Mod Podge (Plaid)
Self Adhesive Flat Back Pearls (Michael's)
Stamens (Wilton)
Chipboard
Heat Tool
Spray Bottle

I started off my by using this 7"x14" stretched canvas. I like to buy  my canvas pre-primed. It saves me from doing an extra step and drying time always kills me... It's literally watching paint dry! I'm so darn impatient! 

I took 3 different shades of "reds" and rubbed them directly onto the top of my canvas. 
I used Watermelon, Red Cherry, and Iced Rose

With a spray bottle filled with water, I misted my gelatos. I tilted my canvas to allow the drips to flow down. I repeated these steps till I got the amount of "drippage" I liked... I think I may have repeated those steps about 2 or 3 times.

Then I used my heat tool on the drips to hurry drying time. 

Once it was dried I sealed my drips with a coat of Mod Podge and set aside to dry. 

Then I used this my ebrush to airbrush this ruler pattern onto my canvas. 

I cut out various gears using my Big Shot Machine, Darice's Gears Dies, and Tim Hotz's Picture Wheel Die. For my project I used 2 picture wheels and 3 each of all the gears. Don't discard the insdie "hole" cut-outs!! They make excellent "bolts" when stacked and layered on the gears!


Then I shaded them using my metallic gelatos. I applied my gelatos directly onto the chipboard and rubbed it in with my fingers.

Then to give them a grungy look. I airbrushed the edges using my Spectrum Noir True Black marker.

I love to shade and distress by airbrushing!! There is virtually NO drying time!

Once they were done being airbrushed I ran my gears through my Xyron Creative Station.

Then I peeled them and applied the gears onto the canvas. I saved one of the picture wheels and one of the larger gears for this next step...

Now, It's time to attach my clock!

Using a drill punch, I punched a hole for my clock kit and inserted it through the hole from the back of the canvas.  I love this cute little clock kit... it was the perfect width for this canvas without looking bulky or protruding out from under the canvas!

When you flip your canvas over, make sure your hole in is big enough to fit the clock mechanism through the wheel hole. Secure into place with the bolt and washer that came with clock kit. The wheel provide a sturdier surface for the clock and prevents the canvas from warping.

I cut 4 of these long tems out of chipboard using the Tim Holtz Garden Greens Die. Love using my steel rule dies on chipboard... It cuts through it like BUTTER!!


Then I ebrushed my leaves Black (again, with my Spectrum Noir True Black marker).

Then I ebrushed my velvet flowers to match my canvas by using Spectrum Noir DR6 & DR7 Markers. 

I used a total of 6 velvet flowers. 2 each of 3 different size/ shaped flowers.

I inserted stamens in the largest ones and layered them on top of each other.
I attached flat back pearls and paper roses onto the remaining flowers.

And hot glued my stems and flowers onto my canvas.

The last step is to insert a battery and set the time!!

Now, I have a clock that is creatively me!!


I hope you like I hope you liked this project.

Until next time...

HAPPY CRAFTING!!
~ Mitsy


Tuesday, December 22, 2015

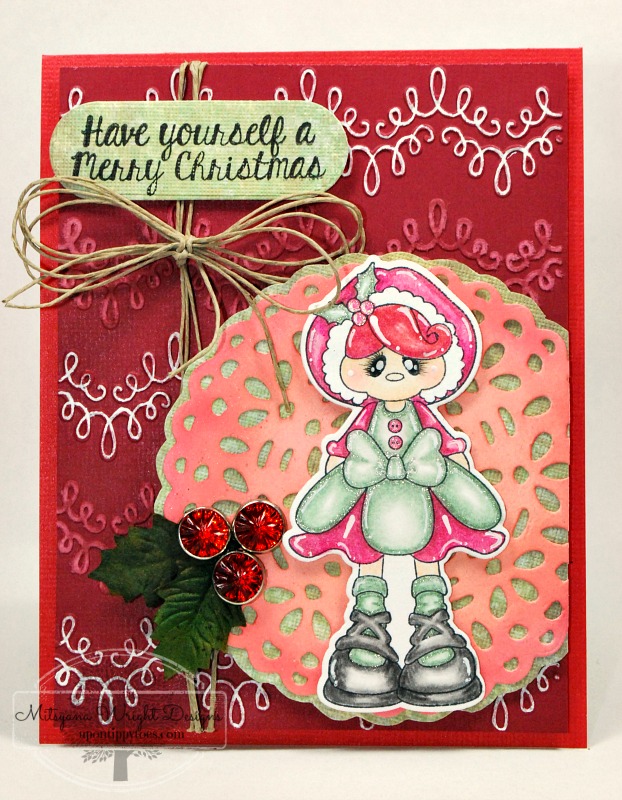
Have yourself a Merry Christmas

Hello, Crafty Friends!
Can you believe that Christmas is just 3 days away??!! It's crazy how fast approaching Christmas is. The year has gone by so fast and it doesn't look like it will be slowing down anytime soon.  And can you believe I'm still cranking out Christmas cards?? I know I'm pushing it to the very last minute! EEEKKK!!

It's a good thing I love crafting or this might feel like work! LOL
merryliittlechristmas
Here's the latest card I made with Pink and Main's Holly Stamp Set.


I also used the matching Holly Dies to eliminate the need to fussy cut. I love how Pink and Main's dies cut really close to the image but till leave a tiny border.


I just noticed something... the doily I have her on looks like an iced cookie. LOL
Which perfectly suits her because she is so sweet!!

Sorry, friends... no tutorial today but I do have a complete list of supplies below.

 Supplies used:
Holly Stamp Set (Pink and Main)
Holly Dies (Pink and Main)
Color Pencils and Markers (Spectrum Noir)
eBrush (Craftwell)
Embossing Folder- Happy Birthday (Lifestyle Crafts)
Dainty Doily Die (Lifestyle Crafts)
Gamsol
Red Cardstock (Core'dinations)
White Cardstock (Bazzill)
Momento Tuxedo Black Ink Pad (Tsukineko)
Rhinestone Brads (Hobbly Lobby)
Paper Holly Leaves (Prima Marketing Inc.)
White Gelly Roll Pen (Sakura)
Glitter Gelly Rolly Pen (Sakura)
Artist PITT Pen (Faber-Castell)
3D Dots (EK Success)
2Way Glue (EK Success)
Hemp Twine

Hope you all have a Very Merry Christmas!!

Monday, December 21, 2015

Elegant Holiday Party Favors


Hello, Crafty Friends!! It's time for holiday parties to commence! And I have elegant holiday party favors that are also quick and easy to make.

Supplies Used
Cut'n'boss (Craftwell)
Teresa Collins Pocket Dies- Girls Best Friend (Craftwell)
Sophisticated Embossing Folder (Craftwell)
Rosey Reds (Core'dinations)
Printed Burlap Stack (DCWV)
Buttons(Optional)
Hot Glue Gun and Sticks
Stapler
cellophane bags
Chocolates or treat of your choice

I  started with a 12"x12" sheet of printed burlap. I cut it into 3 even pieces giving me pieces that measure 12"x 4".

I used a steel rule die for a "door knob favor"... but I know that this type of die is not very common. For an easy solution, I turn to my good friend Google. You can easily find templates online just by searching for "Door Hanger Template Images". Pick one that has a big "knob" opening... that will be your window.


My die comes with crease lines. But if you 're doing a homemade template, find the center of your hanger ( as if you were to fold it in half), then add a 1/4" from that center point to each side and score a line. This will give you a 1/2" wide favor.

Add chocolates or your preferred treats into your hanger and fold. Staple close. Make sure you also staple the cellophane bag into place otherwise it will slip out.

For the toppers, I used my Teresa Collins bow die from the Girls Best Friend set. I just used the bow and tails to make my bows... I didn't need that little piece only because I was replacing it with button for my bow centers.

Before I pieced my bows together I embossed them using Craftwell's Sophisticated embossing folder.
I love how huge Craftwell's embossing folders are... a whopping 8-1/2"x 12"!! I can run all my pieces through at the same time!!

Then I gently sanded the raised parts of the embossing exposing the lighter color core of the Core'dinations paper.

I assembled my bows using hot glue and also glued assorted sized buttons on each bow. Then attached them to my burlap favors with more glue.

And that's how I made these beauties...


 Hope you all enjoy your holidays!!

Happy Crafting!!
~ Mitsy


Friday, December 18, 2015

Die-Namites December Blog Hop


Hello, Crafty Friends!!

It's that time again! Time for another Die-Namites Tips & Techniques Blog Hop!!

Did you know that die-cuts don't only look great on cards... they look great as embellishments to accent gifts too!!


I love how this die makes a plain and simple white box look so elegant!!


I used this gorgeous die called Beautiful Ornament to  make my box embellie!

Then I cut 3 ornaments out of craft cardstock and glued them on top of each other using a glue pen. Layering is a great way to make your die-cuts thicker and sturdier... a lot like chipboard.

 I just have to shade EVERYTHING. My method of choice, is hands down, airbrushing!! Great for those delicate die cuts!

For even more dimension, I added a layer of Diamond Glaze over the shading. This also deepens the colors on the die-cuts. Allow to dry and wrap twine around your box and attach your embellishment with more twine!!

And presto... no need for wrapping paper!!


I hope you enjoyed my project!!

And don't forget to visit my crafty DT sisters!!

Comment on each design team member's blog and visit the Die-Namites Facebook Page HERE. We will randomly choose two people from the comments to win Die-Namites gifts certificates. There are lots to see and learn. Be sure to comment here too!! The next stop on the hop is the super fabulous Freetany. You have until Monday, December 21, 2015, at 12:00 AM to comment. 

Here is the entire Blog Hop line-up:
Tanya-Freetany Shpachynska - http://freetany.blogspot.com/…/dienamites-blog-hop-december… (Go HERE next)
Erin Manz Reed - http://scraps-of-reflections.blogspot.com/2015/12/mini-gift-cards-dec-dienamites-blog-hop.html
Henryka Kowacz - http://magic-craft-land.blogspot.com/…/blog-hop-tip-and-tec…

Good Luck Everyone & Happy Hopping!!
~ Mitsy

Thursday, December 17, 2015

Stay warm!

Hello, Crafty Friends!!
I’m neck deep into Christmas card making this year and I’m afraid I just skimmed barely made a dent in my mailing list…. sigh. Thank goodness I enjoy cardmaking so much!! I’ve found coloring to be very therapeutic and coloring my stamped images is an awesome outlet!
I think of stamped images as mini adult coloring pages. Adult coloring books are all the rage nowadays and though I absolutely LOVE them I often find it hard to keep the coloring momentum going. Then there’s the question of what do I do with it after I’m done… hmmm. I’ll stick with my stamps! Each image not only brings me joy coloring it but then it moves on to share a bit of that happiness to someone else.
Today, I’m sharing this adorable card I made with Pink and Main’s Scarlett. I absolutely think she is uber adorable and love, love, love her boots with those little pom-poms!! She is too stinkin’ cute  for words!!

All patterned paper is from Pebbles Inc. and is from the Winter Wonderland Collection.


This card totally describes the weather we’ve been having this week! You know it’s cold outside if you’re dressed like this inside!! Brrrr… Stay warm everyone!!
And Happy Crafting!!
~ DT Mitsy

Wednesday, December 16, 2015

December Challenge and Photo Inspiration


Hello, my  crafty friends!! More holiday inspiration coming your way! And it's time for another Challenge!!

Come on by the Die-Namites Blog for our monthly challenges. Each month we'll have a challenge with a photo as our inspiration. This month's photo is:

Use this as inspiration and just create!

You can enter your projects for your chance of winning a $25 Die-Namites Gift Card. 

To find out more about our monthly challenge or to link your challenge project, see the original post here.

I like the organic feel of the inspiration photo. All the natural textures and colors. It gave me a very woodsy/ rustic vibe.

I didn't go the rustic route... but kept the neutral color palette.

Here is my challenge project:


I started off using my Cricut electric cutting machine to cut my card base.


I found an awesome cut file in the Cricut library for a trifold card... You can find the same file in the subscription area of Cricut Design Space.

It's a trifold card complete with score lines and a frame.

I used my Xyron Mega Runner to adhere my panels to the outer right-hand flap and onto the inside middle panel...

And because it had a 1/4" refill in it, I even used the Mega Runner on my frame!

Pinecone
For my focal point, I used Die-Namites' Pinecone die.

And, guess what, you can get 15% off your next purchase... that's right not just off this die but your ENTIRE purchase!! How awesome is that??!! Just use my special code mitsyana15 during checkout!!

I used my manual die cut machine to cut two die cut pinecones out of craft cardstock. This die is just GORGEOUS!! And these dies just slide out of the die!!The die has poke holes but never had to use them or a poke tool to get my pieces out!! And that is just AWESOME!

Then I ebrushed my pinecones using brown and green Sharpie Markers.

Supplies Used
Pinecone Die (Die-Namites)
Cricut Explore Air
Trifold Card File (Cricut DS Subscription)
Patterned Paper (Craft Smith)
Craft Cardstock
Hemp Twine
3D Lacquer
Green and Brown Sharpie Markers
eBrush (Craftwell)
VersaFine Onyx Black Ink Pad (Tsukineko)

Then I used my liquid adhesive (3D Lacquer) to attach my pinecones to the flap of my card.
I tied a quadruple loop bow out of hemp twin and also attached with liquid adhesive.

And, last but not least I stamped my sentiment from the "All I want for Christmas" stamp set with VersaFine onyx black ink.

And here is my finished card: 


I love how elegant this card turned out!


This inside panel I left blank for writing or if I wanted to attach a gift card.

Hope you enjoyed this card and are inspired to join us in our challenge fun!!

Until next time...
HAPPY CRAFTING FRIENDS!!
~Mitsy