Showing posts with label Darice. Show all posts

Monday, March 19, 2018

Spring Foliage Inspired Altered Dress Form

Hello, Crafty Friends!! Today is my first official post on Xyron's 2018 Design Team! And this week we are all about SPRING!! Goodbye, freezing cold temps! Hello, sunshine and flowers!! 

 I remembered I had recently received and fabulous paper mache dress form and I had been dying to have a go at it. I knew right away I wanted to make or at least attempt to make an amazing dress to go on it. The challenge was to make it spring inspired. Then, I thought to myself, "Hmm... This would be absolutely gorgeous if I made the dress out of leaves and flowers"! Well, it turns out, I was right!!

So, today I'll show you how I created this gorgeous Spring Foliage Inspired Altered Dress Form.


Supplies Used
23" Dress Form (Darice)
Big Shot (Sizzix)
Tim Holtz Melange Tissue Wrap (Advantus)
Cardstock- All in the Family- Olive Greens (Core'dinations)
110 lb White Cardstock (Recollections)
Kraft Cardstock (Recollections)
Eileen Hull Blends- Leaf, Wildberry (Clearsnap)
Chalk Box Paint Box Chalk Ink- Cornucopia (Clearsnap)
Hot Pink Tulle
Fabri Tac (Beacon)
Wedding Picks (Celebrate It)
Beaded Garland (Celebrate It)
Rhinestones

First, I gathered my materials. Then, I started by die cutting different shades of green cardstock into 2" x 4" pieces with Eileen Hull's "Leave, Spring" die. I cut down my paper into smaller pieces first because this die has 4 different leaves on it and I only wanted to use the largest leaf on the die with the least amount of waste.

I wasn't sure how much leaves I needed to create the dress but figured 2 - 12"x 12" sheets of each color would be plenty. I ended up cutting  144 leaves total... um, yeah that was waaaaay more than enough! In fact, it was too much. It's alright. I'll stash the extras away to use on other projects.

I wanted each leaf to be seen, so I added shading around the edges of each leaf using different shades of green chalk ink. And yup, I shaded all 144 of those leaves! Well, at least next time they'll be good to go and I can just apply them to my next project! LOL!

 I knew I didn't want any part of my dress form to be "naked". So, I cut pieces of tissue wrap and inserted into my Xyron Creative Station machine and cranked it through to make my own giant sheets of washi tape. Then, I covered the top half of the dress for up to the wooden post.

 I wanted each layer of leaves to lay on the other. I knew I had to create my dress from the bottom on up. I wanted the bottom of my skirt to be fluffy. So, I used tufts of tulle all along the bottom.

I cut my tulle, into 5"x5" pieces, bunched them to form strips, then loosely tied a single basic knot. For this form, I made a total of 20knots.

Then glued each knot, end to end, all along the bottom with a fast drying clear glue,

Once the glue had set, I was ready to build up my leaves.

 I ran my leaves a Xyron 3" Sticker Maker. the applied each leaf in staggering rows. I made 2 rows of each color. leading up to the waist. Once the skirt was done, I trimmed the bottom edge of the tulle to make sure it was even.

Then, I moved onto the bodice...

 I wanted the leaves to "cup" each "breast" so I created darts in the leaves by cutting out about a 1/3" triangle from the bottom of two leaves. I pulled together the flaps and overlapped the sides and glued in place. Then adhered each cupped leaf to each breast and added another two leaves to below those on each side to complete the bodice.

I wanted to add more texture and color. So, I die cut stems and flowers using Katelyn Lizardi's Butterfly Embellishments die. This die comes with a coordinating embossing folder. I die cut 18 stem and 12 flowers. Note: you need 2 flowers to create a single flower.

I shaded the leaves and flowers using Eileen Hull's Blends. Leaf for the leaves and Wildberry for the flowers. 

I glued a flower-shaped rhinestone to the center of each flower. Then adhered the stems to the dress form to form a spray. Then attached my flowers.

For added dimension and drama, I added beaded wedding picks and garland throughout...


And here is my finished Spring Foliage Inspired Altered Dress Form...


A closer look...


Even closer...


I love how these pinks really pop against these greens!!


Well, I hope you all enjoyed my VERY FIRST altered dress form!! Yup, this was my very first! And, I have to say I just added another addicting hobby to my evergrowing list! This may have been my first but it sure won't be my last!!

Thank you all for stopping by!

Until next time...

HAPPY CRAFTING!!
~Mitsyana

***Disclaimer***
This blog is compensated to provide opinion on products, services, websites and various other topics. Even though the owner(s) of this blog receives compensation for our posts or advertisements, I always give my honest opinions, findings, beliefs, or experiences on those topics or products.
The views and opinions expressed on this blog are purely my own. Any product claim, statistic, quote or other representation about a product or service should be verified with each manufacturer, provider, or party in question.


Monday, June 6, 2016

Anchor of my Hope

Hello, Crafty Friends
I'm back again for another week with Craftwell & Latina Crafter!! Today marks the beginning of week #2 of awesome Latina Crafter projects! And, today I will show you how made this "Porthole" window card.


Supplies Used
Cut'n'boss (Craftwell)
Teresa Collins Pocket Dies- Memory Collection (Craftwell)
Teresa Collins Embossing Folder- Diamond Motif (Craftwell)
Nested Circle Dies (Darice)
Xyron Mega Runner 
Seaside Yacht Stack (DCWV)
Glittered Vellum
Red & White Baker's Twine
VersaFine Onyx Black Ink
Spectrum Noir Marker- TB1
Blue Button
Cardstock- Black, White

One of the best inventions ever... clear stamps!! One of the benefits of using clear stamps is one's ability to see exact placement of your images/ and words! I can position or combine stamps in a variety of positions for a variety of looks, expanding and maximizing my stamping possibilities.

First, I positioned my clear stamps onto an acrylic block and stamped the image onto a practice sheet of paper to make sure that alignment is how and where I want it. This way I  minimize waste and saves my "good stuff" for my actual projects. For this card I used Latina Crafter's Anchor set.

Once placement was exactly how  wanted, I stamped my image onto my "pretty" cardstock.

I added shadows to the banner by shading the ends with a Spectrum Noir Marker in TB1. 


For my card front I cut a 4"x5.25" piece of cardstock. I found this awesome anchor paper that matched the theme of the stamps with cute little anchors from the DCWV Seaside Yacht Stack. I embossed it using a Teresa Collins Diamond Motif Embossing Folder through my Cut'n'boss machine using the following sandwich:


I wanted to cut a window but I wanted my stamped image to be centered. To get image centered, I first centered my stamped image using a wafer thin metal die blade side up. I held the die and paper in place with my thumbs and forefingers, then flipped them over. Still holding them together I centered them over my card front mat. Now, when I remove my stamped paper, my die is now positioned blade side down. At this point you can use washi tape or painter's tape to keep in place. and die cut your window.

Then used my Xyron Mega Runner to attach my window to my card A2 sized card base. To complete my "Porthole" window, I centered the next smallest circle die inside the first window and ran it through my die cut machine again.


Then I attached my stamped image on the inside if my card. Centering it on the back lap should also result in it being centered in the window.

Then, I cut a 4"x5.25" piece of cardstock and attached it to the inside/ backside of the window. Then repeated the same step for the front window to the inside. This covers up an adhesive that shows through the vellum and gives the inside of the card a finished look.

To embellish the card I also stamped an anchor and cut it out by hand.

And, die cut the "RememberThis" phrase from the Teresa Collins Memory Collection set. Then ebrushed it using the same marker I used to color the stamped banner. I used a glue pen to adhere it to black cardstock and attached it to my card stock with more adhesive tape.

To finish my card, I used baker's twine topped with a button. and used liquid glue to attach the twine and anchor.

And here is my finished card...
You can''t see the actual sentiment until you open the card...
or press down firmly


I hope you enjoyed today's project!! I really love the quality of Latina Crafter stamps!! And they go so perfectly with my Teresa Collins dies and folders... don't you think??!!

Until next time,
HAVE A CRAFTY DAY!!
~Mitsy


=


Tuesday, February 9, 2016

Somebunny Love You

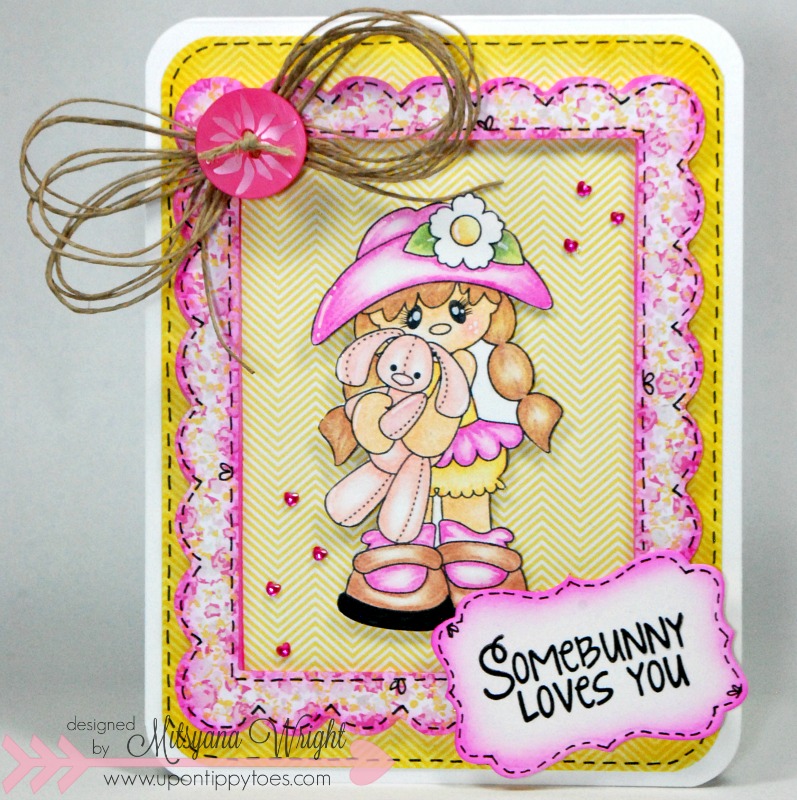
Hi there, Crafty Friends... I hope you all are having an awesomely crafty month so far!! Don't forget that Pink and Main holds monthly challenges... and this month's theme is LOVE.

 So, get your super fab Pink and Main stamps out and get crafting!!
I'm joining in on the fun and sharing a little "Love" too!!

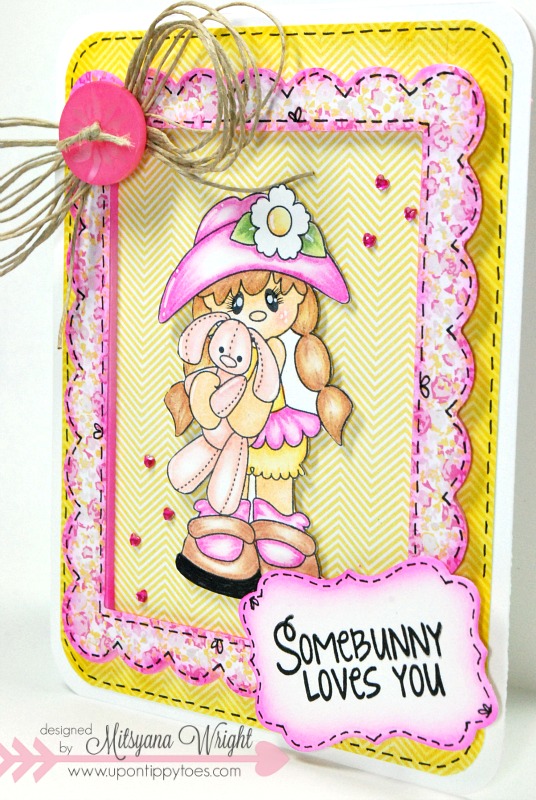
Here is my card for this month's challenge...
SOMEBUNNY
For this card, I used Pink and Main's Somebunny stamps set. I thin this little girl is absolutely adorable clutching her little bunny rabbit.

She also come with a couple sentiment options to use with her, as well as flower, center, and leaf stamps to coordinate.

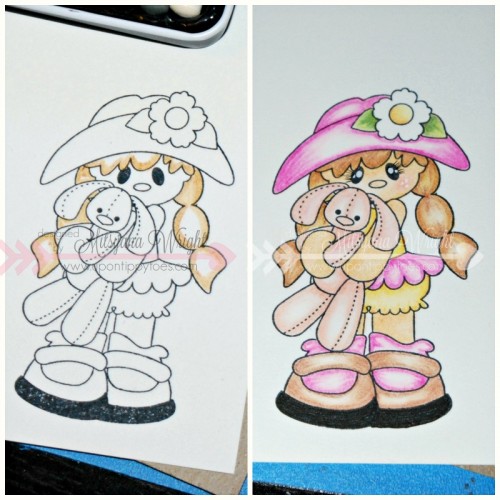
I colored my little girl with Spectrum Noir color pencils and blended the color with low odor mineral spirits and blending stumps.

Here is a before and after...
SOMEBUNNY3
The first picture (left) is before being fully colored with Spectrum Noir Pencils and mineral spirits. The second picture (right) after being colored and blended.

I also added eyelashes and highlights to her eyes and freckles to her cheeks. I find the smallest details add the most character. It's the same little girl in both pics but the faces look so different.


Then, I fussy cut her out and backed her with foam adhesive for dimension.

For the card base I cut a A2(4.25"x 5.5" folded) sized card base. I also cut out a 4"x5.25" card mat. I rounded both the card and mat''s edges with a corner punch.

The frame was cut from an old Sizzix die that has been retired called Frame, Scallop. I used it to cut my patterned paper as well fun foam. The foam makes the frame just pop!!

I also hand drew faux stitching throughout the entire card. 
SOMEBUNNY2
The sentiment was stamped in Versafine Onyx Black on white cardstock cut with the second to the smsllest Darice Nested Rectangles die.

I topped the card with a quadruple loop hemp bow and bright pink button. Then added tiny heart rhinestones around my little sweetie. These are so super small, they are what manicurist use to put on nails. I think you can find them in the nail section of most super stores or even the dollar stores. I attached all my embellies with a tiny amount of 3D Lacquer.

Supplies used:
Somebunny Stamp Set (Pink and Main)
Patterned Paper- Happy Day (My Mind's Eye)
White Cardstock-Bazzill Basics
Spectrum Noir Color Pencils
eBrush (Craftwell)
Sharpie Markers- Yellow, Pink
VersaFine Onyx Black Ink Pad (Imagine Crafts/ Tsukineko)
Fun Foam
Nested Rectangles (Darice)
Corner Punch (EK Success)
PITT Artist Pen- XS (Faber-Castell)
White Gel Pen (Sakura)
3D Lacquer
Foam Adhesive
Hemp Twine
Pink Button
Heart Rhinestones

I hope this project has inspired you to join in on this month's challenge!!
You can read more about it here.
Happy Crafting!
~DT Mitsy

Wednesday, December 30, 2015

Mixed Media Clock


Hello, Crafty Friends!! 
Oh my goodness... I am so glad that the Christmas is over!! Now I can craft for me!! Don't get me wrong, I love making handmade items for my friends and family but this year it just seemed like it was non-stop! Between crafting gifts, school parties, and design team projects I was beside myself!! During this holiday season it was eat, drink, breathe, CRAFT!!!

So, now that everything is generally getting back to normal, I can make pretty things for me!!
And I made myself a mixed media clock. Because mixed media on canvas is pretty and all but I have a piece of art that is also functional!! YAY!!


Supplies Used
7"x14" Stretched Canvas- Pre-primed (Daler Rowney)
Gelatos- , Watermelon, Red Cherry, Iced Rose, Iced Chai, Iced Coffee, Iced Currant, Gold Champagne, Silver Ice (Faber-Castell)
eBrush (Craftwell)
Spectrum Noir Markers- DR6, DR7, True Black
Tim Holtz Stencil- Measured
Big Shot (Sizzix)
Tim Holtz Alterations Dies- Picture Wheel, Garden Greens (Sizzix)
 Gears Dies (Darice)
Hot Glue Gun & Sticks (Ad Tech)
Velvet Flowers- Pink Posy (7 Gypsies)
Paper Roses (Michael's)
Drill Punch
Clock Movement Kit (Plaid)
Mod Podge (Plaid)
Self Adhesive Flat Back Pearls (Michael's)
Stamens (Wilton)
Chipboard
Heat Tool
Spray Bottle

I started off my by using this 7"x14" stretched canvas. I like to buy  my canvas pre-primed. It saves me from doing an extra step and drying time always kills me... It's literally watching paint dry! I'm so darn impatient! 

I took 3 different shades of "reds" and rubbed them directly onto the top of my canvas. 
I used Watermelon, Red Cherry, and Iced Rose

With a spray bottle filled with water, I misted my gelatos. I tilted my canvas to allow the drips to flow down. I repeated these steps till I got the amount of "drippage" I liked... I think I may have repeated those steps about 2 or 3 times.

Then I used my heat tool on the drips to hurry drying time. 

Once it was dried I sealed my drips with a coat of Mod Podge and set aside to dry. 

Then I used this my ebrush to airbrush this ruler pattern onto my canvas. 

I cut out various gears using my Big Shot Machine, Darice's Gears Dies, and Tim Hotz's Picture Wheel Die. For my project I used 2 picture wheels and 3 each of all the gears. Don't discard the insdie "hole" cut-outs!! They make excellent "bolts" when stacked and layered on the gears!


Then I shaded them using my metallic gelatos. I applied my gelatos directly onto the chipboard and rubbed it in with my fingers.

Then to give them a grungy look. I airbrushed the edges using my Spectrum Noir True Black marker.

I love to shade and distress by airbrushing!! There is virtually NO drying time!

Once they were done being airbrushed I ran my gears through my Xyron Creative Station.

Then I peeled them and applied the gears onto the canvas. I saved one of the picture wheels and one of the larger gears for this next step...

Now, It's time to attach my clock!

Using a drill punch, I punched a hole for my clock kit and inserted it through the hole from the back of the canvas.  I love this cute little clock kit... it was the perfect width for this canvas without looking bulky or protruding out from under the canvas!

When you flip your canvas over, make sure your hole in is big enough to fit the clock mechanism through the wheel hole. Secure into place with the bolt and washer that came with clock kit. The wheel provide a sturdier surface for the clock and prevents the canvas from warping.

I cut 4 of these long tems out of chipboard using the Tim Holtz Garden Greens Die. Love using my steel rule dies on chipboard... It cuts through it like BUTTER!!


Then I ebrushed my leaves Black (again, with my Spectrum Noir True Black marker).

Then I ebrushed my velvet flowers to match my canvas by using Spectrum Noir DR6 & DR7 Markers. 

I used a total of 6 velvet flowers. 2 each of 3 different size/ shaped flowers.

I inserted stamens in the largest ones and layered them on top of each other.
I attached flat back pearls and paper roses onto the remaining flowers.

And hot glued my stems and flowers onto my canvas.

The last step is to insert a battery and set the time!!

Now, I have a clock that is creatively me!!


I hope you like I hope you liked this project.

Until next time...

HAPPY CRAFTING!!
~ Mitsy