Showing posts with label flip-it cards. Show all posts

Wednesday, October 19, 2016

BEWARE OF (CUTE) ZOMBIES

**ZOMBIE ALERT**
zombies2
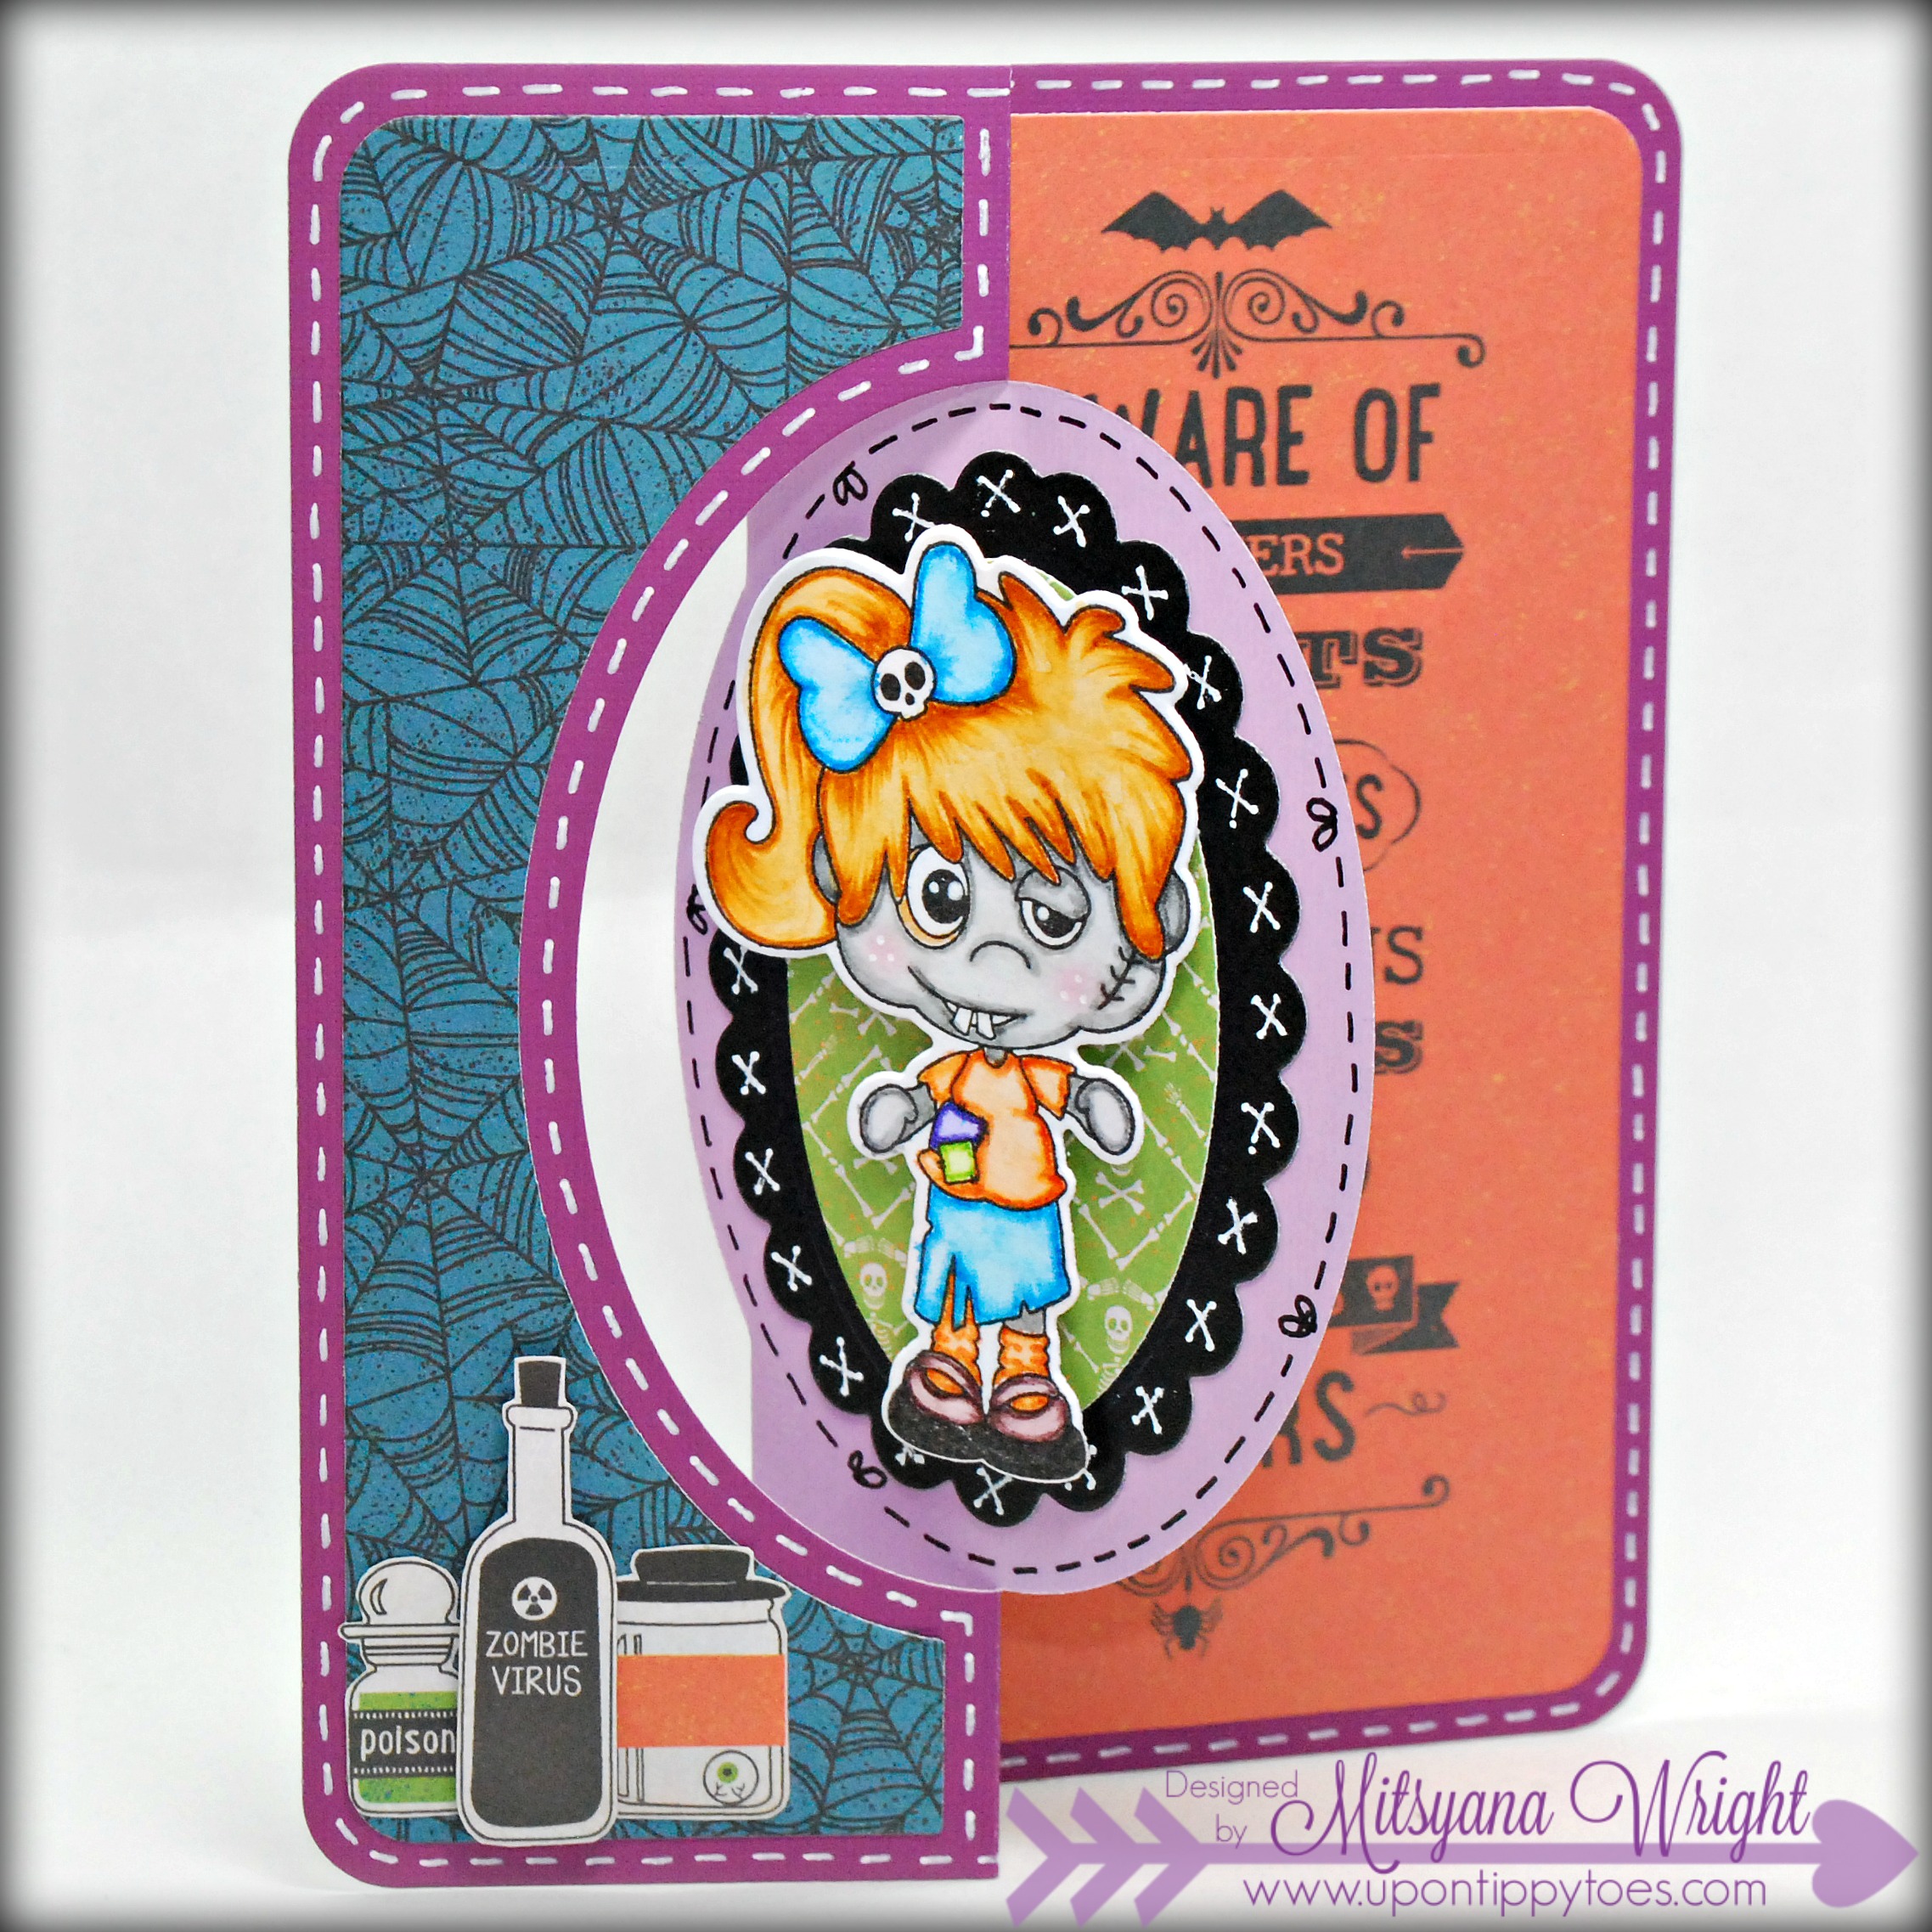
Hello Guys & Ghouls... I've got a hauntingly cute and spooky card for you today. 

Supplies Used
Zombies Stamp Set (Pink & Main)
Zombies Dies (Pink & Main)
Distress Markers (Tim Holtz)
Le Plume II (Marvy) 
Double-Sided Cardstock(DCWV)
Chalkboard Paper (DCWV)
Eek-A-Boo Stack (DCWV)
Mega Runner (Xyron)
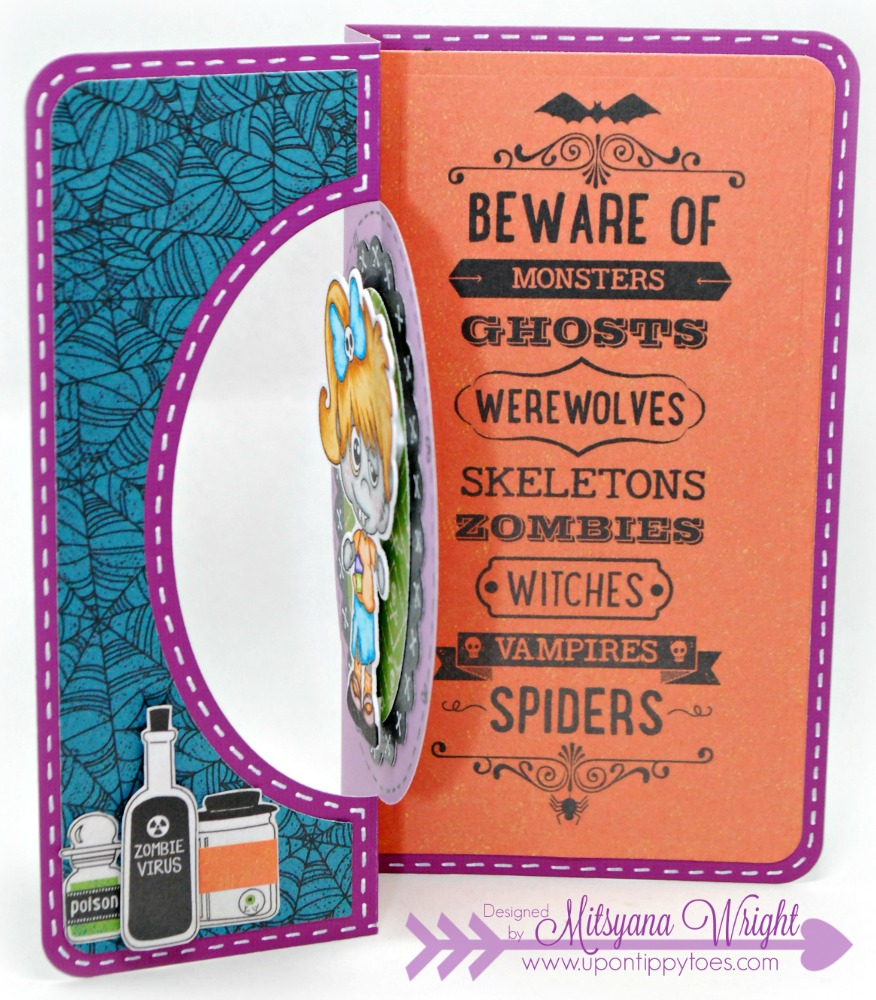
Stephanie Barnard Oval Flip-Its Card Base (Sizzix)
VersaFine Ony Black (Imagine Crafts/ Tsukineko)
White Gel Pen (Sakura)
PITT Artist Pen S (Faber-Castell)
Chalklets (EK Success)
3D Dots (EK Success)

I used the girl zombie from Pink and Main's Zombies stamp set.
I stamped this creepy cutie with VersaFine Onyx Black ink
 and mostly colored her with Tim Holtz Distress Markers and a waterbrush. I used  the colors Carved Pumpkin (shirt & socks), Hickory Smoke (skin), & Mermaid Lagoon (bow & skirt). 

The rest of her was colored using Marvy Le Plume II Markers (also with a waterbrush) in Ochre (hair), Violet & Lt. Green (small patches), Rosewood (inner eye), & Dark Brown (shoes).


Then I die-cut her out using the matching Zombies Dies.


I used this zombie as my focal point and mounted her onto the inner oval of my flip it card.
I mounted her with foam adhesive for a bit of dimension.

zombies3

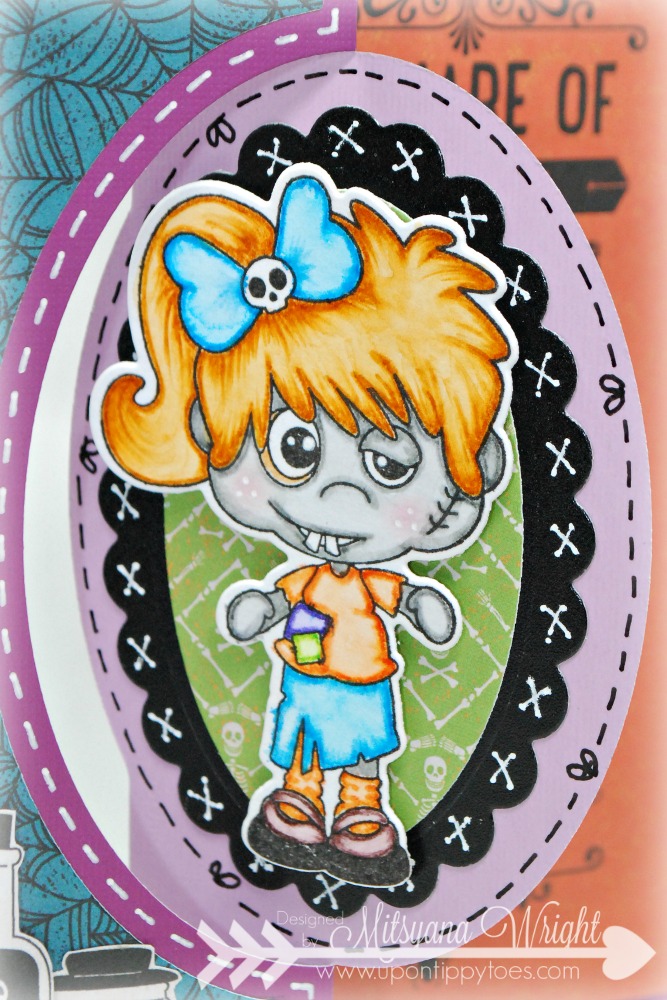
She is just adorable and I absolutely love the little skully bow in her hair and bucked teeth!
I added a little pink chalk to her cheeks then added freckles on top using a white gel pen.
Who knew zombies could be so cute?!!
zombies4
 You can really see the dimension of my zombie from the side profile.
I was excited to find this awesome paper in my stash that matched this stamp set perfectly! All the paper is from DCWV. The patterned paper is from a mini stack called Eek-A-Boo Stack and  assemble the pieces to the card base using my Mega Runner.

I think this card came out so awesome!!  It totally makes me want to color more zombies!! LOL

Well, Happy Haunting Everyone!! 
Hope to scare you real soon!!
~ Mitsy

Saturday, October 24, 2015

Oak Tree New Release - Cat-titude

Hey there, crafty friends!!
Thank you so much for stopping by! We are going to be having loads of fun today. I am so excited for Oak Tree's new releases!! Make sure to visit my fellow DT Brothers & Sisters and their awesome new release inspirations. As an extra special treat, I will choose a winner at random to win a stamp set from Oak Tree Stamps!!

To enter to win you must:
1. Follow my blog.
2. Leave a comment bellow.

The winner will be chosen at random. Sorry, you do not get to choose which stamp set you'll receive. Stamp set will also be chosen at random. 

But wait, it gets better...

Another lucky winner will be chosen at random to win a bundle of 5 stamp sets from Oak Tree!!! EEEEKKKK!!!

Check out the OAK TREE RELEASE Event (on facebook) for details on special event discount pricing and amazing deals!!

  I recently got the pleasure of playing with their
 absolutely adorable set call Cat-titude!! 


Isn't it stinkin' cute or what??!!

Supplies Used
Oak Tree's NEW Release "Cat-titude" Stamp Set
Stephanie Barnard's Flip-it card #2 (Sizzix)
Cut'n'boss (Craftwell)
Sky's the Limit Stack (DCWV)
Teal Polka Dot Paper (Playshop Hawaii)
Polka Dot Ribbon (Cosmo Cricket)
Canson Illustration Paper
Spectrum Noir Markers- TN1, GB2, TN3, TN5
Momento Tuxedo Black ink pad
Enamel Dots (Virginia Turtle)
Chalklets (Ek Success)
Fun Foam
PITT Artist Pen XS (Faber-Castell)
Glitter Jelly Roll Pen (Sakura)
White Opaque Marker (Recollections)


I started by stamping my kitty from Oak Tree's Cat-titude stamp set onto Illustration paper with Momento Tuxedo Black ink.

For the Kitty
Then I colored the kitty in using Spectrum Noir Alcohol ink markers. I used TN1 for the face and tummy areas and around those edges I blended it with GB2. For the kitty's stripes, I used TN3 and then TN5. I also blended a little bit of FS9 in between the whiskers and mouth to create a muzzle. 

Then I applied hot pink chalk using tiny circular motions for the cheeks and then I used a white opaque pen to add dots to the cheeks.

Lastly, I added I glued rhinestone bows to both her ears using Diamond Glaze. and also applied a small dot between her whiskers to make her nose.


I used the Sizzix Fip-it Cards #2 for my base and panels. For the center flap, I cut a 2.5"square with the same paper I used for the base. 


For quick and easy placement, I ran my pieces through my Xyron Creative Station with a 9" permanent adhesive refill cartridge. 

Then simply peeled and stuck into place. I added dimension to my kitty by applying her to a sheet of foam and then running her back through my Xyron, this time my 3" Sticker Maker

 I also cut another 2.5" square for the back of the flap using the same patterned paper as one of my side panels.


Finally, I added a simple bow and a few enamel dots to even out all four corners of my card.

And here is my finished card...

Closer Views 


CUTENESS!!!


I hope you enjoyed  this quick peek at the new release from Oak Tree Stamps!! Stay tuned because my awesome Oak Tree DT Sisters and Brother will be sharing more new release inspirations soon!!


Until next time...
HAPPY CRAFTING!!

~ Mitsy


Friday, July 24, 2015

Belated Birthday with Brutus/ Monroe

Hey Crafty Friends...

I have a super simple card for you today using Brutus/Monroe's Brain Freeze stamp set!!
Supplies Used
Stephanie Barnard -Card, Flip-Its #2 (Sizzix)
Personal Die-cut Machine
Patterned Paper (My Minds Eye)
Cardstock- pink, white, aqua
VersaFine Onyx Black Ink Pad
Spectrum Noir Markers -PP4, PP5, IB1, IB3
Blue Polka-dot Grosgrain Ribbon
Canson 150lb Illustration Paper

There's one thing you should know about me... I love interactive cards!! And I absolutely adore flip cards! I love flip cards! And before companies started making dies they were super complicated and time consuming to make. There was just so much measuring,cutting, and folding involved. And if your measurments are wrong, can get super complicated really fast. But since the release of such dies they are now super quick, easy, and headache free! And all you really need is some awesome stamps and paper and you're set!!

I started by first stamping my little slushy with Momento Tuxedo Black ink onto Canson 150lb Illustration paper.
I then colored my image using my Spectrum Noir Markers in PP4, PP5, IB1, and IB2. Used My PP4 and PP5 for the stripes and straw, and my IB1 and IB2 for the slush and for shading the cup and dome.
I also Stamped my sentiment using my momento ink pad. And then cut out my image and sentiment with a pierced circle die that came with my flip-its set.
Let's not forget to cut out our base card...
And fold....

The front flap is the front of the card... So the folds go MOUNTAIN (FOLD AT TOP) then VALLEY (FOLD AT BOTTOM).
 
Cut your decorative panels (panels also included in this die set). I used blue painters tape so my dies wouldn't shift out of place. This tape  I bought from my local dollar store and it is awesome it peels nice and clean off my paper without taking off the top layer.
I also cut out coordinating scalloped circles to layer my pierced ones.
I made for more easy work by running my panels , pierced circles and even my strip of ribbon and bow through my Xyron Creative Station all at the same time!! 
Whoops I forgot to put my scalloped circles through too... but I don't need all 9" of adhesive real estate. So I took out the 9" Permanent Adhesive cartridge, lifted up the green divide tab, and inserted my 5" Permanent Adhesive Refill, No need to waste all that awesome sticker making goodness!
 They were about 2 1/2" wide each so they 2 fit perfectly into the 5" cartridge.
I then peeled and adhered to my base card.

My bow and strip of ribbon were already pre-measured and cut. So after they were run through my Xyron Creative Station it was ready to be attached to my card.
I also stamped my "Sorry I missed your birthday" and used the size smaller pierced circle die in my set to cut out it out. I also ran my IB2 Spectrum Noir marker around the edge. then added a 3D dot behind it and attached it to the bottom right of my card.
Now the card is all done and the scallop circles can flip to reveal the inside message.

And here's my finished card...
Hope you enjoyed this super sweet, super quick , and super easy flip card!!

See you all next time!

Happy Crafting, Friends!!


Wednesday, July 30, 2014

Birthday Swing Card


Hello Crafty Friends... Today's project is another first for me. Using my eclips machine from Sizzix  and ecal software I made this... my very first "flip" card.  I was more than happy (ecstatic really) to test Designs on Cloud 9's new Swing Card file. 


The file comes with the card base, center panel and mat, and scalloped borer.
Sorry, flowers and leaves are not included. Hydrangea flowers and leaves pictured throughout are from Prima Marketing.

Another thing is the center panel is rectangular... not just the matted ornate shape in the center. I made it look like it's floating by creating this card with a plastic/ acetate panel. Basically I cut 3 of the card base panels out (2 panels of patterned paper and 1 panel made from clear acetate). I sandwiched all three sheets together with the clear acetate as the center panel.

Just a little note: This card folds up to a standard A2 sized card.


^^^ Folded Front View^^^

^^^ Flat Front View^^^

Remember... Because this is a flip/ swing card, whatever you put on your center window will be "flipped" to the opposite side that is on (what's on the front will end up on the back & vice versa).

^^^ Flat Back View

^^^Folded Back View^^^

This was a lot of fun to put togethher... I think I'm gonna make these cards on a regular basis!

And I think everyone should attempt interactive cards! It's not just fun making them but fun for whomever receives them as well!

Now, go get crafting! 
See you next time!!


All digital files and svgs are cut using my Sizzix eclips machine & ecal software.