Showing posts with label Clearsnap. Show all posts

Tuesday, November 5, 2019

Feeling Gratitude Card

Hello, Crafty Friends!!
I'm so sad that October is done and gone but I'm looking forward to the rest of the holiday season. Thanksgiving, here we come!! And I have so many things to be thankful for! This year has been filled with lots of trials but they have helped me grow and learn. Learn to be a better friend, better mom, a better role model, and a way better me... And for that, I am extremely grateful!

So this card I created for the Eileen Hull team was very fitting...


Supplies Used
Eileen Hull Embroidery Hoop (Sizzix- Retired)
Eileen Hull Blends Inks- Melon, Flagstone, Nutmeg (Clearsnap)
Big Shot (Sizzix) 
Mat Board (Sizzix)
Mega Runner (Xyron)
Feeling Gratitude (Waffle Flower)
Achillea Cottage Flowers (I Am Roses)
Versafine Onyx Black (Imagine. Tsukineko)
Pattern Paper (DCWV)
Kraft Cardstock (Recollection)
Twine
Brown Button- Bittersweet (Buttons Galore)
MISTI (My Sweet Petunia)

For this card, I used two of my all-time favorite dies from Eileen Hull Designs... 

The Leaves, Spring and the Embroidery Hoop. Sadly, the Embroidery Hoop has since been retired. But the Leaves, Spring die is still available and remains one that I constantly reach for.

I cut a 5" x 6" piece of white mat board and ran it through my Xyron Creative Station Lite machine. Once through, I flipped it over and ran it again a second time to get adhesive on both sides of the mat board.


I removed the protective film from one side and attached patterned paper to the mat board. Then I trimmed off any overhang with my scissors. Then, I placed my mat board (paper side down) onto my Embroidery Hoop Die.


I ran the die through my Sizzix Big Shot Machine.

And presto... It gave me three (count them... THREE) die-cuts!! You can use all three in your projects but today I'm only going to use the largest of the cuts as a frame. The other two cuts I'll set aside for future projects.


To build the body of my card, I started with a 5"x7" card base made from kraft cardstock. I matted the card with a 4.75" x 6.75" piece of orange cardstock. Then layered that with 4.5" x 6" piece of leaf patterned paper and a 4.5" x 1" strip of knit sweater patterned paper. 

I attached all the pieces together using my Xyron Mega Runner.

Then, attached my mat board embroidery hoop.


To decorate my card, I chose an assortment of papers that were similar in color to the leaves that were in my patterned paper.

I folded the papers in half before die cutting and covered each shape completely and ran it through my Big Shot. This resulted in cutting out the die-cut shape an it's mirror image (see middle picture below).

Then, I used Flagstone, Melon, and Nutmeg Blends Inks to shade my leaf die-cuts. 


Then I put the leaves on the side to concentrate on the sentiment of the card.

I've always loved this stamp from Waffle Flower called Feelin Gratitude. It encompasses my exact thoughts and fills up the Embroidery Hoop perfectly!

I used my Misti stamping tool to stamp my sentiment onto my card with Versafine Onyx Black ink and again onto gray patterned paper. 

Then cut out the banner pieces from the gray paper, added foam adhesive, and attached it over the banner images on the card front.


I used a strong quick-drying glue to attach my leaves to the embroidery hoop. I grouped the leaves into threes and followed the curvature of the hoop.

I added a twine bow topped with a button between the groupings of leaves. 

Next, attached my premade cherry blossoms... I snipped off the stems of the cherry blossoms and spiraled the achillea stems with a skewer. Then attached the cherry blossoms and achillea flowers onto the leaves and surrounded the bow. 


And here is a look at my finished card...


I totally love how this turned out!! The fall colors on this are so calming and not harsh. And couldn't use a little more calm in their lives, right?!!


I hope you enjoyed today's card and it inspires you to create something gorgeous this Thanksgiving season!!

Until next time...
HAPPY CRAFTING!!
~Mitsyana

Wednesday, July 31, 2019

Daydream Mini Beach Canvas

Hey Gang!! 
It's summertime and scorching hot! Anyone else dreaming of the beach?! 
Today, I made this adorable mini canvas for my sweet friend that has a beach house (wink, wink... you know who you are!!). She's been visiting it more frequently and really enjoying her time away and all the tranquility so I made her this cute wall hanging to remind her of her happy place.

Let me show you how I created it...


Supplies Used
4" x 6" Canvas (Dollar Tree)
Mat Board (Sizzix)
Eileen Hull - House Ornament Die (Sizzix)
Eileen Hull - Grass Die (Sizzix)
Eileen Hull - ColorBox Blends Inks-  Hydrangea, Uniform, Bay, Beach, Frog, Leaf, Stop, Pansy, Golden, Nutmeg ( Clearsnap)
Eileen Hull Molten Dimensions -  White Wonder (Emerald Creek)
Butterfly Stamp Set (Clearsnap)
Top Boss Embossing Pad (Clearsnap) 
ColorBox Embossing Powder - Black (Clearsnap)
White Gel Pen (Sakura)
Misti Stamping Tool (My Sweet Petunia)
Heat Tool


I started by stamping my image onto my mini canvas with embossing ink. I found these cute little canvases from  Dollar Tree. They came in a pack of 3 for a buck, how flipping awesome is that?!! 

Since canvas is very textured already, I wanted to ensure my images stamped out completely so I used my Misti tool just in case My stamped image was missing parts of the image I could re-stamp it without messing it up. I took out the black foam insert before stamping. The canvas is a way thicker material and if I didn't take out the foam the panel wouldn't close.

I used the clouds stamp from the Butterfly stamp set and stamped the image UPSIDE DOWN... who knew clouds upside down can look like waves!! I think it's so cool when you can get multiple uses out of craft supplies. I pored Eileen Hull's Molten Dimensions in White Wonder and heat embossed the shore break. Look at all that gorgeous texture!

Then, I inked the "waves" in  Bay & Beach, "sand" in Golden, and "sky" in Hydrangea & Uniform.


I die cut 4 mini houses out of Mat Board using Eileen Hull's House Ornament die.

I inked them in a variety of Blends inks and pick out the most vibrant ones. I ended up choosing Stop, Pansy, Uniform, and Leaf.

Then used a white gel pen to add the roof and window details.

I ran my little houses through my Xyron X and adhere them to black cardstock. Then fussy cut the houses out. 


I thought my sentiment needed to be just as bold as the houses so I stamped and heat embossed it with black embossing powder.

I die cut grass from a leftover scrap piece of green patterned paper, inked up the edges using Frog and Nutmeg ink. 


Then cut them down into smaller segments and ran the pieces into my sticker maker (Xyron X machine) and adhered them onto my houses and canvas.

How flipping adorable are those little beach cottages??!! I'm dying from overexposure to cuteness!! 


Lastly, I glued on jute twine all along the edge of the canvas to give a more coastal vibe.

And here is my finished project...


I really love how this turned out... especially those waves!! That Molten Dimensions powder really added so much depth and texture to my ocean!!


I hope you enjoyed today's tutorial and are inspired to create your own little canvas masterpiece!

Stop for topping by!

Until next time...
HAPPY CRAFTING!!
~Mitsyana

Wednesday, July 17, 2019

Sending You Prayers Card

Hi, Crafty Friends!
I'm back... This time with Team Xyron!!

Every now and then life has a way of reminding you how precious it really is. It's not all about the happy moments and joyous occasions. Sometimes we face hard times and loss.  Financial hardships, break-ups, or even death can bear down on us and plunge us into despair. And sometimes just we need gentle words to tell us we are not alone. Whether spoken out loud in person or silently and privately, a prayer can go a long way.

Today, I'll show you how I created this beautiful card. Some days you just got to let someone know... hey, I'm praying for ya!


Supplies Used
Mega Runner (Xyron)
Eileen Hull Flower & Leaf Stitchlits (Sizzix)
Eileen Hull ColorBox Blends- Leaf, Frog, Berry, Bay, Beach (Clearsnap)
Sunshine Stamp Set (Pink and Main)
White Cardstock (Recollections)
Cardstock- Pink, Green, Black (DCWV)
Big Shot (Sizzix)

I started with a standard A2 size (4.25"x 5.5"- folded) card base. 
I made the card using papers from the Lori Whitlock "I'd Rather Be Crafting" Collection. 

Measurements
Orange Paper - 4.25"x 5.5"
Geometric Diamond Paper- 4" x 5.25"

I layered at attached them to my card base using my Xyron Mega Runner.


Then, using my Big Shot and Eileen Hull Heart Journaling card die, I die cut yellow striped paper by using the heart insert with the outer rectangle die. Next, I backed the heart cut out with pink polka dot paper by just using the outer rectangle die.

Again, attaching the pieces using my Xyron Mega Runner.


Next, I die cut stemmed leaves from light green paper using the Eileen Hull Flowers & Leaves Journaling Card and the Spring Leaves die.

I  added depth by inking the edges with Leaf, Frog, & Nutmeg Blends inks.

Then added tiny vein details with a fine-tipped pen.


I die cut flowers from using the Flower & Leaf stitchlits.

I misted the flower slightly with water, then crushed the petals upward. 

Once dried, I inked the edges of the flower petals using Berry ink.


While the ink was drying, I die cut the word prayer from white & black cardstock. 

I gave it a variegated look using Bay and Beach ink.

Then paired the die-cut with a "sending you" stamp from Pink & Main's Sunshine stamps set. I stamped the phrase onto plain white cardstock using Coal dye ink. 


I attached my leaves then my flowers onto my card. I wanted it to hang over like a swag over a doorway. I set down and attached the leaves first then added the flowers over the leaves.

Then added my sentiment below my floral arch.

And here is my finished card...


It's not always easy finding the right words...
 But we can hope words of encouragement, faith, and understanding will help lighten a hard load on a heavy heart.

I hope you all enjoyed today's card and I hope you are inspired to send your own paper prayers.

Until next time...
Happy Crafting!
~Mitsyana


Monday, July 15, 2019

Flowers & Cupcakes... SWEET!

Happy Monday, Friends!! 
Today, I created this adorable card as part of the I Am Roses July Challenge! 

If you don't know what that is, you don't know what you're missing! These monthly challenges are a great way to get creative, participate in a wonderful crafting community, and possibly win some amazing prizes in the process!!

To participate, all you have to do is create something new that includes flowers on your project and link it on the I Am Roses Challenge Blog. And the best part ...you can use ANY brand flowers!! Yes, you read that right... you can use ANY flowers!!! More Details can be found on their blog, HERE.

For my project, I made a sweet little card... This stamp had the cutest little girl holding a stack of cupcakes... I just couldn't help myself! 


I Am Roses Supplies Used

Other Supplies Used
Cupcake Brigitta Stamp (C.C. Designs)
Mixed Media Paper (Strathmore)
Big Shot (Sizzix)
Eileen Hull Leaves, Spring Die (Sizzix)
Jen Long Fancy Frame Die (Sizzix)
Edgeables Die (Crafter's Companion)
Mega Runner (Xyron)
 Cardstock-White, Black (Recollections)
Patterned Paper (Pink and Main, Lawn Fawn)
Foam Adhesive
Chalk
Sparkle Pen- Clear (Spectrum Noir)
Paper Piercing Tool (Optional)
Scissors (EK Success)
Paper Trimmer (Swingline) 
MISTI Stamping Tool (My Pink Petunia)

I started by using my Misti stamping tool to stamp Cupcake Brigetta with Wicked Black ink onto mixed media paper. I colored her in using Zig Clean Color Real Brush Markers. Then cut out the image by hand. I added red chalk to her cheeks using a small make-up brush, then added highlights to my image using a white gel pen.


I set aside my image and worked on my card base. I decided I wanted a 5.5" x 5.5" card (5.5" x 11"- folded in half). 

I cut out two pieces of 3" x 5" white cardstock, ran them through a Xyron 3" Sticker Maker, then die cut this beautiful and intricate lace design die twice.

I peeled each off its protective film and mounted them in the center onto a 5.25" x 5.25" piece of purple patterned paper, trimming off the overhang. Then, I attached it to the square card.


For the center of the card, I die cut fancy frames out of black and white cardstock. I layered and attached all the frames together, stacking the black frames on the bottom and the white frames on the top. I could have used all white but adding black to the bottom layers added visual depth. 


I also die cut a few leaves out of green cardstock using Eileen Hull's Spring Leaves die. Then I inked the edges using her Blends ink in Leaf.

I used a remnant from the fancy frame as a stencil to trace an oval out of plaid paper to go in the center of the frame. Then attached it using my Xyron Mega Runner.


I added foam adhesive to the back of my sweet little cupcake girl and mounted her onto my card, making her appear as if she was sitting on the edge of the frame.

I tied crinkle bow and attached the leaves to the frame. 

 I wound the wired stems around a paper piercing tool to create coiled vines. Then attached them onto the card base with clear-drying liquid glue.


And here is my finished card...


Isn't she absolutely adorable!! It looks like the cutie-patootie is having cupcakes in a beautiful garden!

All these shades of purple blooms are nothing short of gorgeous!! The pictures really don't do these flowers justice! They are even more stunning in person!


I hope you all enjoyed my tutorial! And I hope it inspires you to join in on this month's blog challenge... Just think of all the gorgeous flowers you could win!! 

For more amazing inspiration, don't forget to visit my design team sister!! All there projects, pics, and blog links can b found on the I Am Rose Challenge Blog, HERE!


Hope this started your week out with a smile!!

See you all next time!!
~Mitsyana


Saturday, July 13, 2019

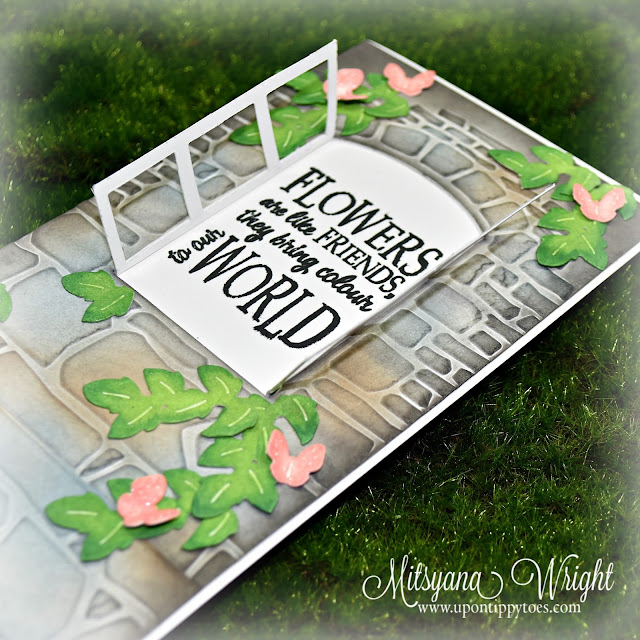
Tower Card using Lynda Kanase's Window Box Impresslits

Hello, Crafty Friends. 
It's been a while but I'm back to with another card tutorial. Today, I'm here with the Lynda Kanase Design Team to share creations using her new Window Box Impresslits Embossing Folder.

The Impresslits folders are designed to cut and emboss at the same time. And the Window Box is the perfect size for A2 cards. But in this tutorial, I will show you how to I  extend my embossing and created this fairytale inspired tower card.


Supplies Used
Big Shot (Sizzix)
Eileen Hull ColorBox Blends Inks
Frog, Leaf, Pansy, Melon, Sunshine, Ebony, Nutmeg, Flagstone, Uniform (Clearsnap)
ColorBox Premium Dye Ink- Coal (Clearsnap)
Mega Runner (Xyron)
Mixed Media Paper (Strathmore) 
110lb White Cardstock (Recollections)
Paper Trimmer (Swingline)
Clear Stamp (Crafter's Companion)
Liquid Glue

I started out with a 4.25" x 5.5" piece of Strathmore mixed media paper. I used Lynda's Window Box Folder and ran it through my Big Shot machine.

Then, I inserted a 2" x 4.25" strip of mixed media paper, placing it directly under the window. I repeated those steps 2 more times for a total of 3 strips.


I arranged the embossing so that the bricks would vary on what sides the fell on by flipping every other strip. 

I used Eileen Hull's Blends inks in Uniform, Nutmeg, Flagstone, and Ebony to ink and shade all the embossed stonework.

I accidentally got ink on my window shutters, so I used scissors to cut them off.

I also trimmed all the pieces down to be 3.5" wide.


Then, I die cut an extra window from white cardstock. I opened the window shutter with the assistance of an acrylic block. This helps ensure that my creases were folded nice and straight.

Next, I took my die cut shutters and inserted it into the window.


I secured the window in place using a Xyron Mega Runner. Then attached the window and the extra stone/ brick rows onto a #10 card base(9 1/4" x 7 3/4") made from 110 lb cardstock. I stamped my sentiment into the opened window using ColorBox Wicked Black ink. 


I die cut multiple leaves, flowers, & butterflies from more mixed media paper. I used Blends inks in  Leaf & Frog to color the leaves, Sunshine & Pansy to color the flowers, and Melon to color the butterflies.


I ran all the leaves through my Xyron X (150 Sticker Maker) and attached them onto the tower creating vines.

Then, I used a clear drying glue to attach the flowers and butterflies.


And here is my finished card...


I really love how this tower turned out.


The stonework in this embossing folder is absolutely gorgeous!


I love this sweet little dies Lynda included with this folder. It really adds so many beautiful details and makes projects come to life.


I'm in awe and I hope you are too!!

I hope you enjoyed this tutorial and are inspired to create your own fairytale tower!

If you loved my project don't forget to stop off and visit my design team sister and check out heir gorgeous projects too!!


Hope you all have a wonderful weekend!!

Until next time...
HAPPY CRAFTING!!
~Mitsyana

DISCLAIMERS
This blog is compensated to provide opinion on products, services, websites, and various other topics. Even though the owner(s) of this blog receives compensation for our posts or advertisements, I always give my honest opinions, findings, beliefs, or experiences on those topics or products.
The views and opinions expressed on this blog are purely my own. Any product claim, statistic, quote or other representation about a product or service should be verified with each manufacturer, provider, or party in question.

This blog contains affiliate links, clicking and shopping through these links helps to support and run the Up On Tippy Toes blog at no additional cost to you.


Saturday, May 11, 2019

Blooming Mother's Day Card w/ Lynda Kanase's Card in Box Flower Basket Die


Hello, Crafty Friends!! 
Where has the time gone? It's Mother's Day tomorrow and for today's project, I have a tutorial for this gorgeous card I created for my mom using Lynda Kanase's Flower Basket Box Card die! 


I know what you're thinking... wait a minute, this isn't a box card! And you are absolutely right!! This card was made by using components included in the box card die set that make it super versatile. Let me show you how...

Supplies Used
Lynda Kanase Card in a Box- Flower Basket (Sizzix)
Big Shot Machine (Sizzix)
Sea Glass Paper Pad (Craft Smith)
Mixed Media Paper (Strathmore)
White Cardstock (Recollections)
Eileen Hull ColorBox Blends Inks- Sunshine, Golden, Leaf, Frog, 
Nutmeg, Uniform, Flagstone, Ebony (Clarsnap)
Awesome Family (Pink and Main)
Mega Runner (Xyron)
Scissors 
Stylus
Paper Trimmer
Acrylic Block
Clear Drying Liquid Glue
Self-Adhesive Rhinestones

I started by making my card base.  I've been on a #10 card kick for a while. I think they are way more interesting than a boring 'Ol A2 card and it doesn't cost extra to send through the mail since they fit into a standard letter-sized envelope. So, YES, #10 cards are my jam!

To make the card base I used the following measurements...
White Cardstock Card Base- 9 1/4"x 7 3/4"
Striped Patterned Paper-
Green Geometric Pattern Paper- 


If at first glance you don't fall head over heels in love with this set, this right here may change your mind. This is the die-cuttable window die that comes included in the set. What is so awesome about this particular die is that it has no outer cutting edge, so it just cut out all those tiny little diamond shapes. And because of this, you can use this die to cut out one continuous background pattern. Which is what I did here to create this trellis for my flowers to climb.


Simply line up the die flushed against one side of your paper then die cut. Remove the die cut pieces, poke out any that didn't fall out, and reposition your die. Use the previous cut marks to line up the die for easy alignment. By using the previous cuts holes, you can make your pattern as long or as wide as you like! How flipping cool is that??!!

I trimmed the paper down and gave it a 1/4" lip one side and jagged edge and randomly cut edge on the other. 
 Then, I used my Xyron Mega Runner to adhere may card base together with my patterned papers and trellis onto my card.

Next, I die-cut Lynda's gorgeous flowers and leaves from this die set from Strathmore Mixed Media paper. This paper is very substantial, very thick, it is a 140lb weight,  and holds up amazingly to wet mediums. 

 I used Eileen Hull Blends to shade all my die cuts.

For the leaves, I used Leaf, Frog, Golden, and Nutmeg.
For the larger flowers, I used Uniform, FLagstone, and Ebony.
And for the smaller flower, I used layers of Sunshine.


 To give my flowers shape, I used my Stylus to make fine lines and crease on the backside of my flowers. Then on the front, I used the bigger ball on my stylus to roll a pitted center. Then attached my beads and rhinestones to the centers.

I arranged my leaves and flowers onto my trellis as desired. Then when I was happy with their placement I adhered them down using a clear drying glue, always starting with the leaves because those need be tucked under the flowers.


Then, using an acrylic block and I used the words "to an" and "mother" leaving an evenly spaced gap.

And on a separate piece of patterned paper, I stamped the word "Amazing" then hand cut it out leaving a thin border around the word. Then added foam adhesive to the back of the word and fitted it gap I left between the " to an" and "mother".

And here is my finished card...


I really love how this card turned out and I can't wait to give it to my mom and see her reaction. 

I hope this card inspired you to make something beautiful for your mom, not just for Mother's Day but for ANY DAY!

If you want to see more amazing projects made with Lynda Kanase's Card in a Box Flower Basket Die set, Check out my awesomely talented design team sisters on their blogs!! Their projects are sure to knock your socks off!!


THANK YOU so much for stopping by!!

Until next time...
HAPPY CRAFTING!!
~Mitsyana