Showing posts with label Hawaiian. Show all posts

Tuesday, February 15, 2022

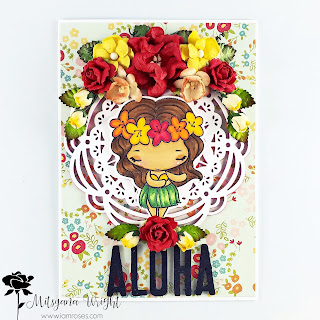
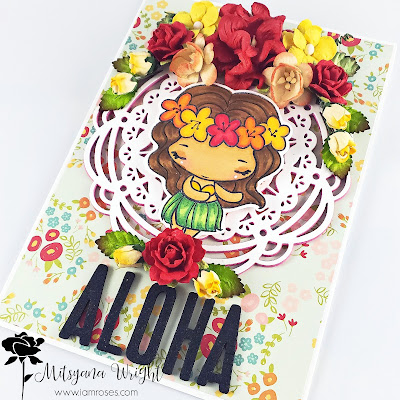
Aloha Card - IAR February 2022 Challenge

**Disclaimer**

This website uses affiliate links. A small percentage of sales made through these links goes toward supporting this blog at no additional cost to you.


Hey there, Crafty Friends!! It's February 15th! And you know what that means... Time for another I Am Roses Blog Challenge!! And boy, do we have a surprise for you!!


If you are new here or are unfamiliar with the I Am Roses Challenges, it is a crafting challenge that is held monthly on the I Am Roses Challenge Blog.  Participants create a project using at least 3 I Am Roses products and uplink them to the I Am Roses Blog to enter for your chances to win amazing IAR prizes! Each new challenge starts on the 15th and runs throughout the remainder of the month.

Aaaaand... SURPRISE... instead of our usual top 3 winners, IAR is now choosing 5 WINNERS to each win a $30 voucher to the I Am Roses website!! How AWESOME is that?!!

For additional information, head on over to the I Am Rose Challenge Blog.

And here is my project for this month's challenge...


I am an island girl, born & raised, and I miss home so much! During these cold winter days, I miss it even more! So I created my card to be Hawaiian-themed and surrounded my little hula girl with bright and sunshiney colors! 


I hope you enjoyed my card and that it inspires you to create something beautiful!

THANKS for stopping by!!

~Mitsyana

I Am Roses Supplies Used

Other Supplies Used
Eileen Hull Heart Mandala Die (Sizzix)
Patterned Paper (Simple Stories)
Hula Anya (Greeting Farm)
Mega Runner ( (Xyron)
Alcohol Markers (Diamond Press)
Black Craft Foam (Creatology)
White Cardstock


Friday, October 14, 2016

Mahalo... Hawaiian Thank You Card


Hello again, Crafty Friends!!
Welcome to Friend Friday!!
I am here today with Team DCWV & Chameleon Markers! For the first 3 Fridays of October we will be sharing awesome projects from both design teams during our DCWV & Chameleon Blog Hop!! 


And we are kicking off Week #2 of our hop with some exciting projects!! Please make sure to stop by each of my design sisters' blogs for more inspirational creations!!

For my project today, I will be using Chameleon's Skin Tone Pens with my fabulous DCWV papers!!

Supplies Used
Skin Tones (Chameleon)
Color & Create Projects- Globetrotter (DCWV)
Gold Thread Burlap Paper Pad (DCWV)
Natural Corrugate Stack (DCWV)
Chalk Paper Pad (DCWV)
Black, White, Cream Stack (DCWV)
Neutral Stack (DCWV)
Creative Station Lite w/ 5" Permanent Refill Cartridge (Xyron)
Tim Holtz Tropical Thinlits (Sizzix)
Glossy Accents (Ranger)
Mahalo Stamp (Rubber Stamp Plantation)
VersaFine Onyx Black Ink (Imagine Crafts/ Tsukineko)
VersaMagic Jumbo Java (Imagine Crafts/ Tsukineko)
Cutter Bee Scissors (EK Success)
Pinking Scissors
Hemp Twine
Button

I have to start off saying how much I love these Chameleon Pens! Specifically their ability to get a multitude of shade from one pen! 

To activate the pen, take the cover off whichever tip you wish to use (they're dual tipped) and insert it into the barrel with the white nib (with the white nibbed barrel on top and colored tip marker on bottom), hold in place for a count of at least 10 seconds. 

Then start coloring where you. Start in an area where you wish to place down the light color/ highlights down first. The color will automatically darken as you continue to color.

Repeat as necessary.

I used only the color BR4 to color this entire card... and yet it looks like I used 3 or 4.
The color variants you get in each pen is simply amazing!! 

For my card front, I trimmed my coloring page down to 5-3/8" x 3- 3/8" and cut a piece of Gold Thread Burlap measuring 5-1/2" x 4" to mat.


I wrapped hemp twine, horizontally, around my colored piece. and then tied a bow and bottom on to it. 

Once I got my twine tied and measured exactly, I slid the twine off and set it aside. Then ran my colored cardstock through my Xyron Creative Station. I put the twine back on, then attached my card to then attached it to my burlap.

I die-cut out this little "tiki guy" out of brown cardstock. Then, I used the die as a template to make a shadow from corrugated cardstock.

 I layered the pieces and attached with Glossy Accents. 

I used more Glossy Accents to add more dimension to the surface of the tiki.

Once dried a sponged down with Jumbo Java ink over the edges and onto the raised areas.

 I stamped the word "mahalo" (which means thank you- in Hawaiian) onto Kraft cardstock with Onyx Black ink.

I die-cut 6 monstera leaves (3 from brown cardstock, and 3 from chalkboard paper).

I inked the brown leaves with more Jumbo Java ink, then attached the brown leaves to the black ones. I used the black ones as shadows.

Next, I attached my leaves to my card front then layered my tiki mask and mahalo tag atop of that.

Finally, I attached my card front to an A2 sized (5-1/2" x 4-1/4") card base made from black glossy cardstock.

And here is my finished card...


I love the neutral yet bold tones the brown marker was able to give me. These color work well with a Fall / Thanksgiving theme or for masculine projects as well!

Thank you very much for stopping by!
Or as we like to say in Hawaii...

Mahalo nui loa!!

~Mitsy

Thursday, December 25, 2014

eBrushed Hawaiian gift bag & tag

Merry Christmas eBrush fans!! Today I have a beautiful ebrushed gift set to share with you all. I wanted to do something that is a reflection of my heritage. Although I was not born in Hawaii, I did grow up in Hawaii and spent most of my life there. So, I wanted to do a little something special that is a reflection of my heritage. 


Supplies you will need:
eBrush with Sharpie (SP) adapter
Metallic Gift Bag
Dreamweaver Stencils ( LL482, LS27, & LM204)
Background stencil (for more info click here)
Painter's tape
Oval Die
Tag Die
Metallic Paper
Sharpies (red, orange, yellow, light green, & green)

With a few item I turned this dollar store bag into a trendy upscaled gift.

With painter's tape I taped a down a border around my stencil onto my dollar store bag. This helps keep the stencil from moving and gives me a clean line around my bag. I put a cut out of an oval under my background stencil to mask off an area for my other stencil image to be set into.


I airbrushed the background onto my bag using my eBrush machine with the Sharpie adapter and a red Sharpie. Then I removed the stencil and oval mask.


In then revealed masked oval area I centered my  Dreamweaver pineapple stencil (LS27) and masked it with more painters tape. I then ebrushed the pineapple using my sharpies starting with my yellow, then orange for the base of my pineapple, and then light green and green for the leaves. 

I masked off my Dreamweaver's Season's Aloha (LM204) stencil above the red stenciled area and ebrushed my sentiment. 

Here is the image of the finished bag . 

I also removed the metallic "rope" that came with the bag and replaced it with burlap ribbon. This gave it a more luxurious look of that of an upscale boutique store.


Using my tag die I cut a tag out of metallic paper to match the bag. I repeated the pineapple motif my ebrushing a bigger Dreamweaver pineapple stencil (LL482). Again, using yellow, orange, light green, and green sharpies. Instead of ebrushing the same red background I opted for just a simple red border.  I did want them to coordinate but I  didn't want it to be too "matchy-matchy".

 The results were just stunning!!

We are a family that supports local artisans so I paired my gift bag and tag with a wine bought from our local winery.

I hope this inspires you to turn your dollar store finds into something luxurious too!

And as we say in Hawaii...
Mele Kalikimaka
( Merry Christmas)
& 
Hau'oli Makahiki Hou
(Happy New Year)

Thanks for stopping by!
~ Mitsy